

Rss Bot
-
Content Count
15,131 -
Joined
-
Last visited
Never -
Feedback
N/A
Posts posted by Rss Bot
-
-
You're reading Free Black Friday HTML Email Newsletter Template, originally posted on Designmodo. If you've enjoyed this post, be sure to follow on Twitter, Facebook, Google+!
![Free Black Friday HTML Email Newsletter [Template for Download]](https://designhost.gr/applications/core/interface/imageproxy/imageproxy.php?img=https://designmodo.com/wp-content/uploads/2018/11/email-black-friday-747x420.jpg&key=a20db6087fc11230251c62db91bcc1833df91341dea49c3092652208b32a66c4)
We have a fantastic Black Friday free HTML email newsletter template to inform your subscribers about exclusive deals in a stylish way. Just as shops and malls are getting dressed on the eve of the holiday, digital vendors and online …
-
We've seen the first Adobe Black Friday deal of the year – and it's arrived even earlier than we predicted. The software company has cut the price of its Creative Cloud Photography Plan by up to 25 per cent, for a limited time only.
It's one of the best Black Friday deals we've seen so far – although it's early days – with worldwide audiences (excluding Europe, the Middle East and Africa) saving a huge 25% on the Photography Plan with 1TB of cloud storage, while audiences in Europe, the Middle East and Africa get a 20% discount on the 20GB plan.
Save up to 25% on the CC Photography Plan right now
The 25% discount is the best deal we've seen on the Photography Plan this year, while the 20% offer matches the best deal we saw on Amazon Prime Day.
We think this could be Adobe's best offer on the Photography Plan this November, so if it's something you've been considering, this is a good opportunity to make a decent saving. Note the expiry date though: this deal from Adobe ends on Friday 16 November, before Black Friday officially starts – so if you're interested, don't leave it too late.
Adobe Creative Cloud Photography Plan: what you get
Adobe’s Creative Cloud Photography plan includes powerful photo service, Lightroom CC, which lets you edit, organise, store and share your photos from anywhere. It also includes Photoshop CC, and all its powerful editing and compositing tools, so you can transform your images into anything you can imagine.
Here’s a full list of the apps you’ll have access to with the Adobe Photography Plan:
- Lightroom CC for desktop, web and mobile
- Lightroom Classic CC for desktop workflows
- Photoshop CC to transform your photos
- Adobe Spark Premium to create graphics, web pages and videos
- Adobe Portfolio to easily build showcase websites
- 1TB of cloud storage to get you started
You can read more about Adobe's Creative Cloud Photography Plan over on the Adobe website.
Related articles:
-
Cisco revealed that it had "inadvertently" shipped an in-house exploit code that was used in test scripts as part of its TelePresence Video Communication Server and Expressway Series software.
-
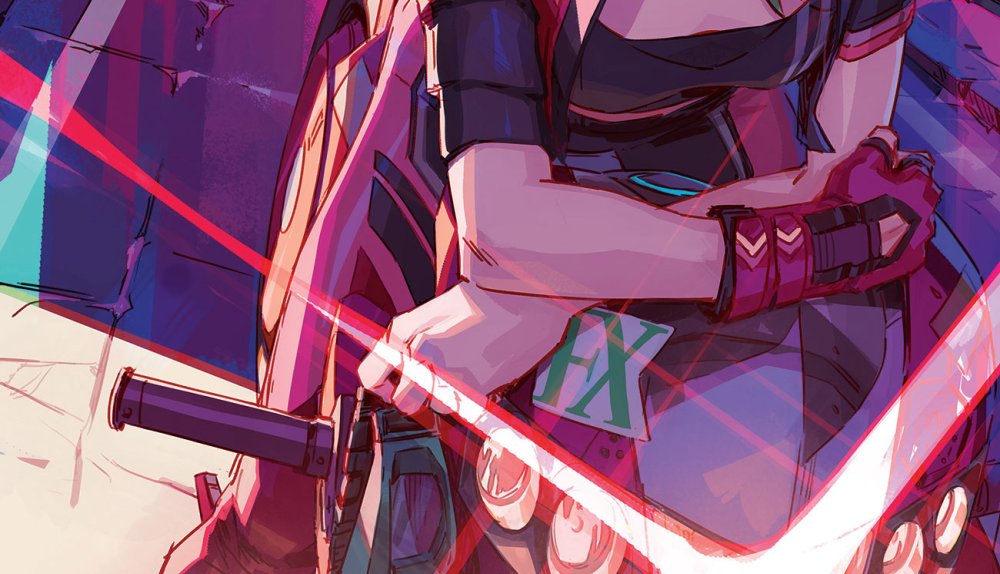
I've been a huge manga fan since childhood and it's impossible to hide the influence that passion has on my art. In my quest to paint powerful and dynamic images, I've learned a lot about how to draw manga from my favourite artists, through observation, and trial and error.
Yet as illustrators we can also make use of a range of visual techniques – composition, colour, lighting, perspective – to help us achieve such goals. People rarely spend more than a few seconds looking at something before moving on. So in the case of art that also serves a commercial purpose – such as a magazine cover – it's even more important to ensure those techniques are all working to create an eye-catching composition. It may feel overwhelming at times, but the trick is divide up the workflow, focus on one step at a time and solve any problems as they arise.
Because it's a static medium, I always try to create dynamism by playing with and exaggerating these techniques. Use of complementary colours, diagonal shapes and forced perspectives are some of the elements I repeatedly use in my work and I'll talk about these and more in this workshop on creating a manga-inspired cover image for ImagineFX.
From the initial rough sketches, creating more detailed line art, adding colour and final touches, I'll dive into this neon world to explain you my choices during the process and pass on some tips or observations that hopefully will help you in your own work. Watch my video above and follow the steps below to discover my tips.
Download brushes to use in this tutorial.
01. Look for inspiration
Start with the classics...
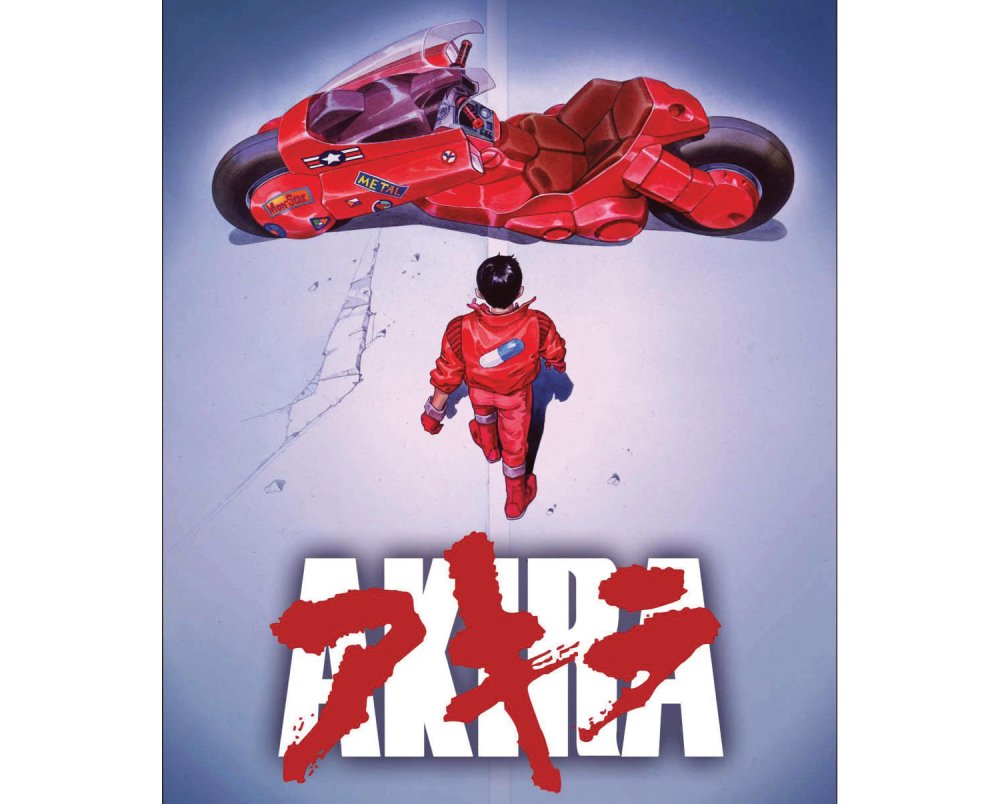
Before I begin sketching I always look around for some reference material. Films, photographs or any other media can help me to generate a raft of original ideas. I'm always trying to make something fresh and different in my art. Having said that, this piece is meant to be a tribute to the manga classic Akira, but I'll also include references to some of my other favourite manga series.
02. Produce quick thumbnails
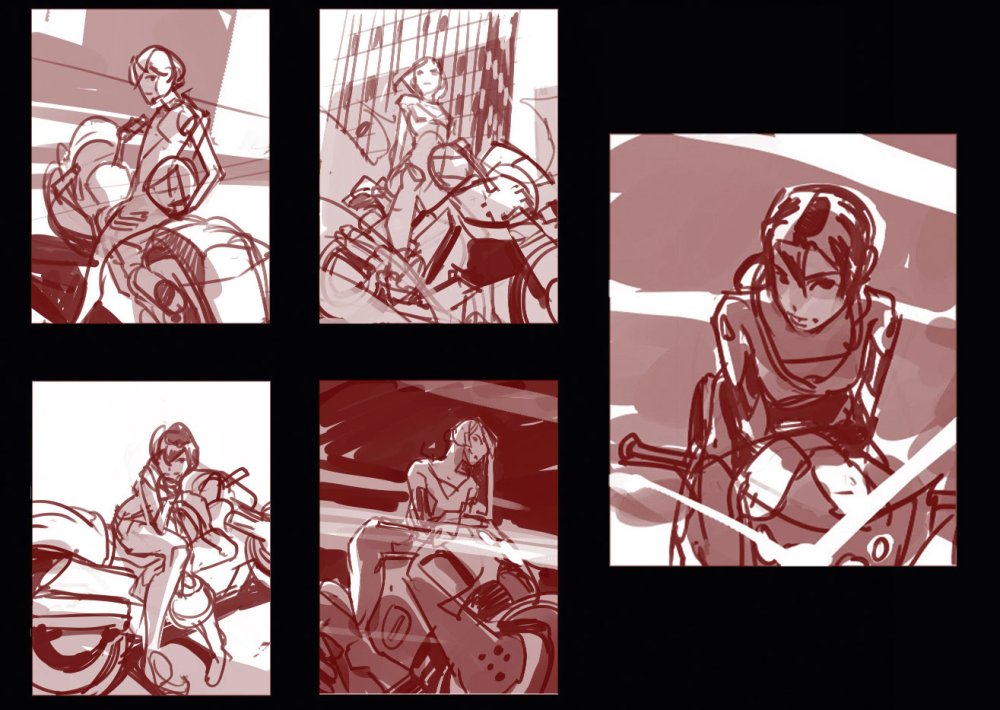
Sketch out some thumbnails to find a composition that works for you
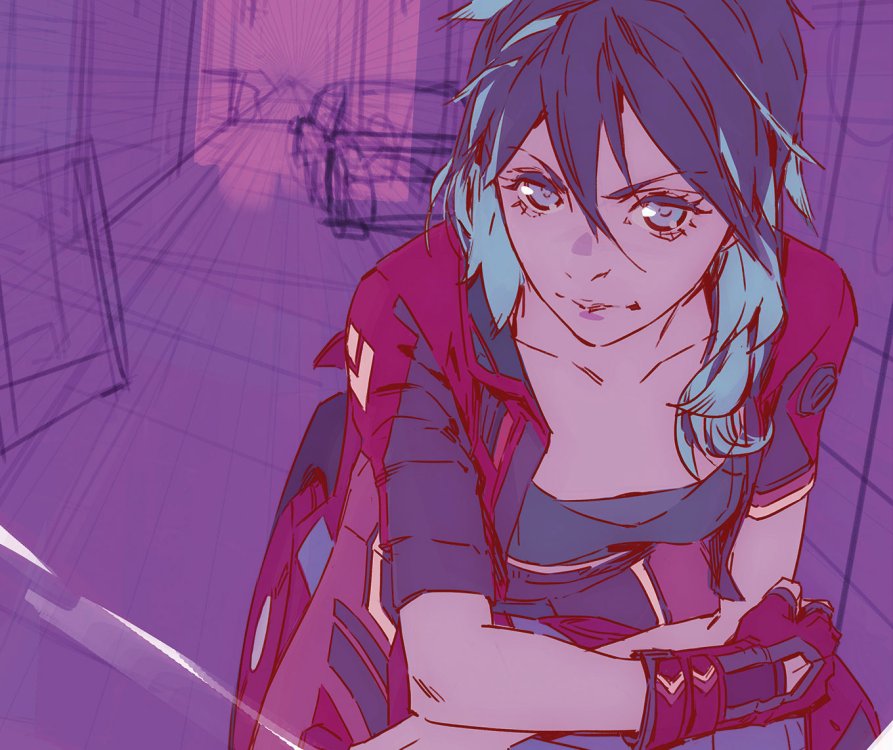
While the premise is simple – a woman on a motorbike – there's plenty of potential for introducing different points of view. Those sketches work as a brainstorming session, and as well as arranging elements differently, I try to work with different emotions on each one, too. Black, white and a mid-tone are all the colours I need at this point, which make things simple yet readable. Those sketches are like the skeleton of the image, and the composition must work even at this early stage. I place my lighting and cast shadows with the narrative in mind, and if I'm lucky I'll start having some ideas for how to colour the scene later on.
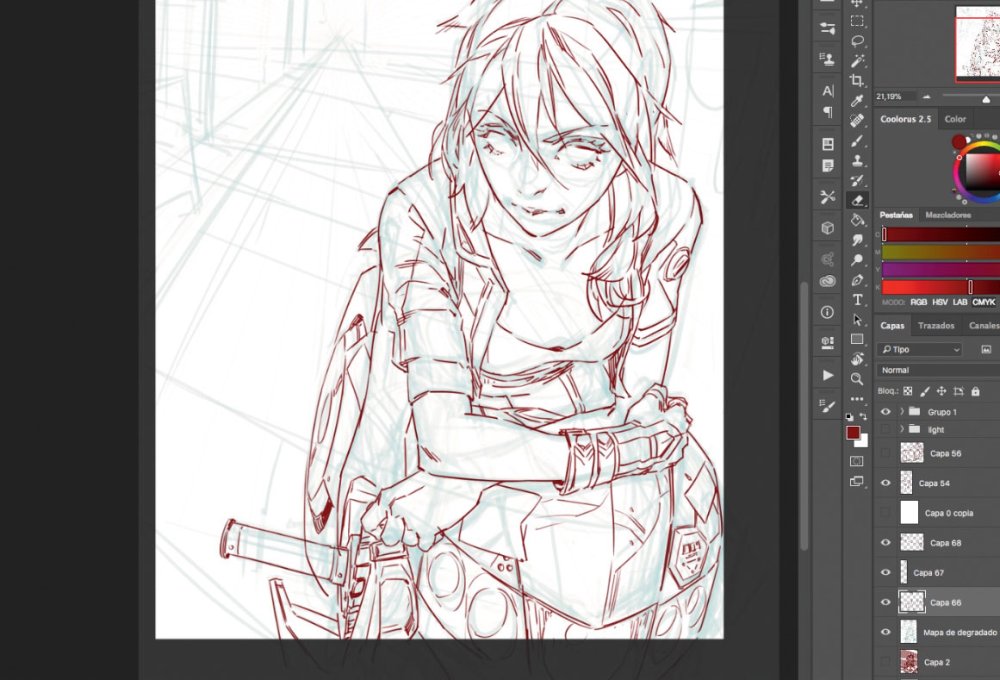
03. Refine the sketch
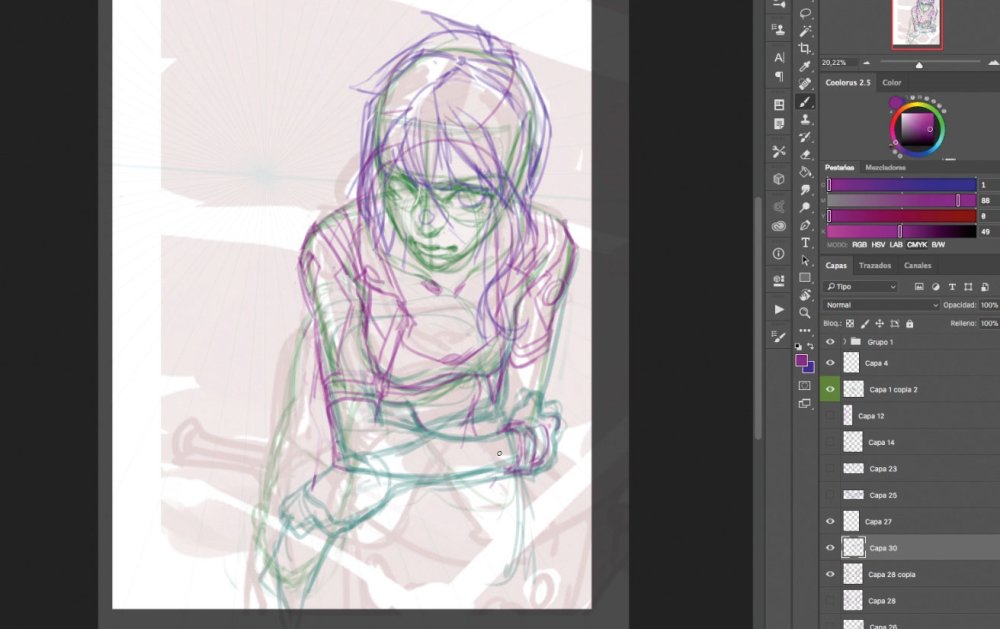
Work in details, paying attention to anatomy and perspective
It's time to draw over the sketch and place details, just as if I were using a lightbox. I focus on anatomy and perspective, using a one-point perspective grid that I rotate slightly to add some dynamism to the scene. Then I define muscles and the main lines of the character. I draw her clothes, hair and other details in a different colour, so as not to lose sight of the character's anatomy.
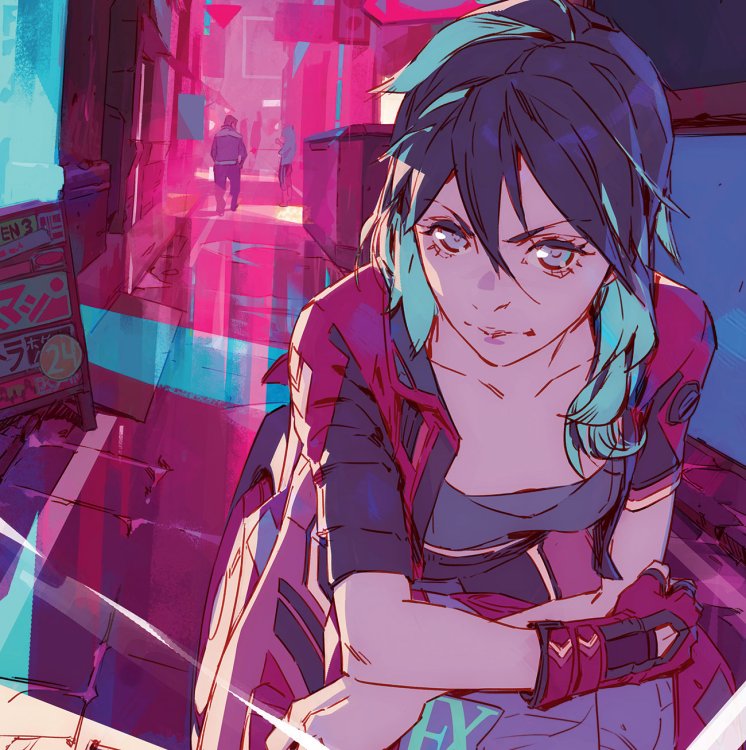
04. Work on background and balance
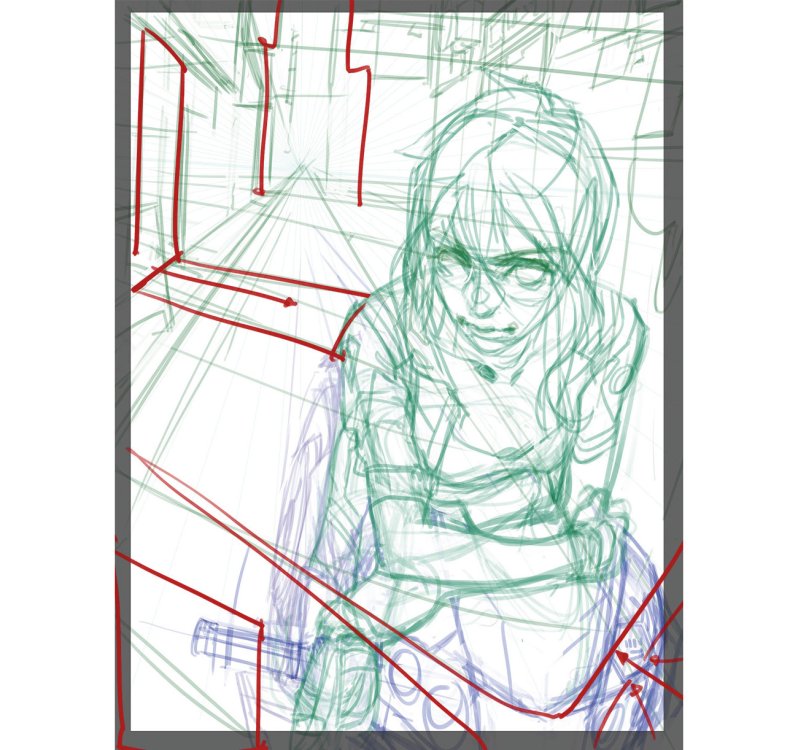
You'll need to add details to the background to give the picture some balance
Placing the character on the right can make the image look unbalanced. To fix this I place details in the street behind using some night Japanese street images as reference. I place a huge light source on the store at the left, which creates a key diagonal line going towards the character. The vertical street lines and the motorbike headlight help to balance out the overall composition.
05. Final line art
Keep the line art clean for the character and foreground, to get that distinctive manga look
When everything's set in place, I draw over the rough sketches lines from before and detail the character and other elements. The background will be detailed using only colour, but line art will remain visible on the character and foreground, so I keep them clean on different layers. This line art will play a huge role in depicting the classic manga look.
06. Don't overwork, simplify
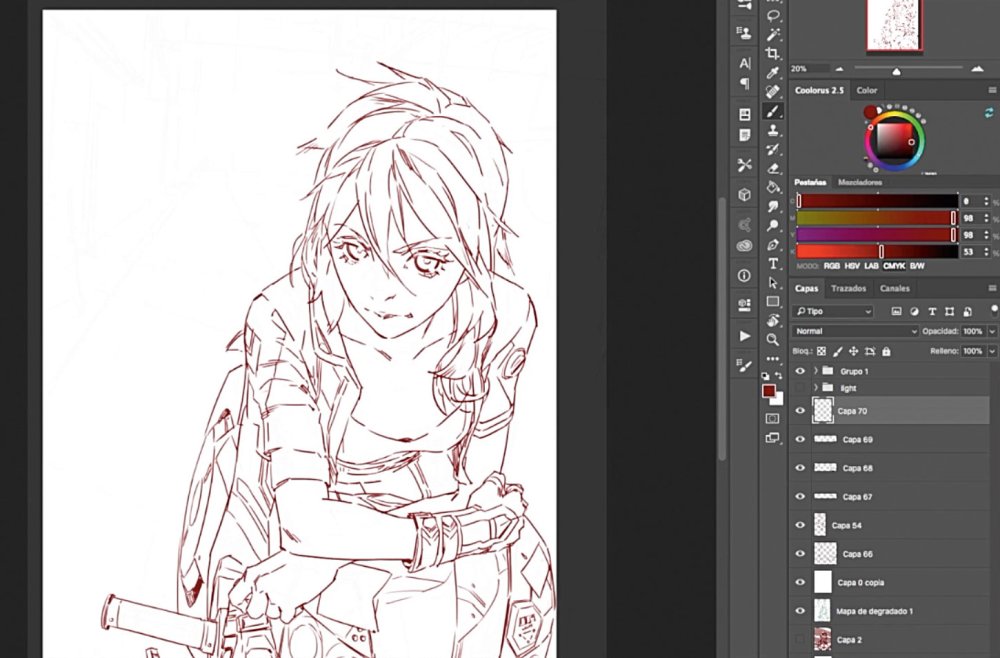
Don't go overboard on the detailing; simplify where possible
Sometimes it's tempting to start detailing early on in the process. The results are often messy. Instead, try to be straightforward and simplify. Here, the basic structure and anatomy are in place, but it doesn't mean they need to be visible on the line art. The structure lines have done their job and now it's time to build on them. I simplify objects like her nose and hands into just a few lines.
07. Use clothing and colour to define your character
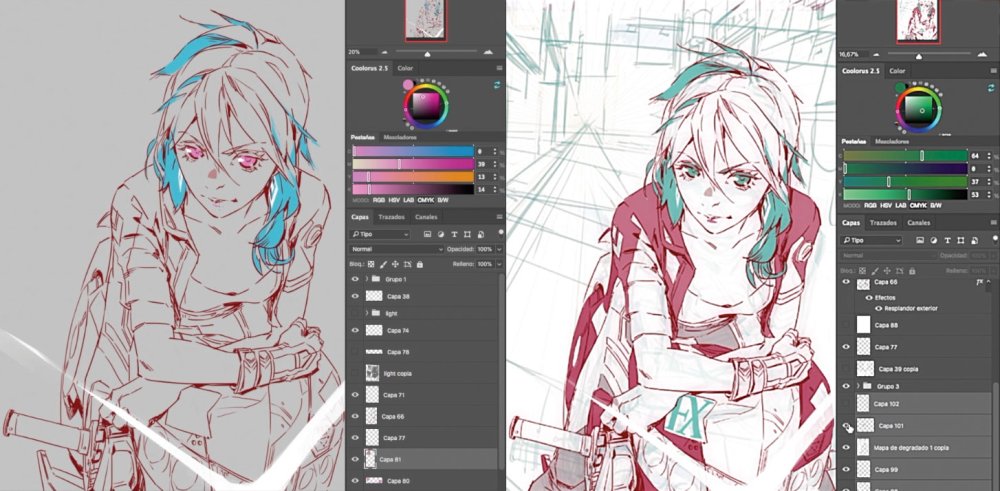
Use things like clothing and colour to define your character
On a portrait piece like this it's important to define the character. The clothing design, colour scheme and eyes all help to add depth to our young biker. I decide to portray her wearing a leather jacket and trousers with plenty of triangles motifs and diagonals. You can also see these shapes in her hair. Red-coloured elements on her clothes and face convey the impression of strength, despite her friendly expression.
08. Think about lighting
The lighting on this picture means paying attention to the placement of highlights and shadows
The idea of setting the scene on a neon-lit street at night was decided early on, but now it's necessary to detail the concept and place highlights and shadows more precisely. I pay attention to the position of the ImagineFX logo, too – it's important to keep it readable. I decide to leave that area in dark tones and free from neon lights, enabling the logo to pop out in white.
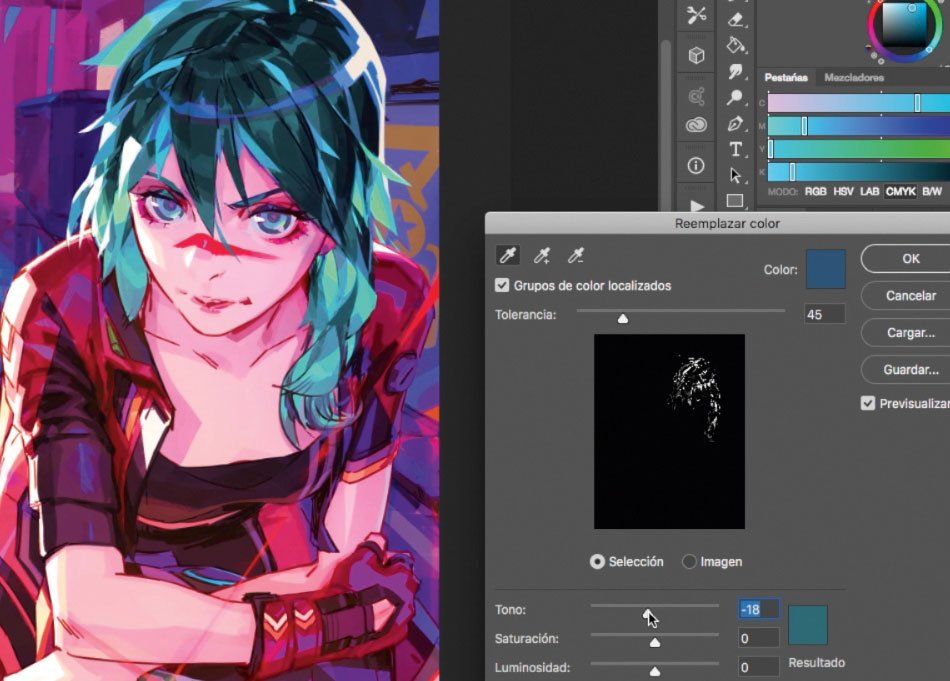
09. Establish general colour schemes
If you don't need a full colour key, Photoshop's colour balance is your friend
I now make my first colour decisions. Depending on the complexity of the illustration, I usually create a full colour key in a smaller duplicate of the file. However, because there's just one big character and I've got a clear idea of the image I don't need more than my previous light and tone study. Filters like Image > Adjustment > Color balance help me to keep all the tones as a purple hue.
10. Bring life to the world
Bring in more details to increase the visual interest
To add realism and life I bring plenty of details into the background: store signs, damp pavements, people… I imagine myself in the scene and try to express on the canvas what I would feel as I walk through that environment. Exaggerated lighting or a sense of weather are always good tools to employ when creating visual interest.
11. Work on volume and rendering
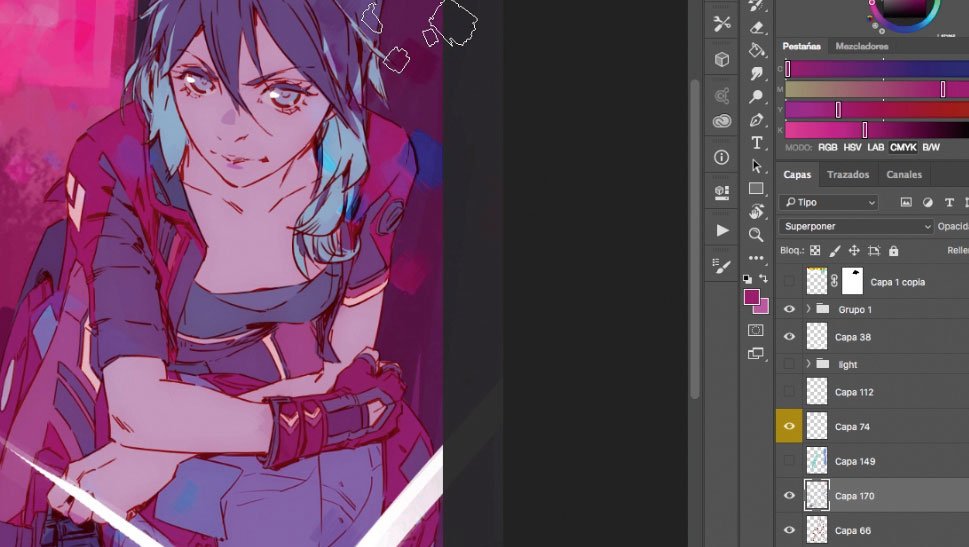
Give the colours a random touch with Toni's custom Colour Generator brush in Overlay mode
Using my custom Colour Generator brush in Overlay mode I add some randomness to my colours. This helps to enrich the entire image. Then I start on the character. First I put highlight over on the left that will make her stand out, and then I dive into the details. My shading is full of hard edges and flat colours, because I want the image to echo the anime or manga style.
12. Consider materials
Merge your layers while you paint
My colours are already established so I select the Eyedropper tool (alt+click) and keep working on shades and volumes, bearing in mind that lighting works differently across a range of surfaces. The darkest zones and contrast are reserved for leather and metal, while skin is worked with a low contrast. I try to merge layers while painting, keeping the background and lights separate from the character.
13. Bring in anime-style effects
Use simple geometric forms to bring out the motorbike headlights
I'm almost there now, so I enhance the overall look and apply my final touches. Inspired by anime I spend a bit of time working up the motorbike headlights, making them big and strong. These geometric forms also help me to fill the composition to the lower-right area of the scene. They're painted with white with some reddish tones on the edges on an Overlay layer mode.
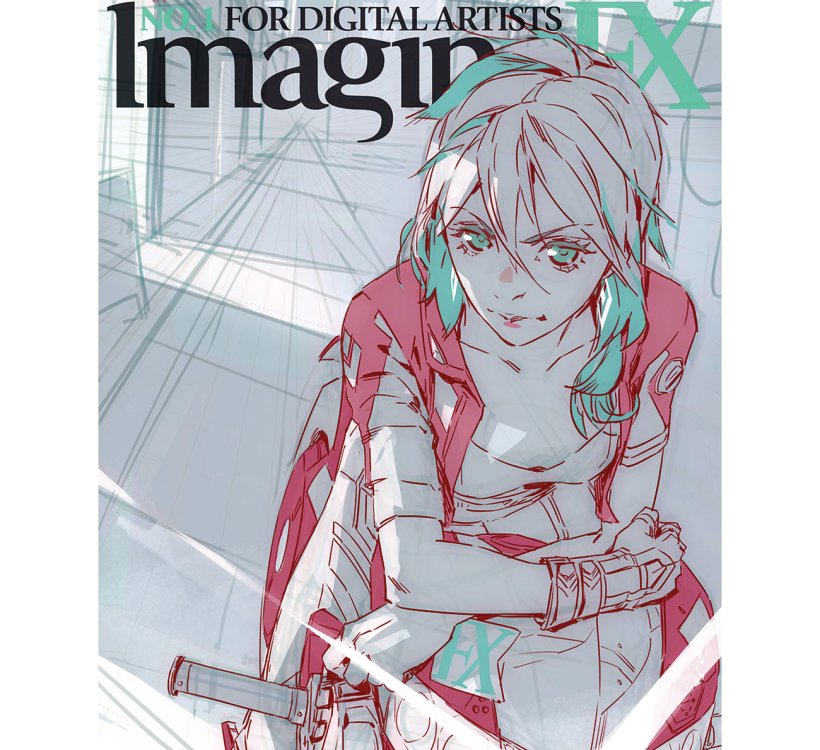
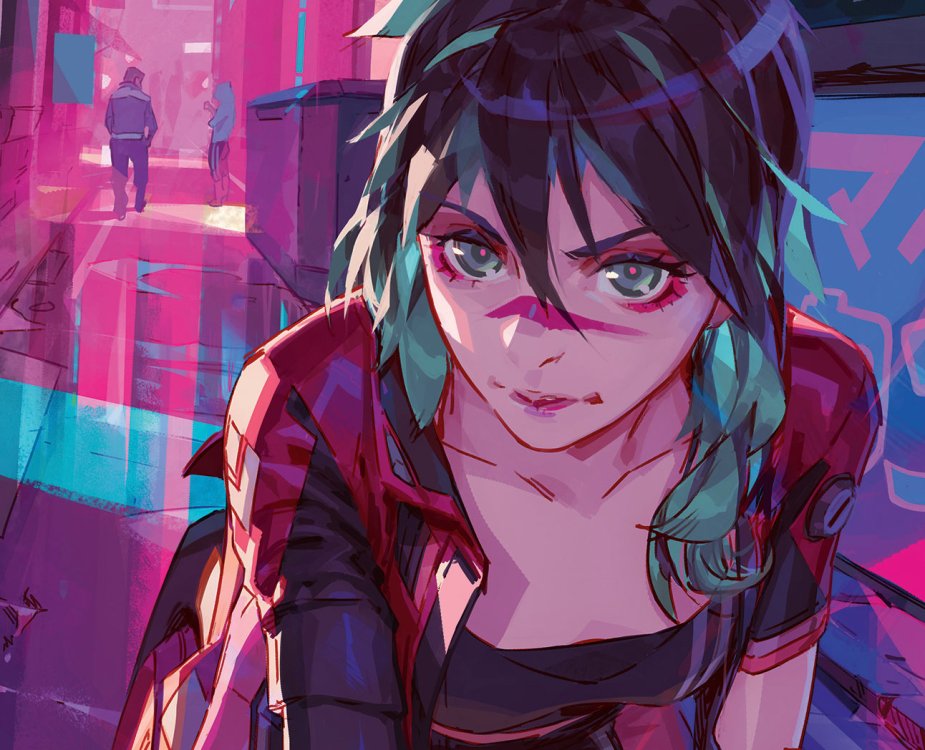
14. Respond to feedback
Some final tweaks and you're done!
At the request of the ImagineFX team, I change the hair colour and light focus to make the character stand out against the logo. I also do some polishing work and get rid of some details on the background to make the cover text more readable. At any point, it's important to stay focused on the important stuff and not fill everything with unnecessary details that might distract the viewer. To finish off, I apply Filter > Focus > Focus mask to emphasise certain shapes in the scene.
This article was originally published in issue 163 of ImagineFX, the world's best-selling magazine for digital artists. Buy issue 163 here or subscribe to ImagineFX here.
Related articles:
-
Bug opened door for malicious link attack, giving hacker access to stored DJI drone data of commercial and consumer customers.
-
As someone who has parented two amazing kids (now grown-ups), I’ve experienced many parental challenges and learned a lot of lessons along the way. Haven’t we all?
Over the years, and after consulting with hundreds of creative firms, I had a big 'aha' moment. To put it simply: parenting and running a creative firm are one and the same, or are at least, closely related.
Ultimately, if you have kid or even a dog (sorry, cats don’t apply), then you’ll be familiar with where I’m going with this analogy. But even if you don't, you may still find it useful to think about the similarities between raising a child and running a creative agency. Here are 10 ways they're the same...
01. Shit happens, you just have to deal with it
Every so often, when you run a studio, you’ll encounter an unexpected bump in the road (or, when it comes to kids or dogs, a big pile of shit). Those experiences – what we’ll call 'fires' – will happen, that’s just life.
But the moment those fires become everyday experiences, you've lost control of your business and have allowed your clients, projects, and staff, who are often the cause of these fires, to drive the direction of your business. Ultimately, it is you – not anyone else – who should shape, direct and influence the direction of your business. The kids don’t run your household, you do, although it might not feel like it sometimes. Note that you don't need to panic if you're regularly cleaning up your kids' shit, they'll grow out of it. Dogs, not so much.
02. There are frustrations, and rewards
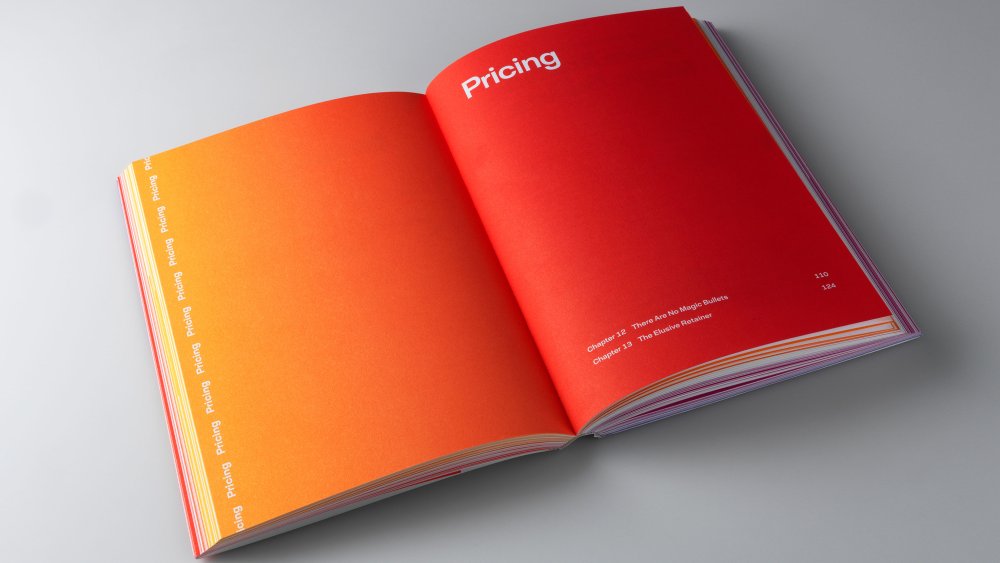
Image by Brilliant Graphics, who printed Emily Cohen's new book
As parents, we never give up. Running a business is similar; we will have many different experiences – some good, some bad. But, we should never let those difficult moments get us down. We need to move forward. Always.
03. You will mess it up, and that's okay
We all make mistakes, some more than others. That’s simply human nature. It’s only when we recognise them, own up to them, and learn from them that we will truly grow as human beings, as parents and as business owners.
04. You can't do it alone
Instead of grandparents, neighbours and babysitters, successful and thriving businesses rely on an extensive network – or community – of colleagues to help them along the way. From business consultants (like me!), to those that refer new business, to strategic partners and vendors, this is our village. Nobody can do it alone.
05. Structure, praise and encouragement really work

Image by Jason Varney
All aspects of your studio – from your clients to your projects to your staff – run more smoothly and are better behaved when the parameters and expectations are clear. Businesses should reward those with good behaviour as well as push back on and impose consequences to those that misbehave. Believe me, your clients and staff, just like kids and dogs, will still love you, even if you say no to them.
06. Growth = more challenges
As your child ages, you continually have to go with the flow, and change some existing practices that they have simply outgrown. The same rule applies in creative businesses. You must always keep your eye on the ball, stay abreast of trends, and continue to change and evolve with each new step in their business’ growth.
07. There is no right way
Just like there are many different parenting styles, there are many different ways to manage a business. You just have to pick and choose which styles, strategies and tools work best for you and the needs of your business, and don't be afraid to change them later.
08. People who love you are more likely to forgive

Image by Brilliant Graphics, who printed the book
Our kids will (hopefully) never stop loving us despite our many flaws and mistakes along the way. Similarly, clients will forgive your mistakes if you’ve spent time building and ensuring a solid, trust-based and mutually beneficial working relationship. They will become your advocates and defend you when you make mistakes, But, when you allow your clients to walk all over you (and make no mistake, this happens), you’ve become a vendor, not a value-added respected partner and they'll no longer be your advocate. It’s that simple.
09. Don't argue in front of the kids
Keep your disagreements private and come back to your team with a united front. Enough said.
10. The best laid plans...
...you know that one.
Ultimately, as both a parent and business consultant, I’m a big believer in developing a well-defined long term vision and plan for the future. These plans will help you make better decisions along the way and keep you on track toward a final destination.
Rambling aimlessly can be confusing for those along the ride, like your clients and staff. Yet, despite your best efforts, life will still throw you some unexpected curveballs along the way. Accept that even with the best plans, you may have to pivot and change along the way. You just have to make sure that life’s little, and not-so-little, surprises still align with your own values and goals, and that you don’t change simply for change's sake, but with a purpose and vision for what happens next. Move forward fearlessly and you’ll reap the rewards.
For more of Emily Cohen's business insights, don't miss her new book Brutally Honest: No-bullshit business strategies to evolve your creative business, which is out now.
Read more:
-
Creating browser-facing applications with Node.JS gets tedious. Express.JS is a JavaScript framework dedicated to single-page and multi-page applications hosted in the Node.JS environment.
It provides a thin layer of fundamental web app features that won't obscure the Node.JS features you're already familiar with, so you can be sure that your finished app will be up to scratch performance-wise. And it's also great for creating robust APIs, thanks to a stack of HTTP utility methods and middleware ready to use.
Want to get started? Here's what you need to know.
01. Generate a workable structure

Introduce the right working options to get started
Express.JS prides itself in being 'unopinionated' – that is, the framework allows the developer to mix and match in terms of architectures, templating and markup engines. Sadly, with great power comes great responsibility.
The Express developer team seeks to soften the blow by introducing a project generator. It comes to your workstation in the form of an NPM package, and will aid our experiments with the following framework:
The generator also contains dozens of project options – the figure accompanying this step shows the full help output. For simplicity's sake, we will limit ourselves to a project based on the default settings. Kick off its generation process with:
Warning: the default view engine will not be Jade in future releases.
When done, the current working directory contains a new folder called 'futuretest'. It is home to our test project and must be configured using NPM's package download command. At the time of writing, the generator includes the Jade view generator – the project plans to change this in the near future, obligating you to pass in a parameter selecting the view engine intended. Alternatively, request the use of Pug – it is the official successor of the Jade engine:
02. Understand the application structure
Now that the project generator has done its thing, let us open App.js in an editor of choice. Its – much abridged – structure presents itself as following:
Express.JS is highly modular. App.js serves as an entry point, where one or more 'use()' functions allow the adding of components intended to handle various requests. Invocations of 'set()' let you adjust parameters in the engine – one of which is the installation of the Jade view engine mentioned in the previous step.
The actual emission of web content takes place in the router classes. For brevity's sake, let's limit ourselves to Index.js:
'get()' is provided with a matcher string and an event handler which gets invoked whenever a corresponding event occurs. In our case, the render method of the chosen template engine is told to return content to the browser of the user who logged in.
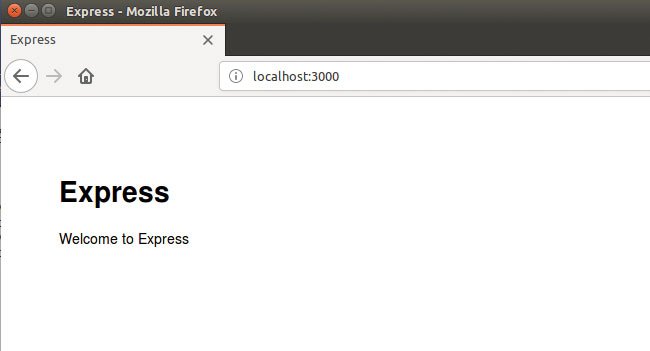
03. Run the web page
At this point, we are ready to take the website for a spin for the first time. Return to the terminal containing the Express.JS installation, and call on NPM start with the debug flag set:
When done, enter http://localhost:3000/ into a browser of choice to look at the scaffolding created by the project generator. When done, press ctrl+C to close the window and return control to the command line interpreter – keep in mind that this also closes the debugging web server.
04. It's all about routing and endpoints
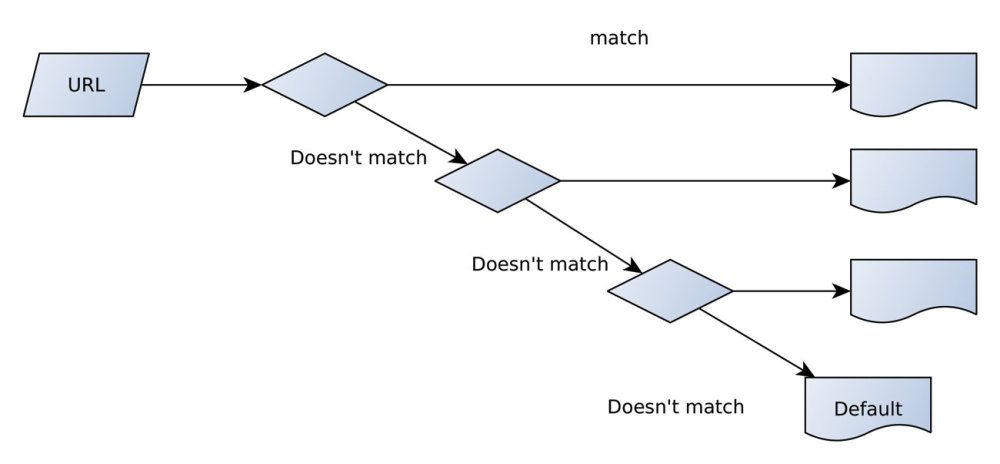
Sort the right entry points, add new routes and introduce regular expression support
For the sake of simplicity, let us agree that a web application is usually made up of a sequence of entry points. Express.JS handles these via the router class – think of it as a repository of methods that get called upon in response to an incoming request.
Adding a new endpoint to an application is accomplished by adding a new worker into the queue. Our auto-generated example creates two router types, each of which is raised using the 'require' method:
In the next step, 'app.use' registers the routers and connects them to the request strings. Our code furthermore adds an error handler that gets invoked if a non-existing URL is entered into the system:
05. Create a new route
Open Users.js, and modify its code as below:
Adding new routes to Express.JS is a mechanical process. Grab the router object of choice, and invoke the method corresponding to the HTTP verb you seek to handle. Next, pass in a string that will be added to the 'offset' registered with 'app.use'. From that moment onward, both http://localhost:3000/users/user1 and http://localhost:3000/users/ return a valid response.
Keep in mind that Express.JS is not limited to handling 'GET' resources. 'post()', 'put()' and 'delete()' handle the traditional four HTTP requests, with dozens of additional verb methods catering to more unusual needs. Finally, the 'req' object provides access to the request header – put it to good use when parsing parameters or client information.
06. Advanced matching
Adding routes by hand gets tedious as program complexity grows. Express.JS caters for this problem by introducing both wildcard and regular expression support. For example, look at the following declaration which uses a regular expression to match against various strings containing the character sequence dog.
07. Abnormal routing
While handling the four HTTP requests ought to be enough for anyone (hat tip to Bill Gates), Express.JS can also work with additional protocols. Express-WS is an especially tasty candidate for this section – it extends Express.JS's reach to include WebSocket communications.
Once the plugin is added to the main Express.JS project, enabling it is accomplished via a 'require' call. It returns a helper object containing all but one method – call it to establish a connection between the router and the plugin:
Their prototype differs from normal routes due to the presence of the 'ws' object – it provides access to the underlying WebSocket instance connected to the client responsible for the connection.
08. Integrate databases and templating engines
Be sure to employ the power of the rich plugin ecosystem
Being based on Node.JS means that the rich plugin ecosystem is at your command when working on web-based applications. For example, accessing SQL and NoSQL databases – usually an extraordinarily tedious task – can be handled using plugins provided by the database vendors. The actual deployment is as easy as installing the needed NPM module – if your code is to access a Redis database, simply add the following:
Of course, in-memory SQLite is also supported:
Keep in mind that the Node.JS integration is not limited to database plugins. Adventurous developers could go as far as to include products like Tessel, thereby creating web applications which can also interact with Internet of Things devices.
09. Templating in style
One area where simple and real programs differ is the creation of views. While a small example project usually uses hand-crafted strings, assembling large swaths of HTML with a string of connected things is highly annoying.
Template engines provide a neat workaround. They permit the creation of predefined schema files, which can be populated programmatically in execution.
In the case of our example program, the views lay in .jade files. Opening index reveals the following structure:
Expressions enclosed in curly brackets act as template fields whose values are to be replaced at runtime. Index.js invokes render with a parameter object, leading to the rendering of the start page shown in the figure accompanying this step:
Most templating engines can also parse arrays when provided with an item template. In this case, every line of the array is displayed with one instance of the DOM model – similarities to the list display model found in Android are purely coincidental. Express.JS is not limited to the predefined templating engines. Should you feel like rolling out your own for some reason, simply follow the steps outlined here – in principle, you have to override all but one function.
10. Handle static content
Express.JS applications tend to contain CSS files and pictures. Serving these via the Render function is inefficient – a smarter way would involve sending them on their merry way with a traditional HTTP request. This can be achieved via the 'express.static()' function, which can mark entire folders for export:
11. Modify the event flow
Finally, allow us to mention the term middleware shortly. In Express.JS parlance, middleware is a set of one or more components which integrate themselves into the flowchart shown opposite. They can, then, be used to modify requests as they pass through the routing system – when implemented correctly, limitless functionality can be achieved.
Furthermore, some ready components can be found here – visit this site before embarking on a large-scale development project.
12. How to host an Express.JS app
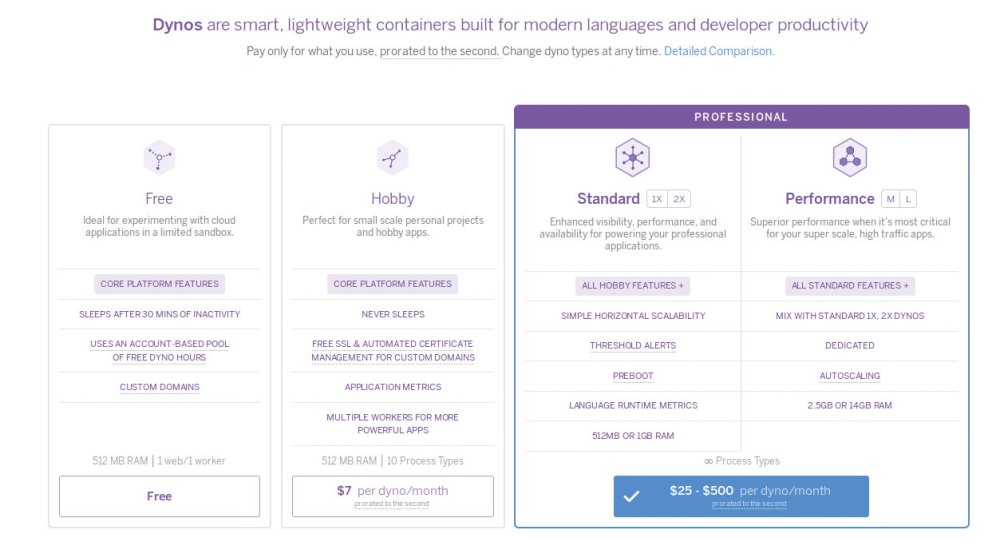
Consider the platforms where you can host your new creation
Testing Express.JS-based applications is easy. Problems occur once you want the page to become accessible to third parties – due to it being generated by the Node.JS environment, there is no way to get a static image fit for FTP deployment to web hosting services.
In theory, there is nothing against using a Raspberry Pi, an OrangePi, a dedicated server or a virtual machine rented from a cloud service or a web host provider that offers virtual hosting. However, renting a full virtual machine can burden you with the responsibilities of keeping the execution environment and operating system up to date.
If this task is not to your taste, a Platform-as-a-Service provider can be a more attractive (albeit, in most cases, pretty pricey) choice.
Many developers consider Heroku, with its pricing shown in the figure accompanying this boxout, to be the gold standard for all things that are related to Node.JS hosting.
This, however, is a bit unfair in truth – Amazon's Elastic Beanstalk, Google's Cloud Platform and Microsoft's Azure all provide similar support for remote execution of Node.JS-based payloads. In all of these systems, the main issue is handling – while Azure is known for its slow deployments, other providers burden developers with difficult-to-use back-end services of extremely complex configuration systems.
Furthermore, the supported version of the Node.JS environment differs from provider to provider. Of course, we don't have enough space to cover the topic in depth. Visit Mozilla's deployment tutorial and Express.JS' performance and reliability and security best practices pages for some of the issues involved. Make sure to look at the provider's documentation to glean more best practices.
13. Future-proof your applications
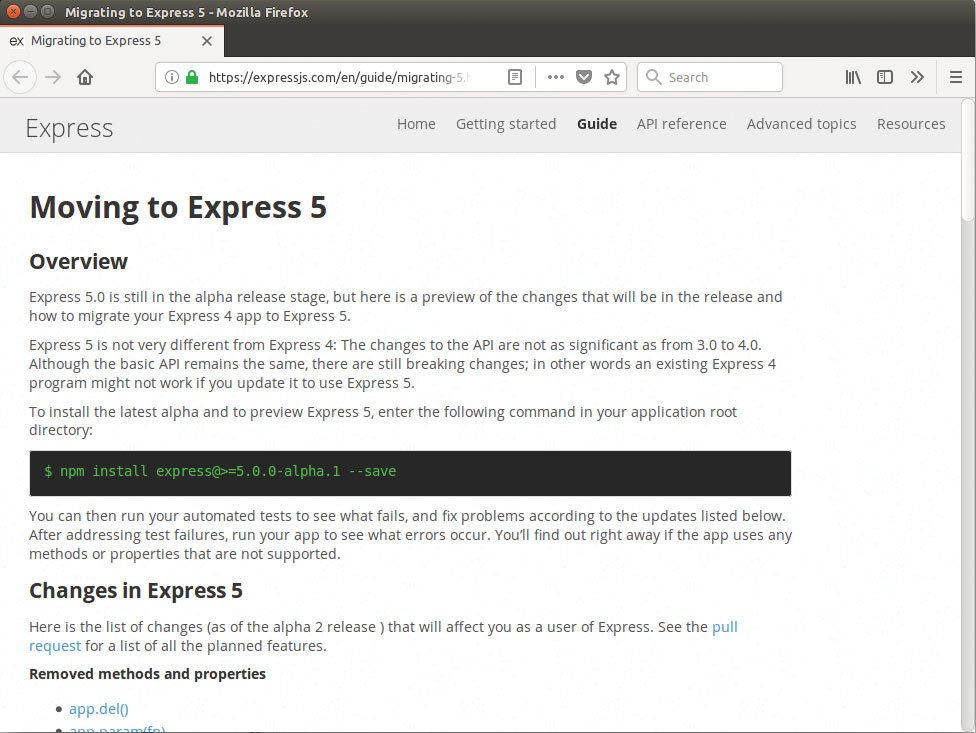
A host of new additions need to be noted
Express.JS's development cycle is far from smooth: the developers are well-known for frequent API changes requiring rewrites of client code. The switch from 3.x to 4.x was especially painful, which is why the impending release of 5.x might leave quite a few of you feeling uncomfortable.
While Express.JS 5.0 brings along a few breaking changes, their impact is more limited. First of all, a set of already-deprecated functions is removed for real – if code still uses them, upgrading to 5.x requires maintenance.
Designers of view engines need to check 'res.render():' rank growth in regards to view renderers, which has led to some synchronous implementations slipping through. Version 5 of the framework enhances performance by enforcing asynchronous rendering.
In addition to that, a set of sundry improvements and changes documented here sees the return of some extinct features from previous versions – furthermore, some long-standing bugs will be fixed in the new release.
Finally, be aware that you can already try the new version. Simply create a copy of your source code, grab a terminal and enter the following command to download an archive's worth of barely tested bleeding-edge JavaScript. Be safe.
This article was originally published in issue 279 of creative web design magazine Web Designer. Buy issue 279 here or subscribe to Web Designer here.
Related articles:
-
Thanks to an over-saturation of .com websites, finding a unique and relevant domain name is one of the hardest things for an entrepreneur or start-up company to do. So why not choose a domain that’s far more suited for your tech enterprise with a .tech domain? Radix '.tech' Domain Subscriptions are available for 90 per cent off at just $49.99.
The .com domain is becoming increasingly outdated, and more and more tech industry giants, including Consumer Electronics Show (CES.tech) and Viacom (Viacom.tech), are shifting to a .tech extension in order to lock down more relevant and simplified domain names. These Radix subscriptions enable you to register and use a .tech domain name for ten years – allowing you to build your brand while reflecting your passion for technology and start-ups.
Get a Radix '.tech' Domain Subscriptions now for just $49.99 – 90 per cent off their usual price.
Related articles:
-
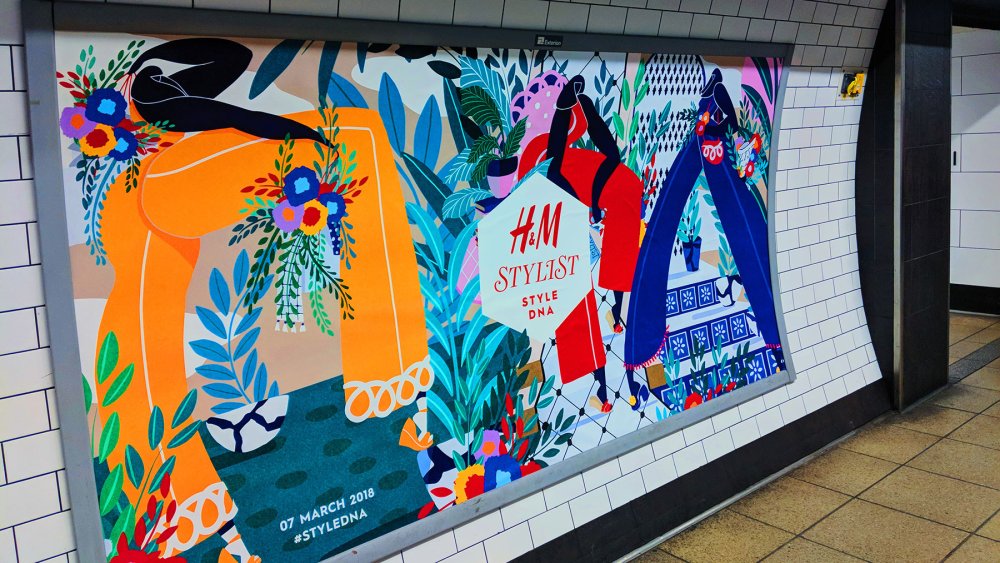
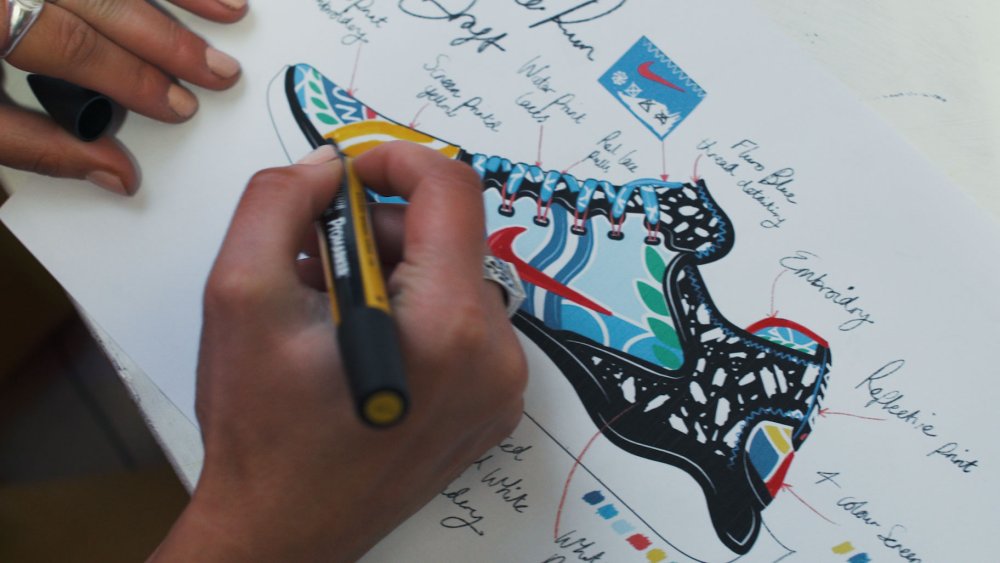
Artist and print designer Kelly Anna's colourful, abstract figures are full of energy. She's known for creating prints for footwear, sportswear and clothing, and everyone from Beyoncé and Cara Delevingne to Foals and London Grammar have been spotted sporting her work.
Recently she's branched out into murals, and it's this skill she'll be showing off later this month at Us By Night – a nocturnal design festival that combines inspirational talks, insight-filled tutorials, a tempting night market and plenty of super-cool extras (find out more in our post here).
We caught up with her ahead of the event to hear her tips for making it in the world of fashion print design.
01. Make it work
Working under pressure to hard print deadlines can help you produce your best work
When Anna first started in the industry, she didn't know how to use Illustrator CC. She's proof that with talent, enthusiasm and a willingness to learn, a lack of formal skills doesn't always matter. "If you want something, just make it happen. Chuck yourself in, start learning," she says.
When there are factory deadlines to work to there's no time to mess up, but throwing yourself into things when under pressure can actually sometimes be beneficial; you can find a fresh approach. "When you haven’t been taught how to 'create a textile print' there are no rules you are abiding to," she adds. "It's so much more fun. I created my own set of rules."
02. Find the message behind the design

Anna's not afraid of using words in her designs
While a fashion print needs to link to a collection, it's not just about making things gel stylistically. For a long time, fashion has been used to make a statement, and Anna likes to use hers to address political or social issues. She's also not afraid of using words within a design to pull things together.
"When you wear a T-shirt that represents how you feel about a certain situation or political view that you stand for, you feel a part of something," she explains. "That's nice."
04. Explore traditional methods
Anna works digitally, but hasn't turned her back on traditional methods. As well as the mural painting skills she'll demonstrate at Us By Night, she also has a soft spot for paper collage.
"Paper collage is where I have the most fun. It offers a sense of freedom," she says. "You can move the graphic blocks around and create different pieces until it feels right. Then just stick it down. I work digitally so much that it's nice to have this naive playfulness."
Traditional techniques can also help free you from the pressures of creating something 'perfect'. Even when working on digital projects, Anna likes to get herself into the rhythm by sketching in pen first. "The reason I use a pen is so I'm not too scared of making wrong marks," she says. "If I fuck up there is nothing I can do about it, so it frees me up."
04. Focus on print first, not garment
Anna works with both digital and traditional methods
Anna creates prints for footwear, sportswear and apparel. When designing a print, she says, the instinct is to focus on the item of clothing it's going to end up on – but really, it's the print itself you should be thinking about.
"I don’t think any piece of clothing is necessarily challenging to design for, it's more about composition and execution of the artwork," she explains. "So many people get this wrong, especially a lot of 'textile' designers."
05. Respect the power of passion projects
Although for many, designing prints for fashion brands sounds like a dream job, with any client (no matter how cool) there will be compromises and restrictions. Passion projects are where Anna feels she can truly express herself – and in turn they can feed into your paid work.
"These projects are the ones that truly help me understand who I am as a creative, and that is only good for everyone else," she explains. "If you are creating work that you truly feel passionate about, you will naturally get work from that. Good brands will follow and pick up on authenticity."
06. Try something different
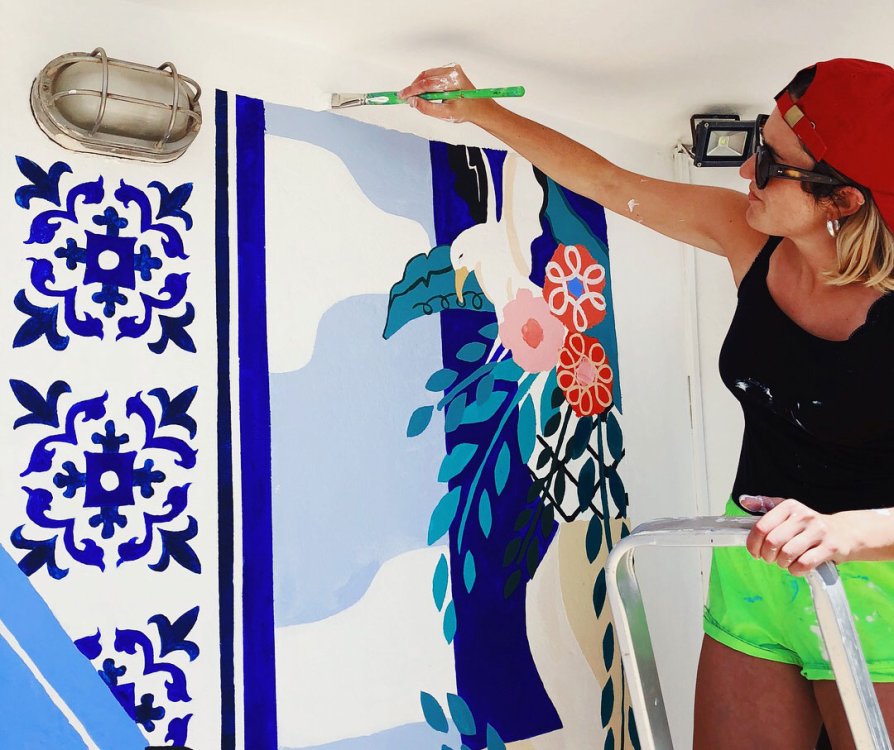
Anna created her first seven murals this year
Before 2018, Anna hadn't done any murals. The one at Us By Night will be her eighth this year. She's seen a photo of where she'll be painting, and will base her design on the kind of atmosphere she feels the space has. Murals offer Anna a chance to explore something totally different from her print work. "I absolutely love changing up spaces and seeing my work on that scale," she says.
Us By Night takes place in Antwerp on 22-24 November. The speaker lineup is comprised of artists, designers, and creatives from around the world. Buy your ticket here.
Read more:
-
We've just spotted the first Adobe Black Friday deal of the year – and earlier than we expected. The software company has cut the price of its Creative Cloud Photography Plan (1TB) by up to 25 per cent, for a limited only.
It's one of the best Black Friday deals we've seen so far – although it's early days – with worldwide audiences (excluding Europe, the Middle East and Africa) saving a huge 25% on the 1TB Photography Plan; and audiences in Europe, the Middle East and Africa getting a 20% discount on the same 1TB plan.
Save up to 25% off the CC Photography Plan right now
Both deals beat the best Photography Plan offer we saw on Amazon Prime Day, which gave a 20% discount on the lower 20GB cloud storage option.
We think this could be Adobe's best offer on the Photography Plan this November, so if it's something you've been considering, this is a good opportunity to make a decent saving. Note the expiry date though: this deal from Adobe ends on Friday 16 November, before Black Friday officially starts – so if you're interested, don't leave it too late.
Adobe Creative Cloud Photography Plan: key facts
Adobe’s Creative Cloud Photography plan includes powerful photo service, Lightroom CC, which lets you edit, organise, store and share your photos from anywhere. It also includes Photoshop CC, and all its powerful editing and compositing tools, so you can transform your images into anything you can imagine.
Here’s a full list of the apps you’ll have access to with the Adobe Photography Plan:
- Lightroom CC for desktop, web and mobile
- Lightroom Classic CC for desktop workflows
- Photoshop CC to transform your photos
- Adobe Spark Premium to create graphics, web pages and videos
- Adobe Portfolio to easily build showcase websites
- 1TB of cloud storage to get you started
You can read more about Adobe's Creative Cloud Photography Plan over on the Adobe website.
Related articles:
-
Unlike the predominantly JPEG world of digital photos, you might be surprised to learn there isn’t a single common standard file format for video. However, the one you’ll most commonly come across is MP4. Why? Because virtually every media player on the market - including VLC, KMPlayer, 5KPlayer and RealPlayer - and every device can read and play can read and play MP4 files.
What is MP4 format?
MP4 stands for MPEG-4 Part 14 with .mp4 as its file extension. MP4 is a multimedia container format based on Quick Time file format that was created by Moving Picture Experts Group (MPEG). This file format stores different data and it has supports different codecs of images, videos and audios.
The fact that MP4 supports so many different codecs means it's very often the file format of choice when it comes to video. So if you have video footage that won’t play on your phone, tablet or TV, chances are you’ll need to convert it to MP4. That’s where Wondershare Video Converter Ultimate comes into its own.
How to convert any video format to MP4
To convert any video format to MP4 you need to use a video converter, such as Wondershare Video Converter Ultimate. This media converter supports different input video formats and output formats. Averagely, it supports over 1000 file formats. With that being said let us have a look at a step-by-step guide on how to convert any video format to MP4 using Wondershare Video Converter Ultimate.
Step 01. Download and install the software
Wondershare Video Converter software is available for download on Wondershare website in Mac and Windows version. You can download the free version and purchase it later and then install it on your computer.
Step 02. Launch the software and upload the video
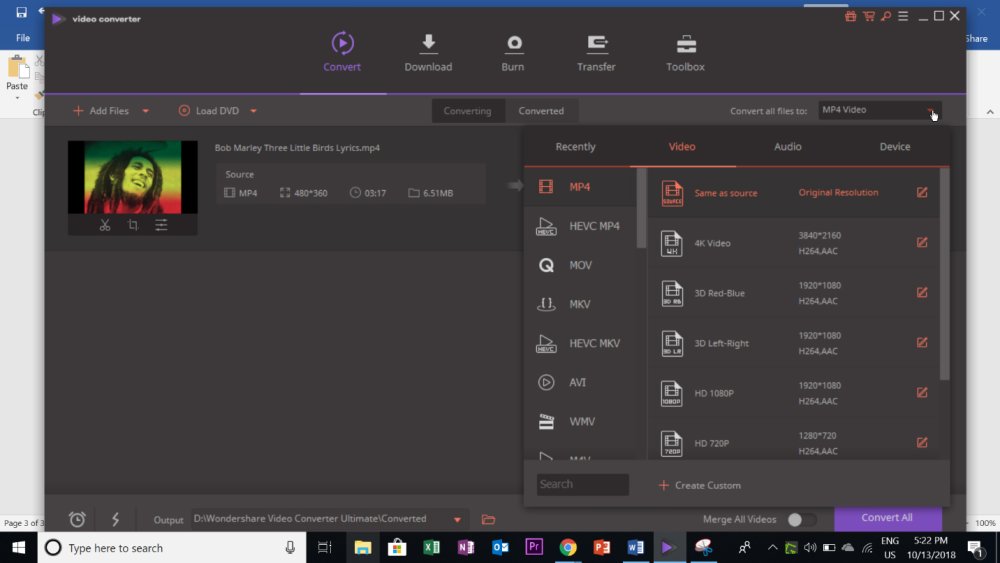
Open the software that you have installed on your computer and select “Convert” button on the home screen.
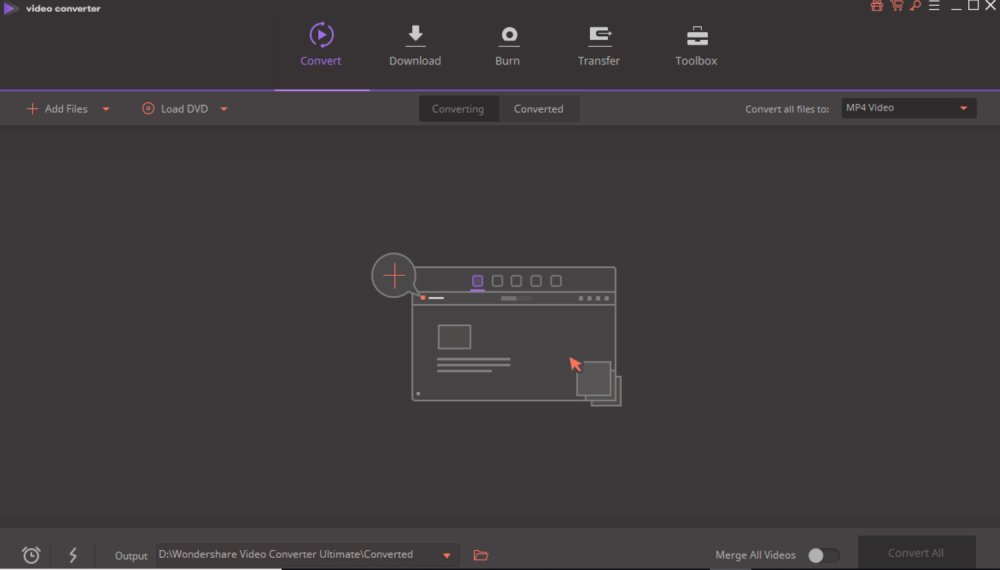
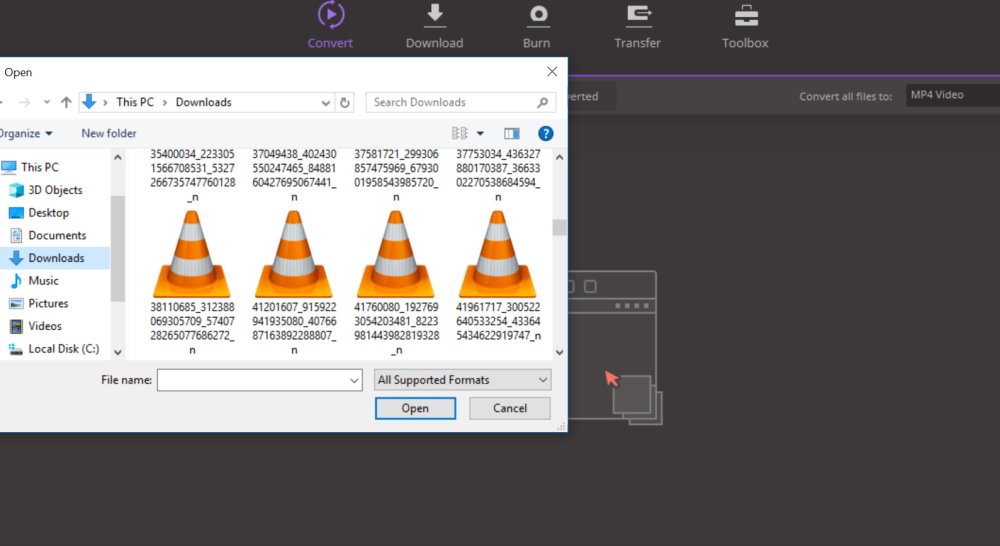
Just below it, click on “Add Files” and select the video file/s that you want to convert. Upload the files by clicking “Open” button.
Step 03. Choose MP4 as output format
Next, you need to define the output format which is MP4 format for our case. The default format will always be MP4 but you can get more settings by clicking on “Convert All Files To” at the top right. Select MP4 format and then choose the desired output resolution.
Step 04. Select output folder
Next, you need to choose where to save your files. Click on the output Folder at the bottom of the window and choose where to save your file/s.
Step 05. Convert video/s to MP4 format
You can now head to the bottom right and click on the 'Convert All' button. The video converter will begin immediately. The time it will take depends on the file size, but Wondershare is 90-times faster than any other video converter.

Wondershare's hidden talents
So you’ve successfully converted your video footage to MP4 with Wondershare Video Converter Ultimate in just a few clicks. But the software’s capabilities don’t end there. Here are some other powerful features Wondershare offers:
01. Other conversions
It’s not just video Wondershare can handle. Want to convert audio files into different formats? Wondershare has you covered. It can also convert files to video editing software, to VR, game consoles and mobile devices.
02. Online media downloader
With this software, you will be able to download video, audios and images from more than 10,000 web sharing sites such as Facebook, Twitter, Vimeo, YouTube and Spotify, to name a few.
03. Powerful video editor
Wondershare Video Editor also allows you to perform basic editing to your files such as trimming, cropping, rotating and applying advanced effects. Moreover, as you edit you will be able to preview the changes in real time.
04. Media transfer tool
To add on, Wondershare allows you to move files from your computer to devices like Android phones and iOS devices. The file transfer option just happens within a few clicks.
05. DVD burner
In a situation where you have media files and you want to do it via DVD, Wondershare can do that too. Simply upload your media, edit the files and burn them to DVD, Blu-Ray Disc, ISO and DVD folders.
06. Multifunctional toolbox
Finally, Wondershare Video Converter Ultimate’s toolbox contains a GIF maker, screen recorder functionality and a VR converter to convert your videos to virtual reality. It also allows you to fix metadata to all of your files, as well as cast to TV functionality.
Wondershare Video Converter Ultimate software makes convert any video to MP4 format a synch. It’s easy to use and comes with a number of other powerful features to help streamline your workflow. So what are you waiting for? Get started with Wondershare for free today!
-
One of the most difficult aspects of working in digital design is finding quality, affordable graphics that can be used across a wide range of mediums. This StockUnlimited Vector Plan offers unlimited access to an enormous trove of high-quality vector designs, and a lifetime subscription is available for over 90 per cent off at just $34.99.
Unlike most graphics subscriptions that either charge hidden fees or offer subpar material, StockUnlimited lets you download an unlimited number of vector designs from a library of over 500,000 graphics. You’ll be able to use royalty free content for commercial and personal use, and fresh designs are added every month. You'll also never have to worry about additional fees, complex licences, or red tape.
Supercharge any design project with a lifetime subscription to the StockUnlimited Vector Plan for just $34.99 – over 90 per cent off its usual price.
Related articles:
-
A file delete vulnerability in WordPress can be elevated into a remote code execution vulnerability for plugins like WooCommerce.
-
A sophisticated proxy code has infected hundreds of thousands of devices already.
-
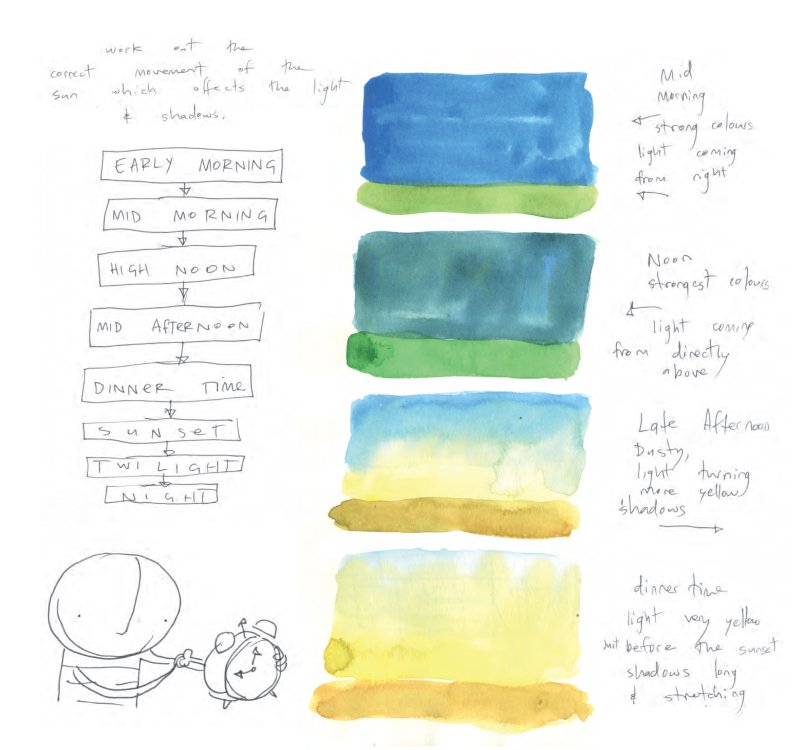
Creating a piece of 3D art with a natural-looking landscape might seem like a challenge, but if you use the right tools then it's possible to generate a realistic environment with the minimum of effort.
With Wysilab's Instant Terra tool, world-building becomes almost criminally easy; once you know what you're doing you'll be able to go from nothing to a photorealistic vista in just six steps; here's how it's done.
01. Generate the terrain
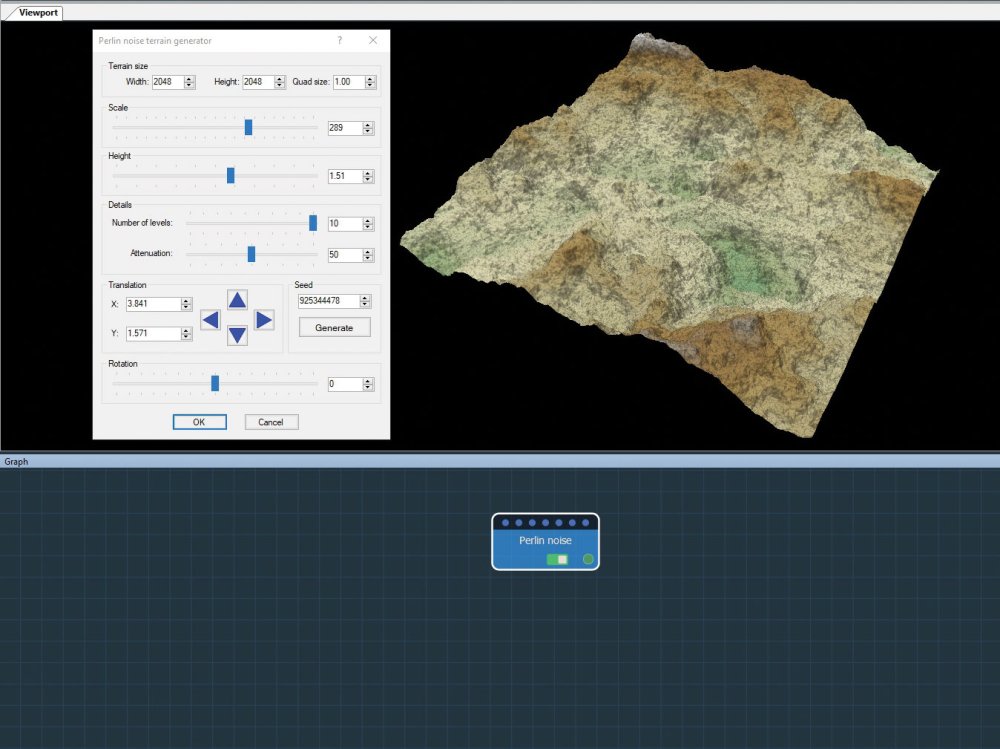
Modify the node's parameters to start shaping your landscape
Start a project by adding one of Instant Terra’s terrain generators. The Viewport displays a visual representation of the terrain and the Graph hosts the procedurally linked nodes that compose the terrain. Double click on the node to open its parameters and modify them to begin shaping the terrain. You can also import terrains from single image files or several image files and modify them.
02. Transform the terrain
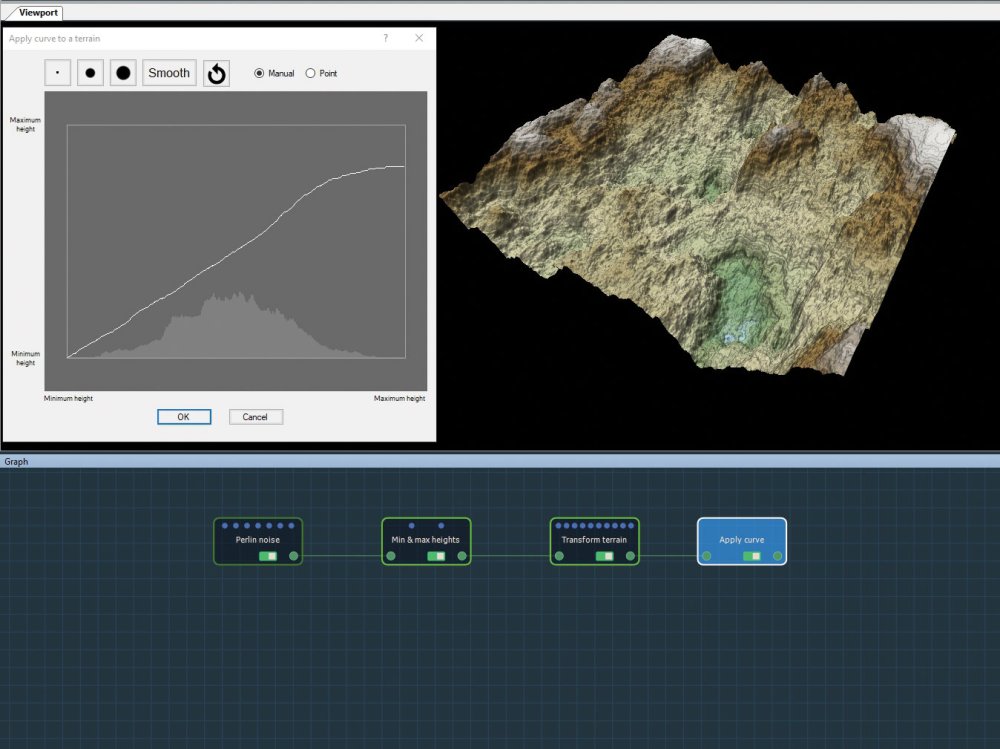
By linking nodes you can create different geological features
Explore different approaches by linking nodes, for example, to constrain the elevation, compress the terrain on the Y axis to achieve a folded structure, and create a natural slope. The individual nodes accumulate procedurally, and can be mixed using composition nodes to form the different geological properties of the terrain. Focus first on global forms and then refine the terrain by adjusting each node’s parameters.
03. Compose the terrain
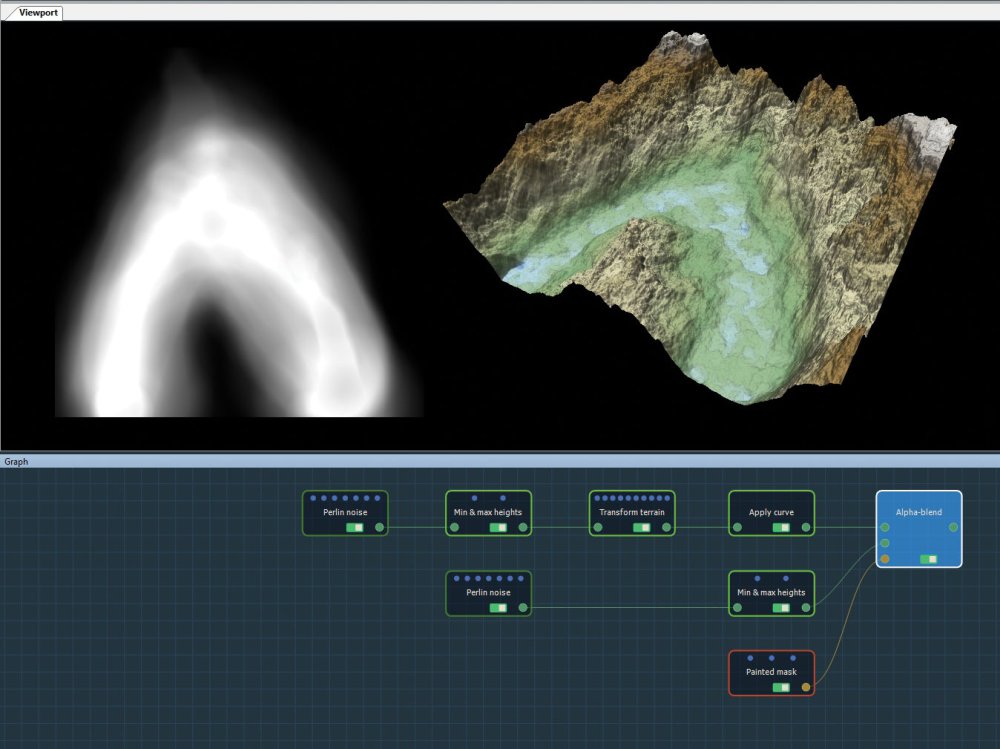
You can combine two terrains in different ways for more varied compositions
Compose two terrains and use the multiplier coefficients of each terrain to create a combined result. Full composition gives maximum freedom when composing terrains with translate, scale, and rotate options. You can also compose two terrains with a mask, for example, paint a mask directly in the 3D view and compose it with mountains and a less steep, sandy terrain to define where the river flows.
04. Simulate erosion
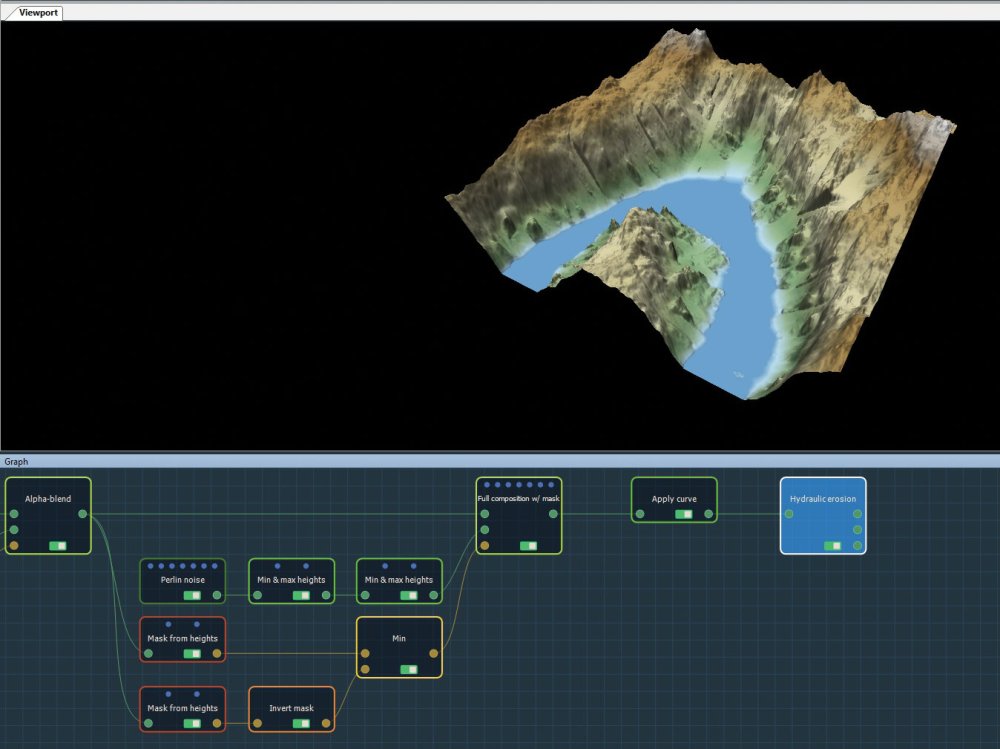
By combining masks you can simulate the effects of rainfall and river flows
Create realistic erosion and deposition effects caused by rainfall and river flows. Combine two masks with different heights, and then use the height values to define the area between the river and the mountains. Edit the mask properties or combine them using mask composition nodes to achieve a final result. Apply global erosion to simulate the sediment that has been washed away by the runoff.
05. Generate masks and export options
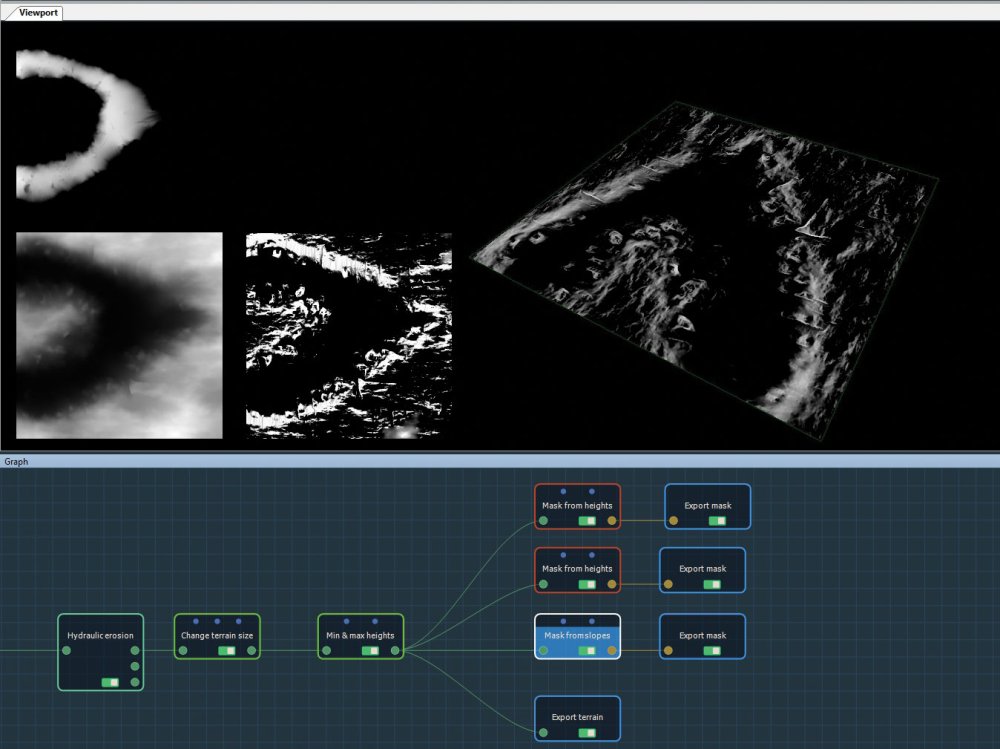
Generated masks have the same size and resolution as the input terrain
Generate masks from the terrain properties, such as slope, height, curvature, or angle, and export them to use them later to achieve an effect. The mask created has the same size and resolution as the input terrain. You can also export a terrain as a grayscale height map or a mesh. If the terrain has a colour map, you can export it as an image file.
06. Create a landscape
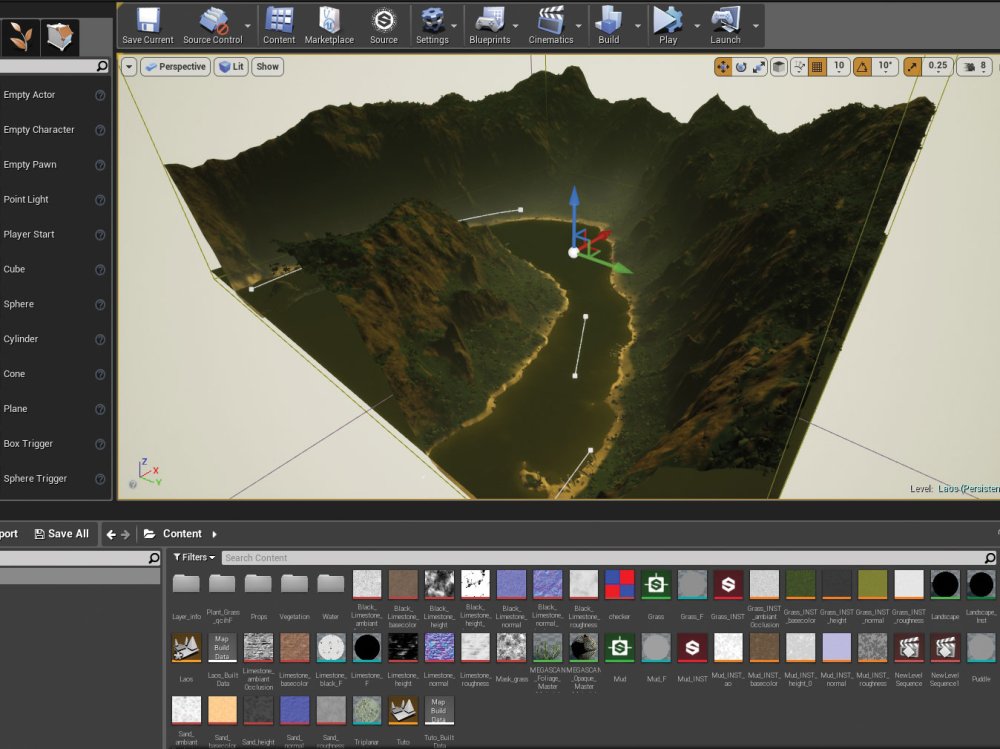
Render your finished landscape in your preferred 3D package
Import the terrain with a rendering engine, combine the exported masks, and apply different materials. The masks are used to define where to apply terrain assets, such as grass, trees, or rocks, etc, in order to create a landscape. The workflow remains approximately the same for all of the rendering engines: here, we use Unreal Engine, but you can alternatively export to other software such as 3ds Max, Unity or Maya.
This article was originally published in issue 238 of 3D World, the world's best-selling magazine for CG artists. Buy issue 238 here or subscribe to 3D World here.
Related articles:
-
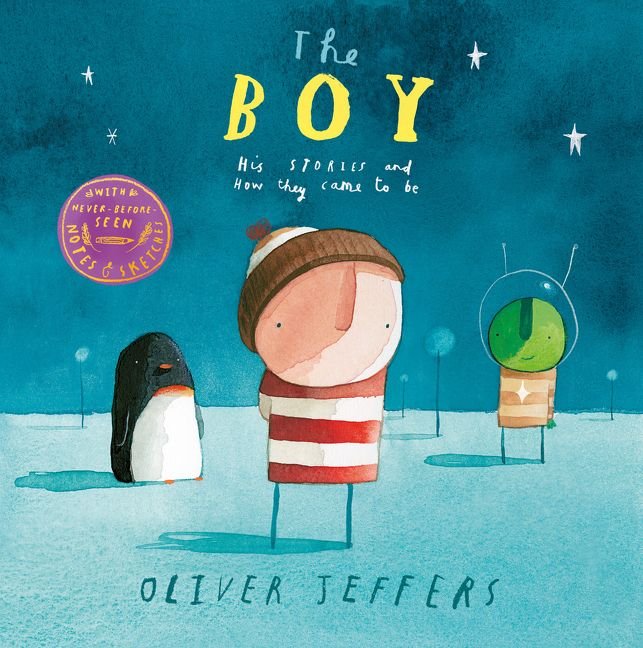
Discover where the Boy came from in this new collection
Oliver Jeffers isn’t one for looking back. “Usually when I finish a project, I move on,” says the best-selling picture book artist and author. However, for his latest collection, The Boy: His Stories and How They Came To Be, Jeffers has brought together the four books in his Boy series along with work from old sketchbooks to show readers his journey as a maker.
Returning to a project can often lead to self-criticism, but for Jeffers delving into material from his archive was a joyful experience. “Whenever I go back and re-read my work it is with a sense of fresh eyes,” he explains. With his life having transformed dramatically since creating these books, including a move from his home in Belfast to Brooklyn and becoming a father, Jeffers' latest release also proved to be an immensely personal one.
“It was a little bit like a time machine,” he says, “because I remembered where I was when I was making some of those notes and what I was thinking and the things that were of interest to me. It really was like a little snapshot of time which was fascinating, and it was only at the end that I realised how far I’ve come since then.”
Raiding the archive
The artwork from his picture books also stood the test of time. “I think I just assumed that I’d keep getting better and better and keep refining my skill, but there was something about the original art that I worked on that was very different to how I work now,” he adds. “It was watercolours, and I’m surprised that it stood up so well.”
When it came to sharing concept drawings and layouts from his personal sketchbooks though, Jeffer’s admits that he took a little more convincing. Although fears that he would feel like a magician revealing their tricks were quickly dispelled. “I realised that there is no trick!”
“It was my brother’s idea,” he reveals. “He designs most of my picture books and he said it was a good idea. But once it was happening, once it was there, I was glad. I think people are appreciative of the fact that it’s out there. I’m glad that it’s happened. But yeah, I wasn’t a fan of the idea initially because it felt a bit like lifting the curtain and exposing yourself!”
Embracing digital tools
It’s been fourteen years since the first book in this collection, How To Catch A Star, was released, and in that time the industry and the ways in which artists work have changed a lot. Jeffers is no exception. While the original artwork for these books was scanned in by the publisher, his work since has made more use of digital tools.

How To Catch A Star was Jeffers' first picture book
“I realised that my art could be more refined using Photoshop CC,” he says. “I used it a little bit but then I rebelled. After that I’d started to notice trends and could see that everything was computer generated and quite controlled and I think a certain amount of charm was lost with that.
“But with my last book, Here We Are, the final layer of drawing was done on an iPad for practical reasons because I couldn’t spend all day every day in the studio. I’m always going back and forth though, I don’t want to be tied to a single discipline or way of making, and I realised that these tools are just another way of making. Photoshop is no different a material than oil paint or watercolours, it’s just another medium so I treated it like that.”
Digital tools might be more convenient when it comes to creating, but they haven’t rewired Jeffers' artistic outlook. “I think when it comes to making, technology doesn’t change the way you think but the way that you do it,” he says. “I try to not spend too much time on a computer, because for me a computer means email. But I’m using an iPad more and more for drawing and animation.”
Creating characters
His working methods aren’t the only way Jeffers has pushed back against trends and industry norms. With his debut How To Catch A Star, Jeffers achieved the dream of many an author and artist by releasing a picture book that he had both written and illustrated. Although at the time he didn’t realise that this was an unusual thing.
Jeffers' put a lot of care into how he presented his work to publishers
“When I came up with the story and created the art for what was effectively a finished book, I didn’t realise that that’s not the way it’s supposed to go,” he explains. With a completed book to his name, Jeffers then set about researching publishers who would suit his work and sent them a sample. “Fortunately people liked what they saw and immediately got back to me and wanted to go forward, so it was a relatively easy experience for me.”
Despite making the road to publication sound straightforward, Jeffers is all too aware that his story is an anomaly. He also stresses the importance of making a good impression when sending out samples of work.
People say don’t judge a book by a cover but that’s not true, we do that all the time
“I put a lot of care into the package of what I was submitting and publishers have said that nothing has really come in like that since,” he says.
“I think if you go the extra mile and put in the extra effort you will get noticed. People say don’t judge a book by a cover but that’s not true, we do that all the time.”
How To Catch A Star was the first in the series of Boy books. As the other books followed, the Boy and his friends, including a penguin and a Martian, would find a global audience. In the Boy collection, readers get to see how he started out as a deceptively simple drawing in Jeffers’ sketchbooks that was then reiterated and developed.

The Boy's simple design lets readers put themselves into the story
“It was almost a case of making the characters as simple as possible but then applying a realistic sense light and shadow off very very simple objects,” says Jeffers. “And I think the simplicity and lack of origin for any of the characters helped globally as well because all across the world people think the boy could be where they’re from. And that the geography of the place could be their place. Something I’ve realised since is that the more vague you are, the more people can apply themselves to the story.”
Changing audiences
Speaking of finding wider audiences, Jeffers’ has noticed that picture books have become much more fashionable since he started out twenty years ago. “I don’t think picture books numbers have improved necessarily but I think they’ve found a way into other genres,” he explains. “I think with Instagram and social media, I think all of these things mean that it’s a good time to be making picture books, there are a lot more eyeballs looking.”
And it isn’t just children who are taking notice of his picture books. “I call them picture books rather than children’s books because I’m noticing that adults like to read picture books on their own accord. I think that’s a good thing. I think once adults forgive themselves for reading them they’ll be surprised by the subtlety and find that the subject matters are universal.”
The Boy: His Stories And How They Came To Be is out now.
Related articles:
-
Predicting coming web design trends is always tricky. Get it right and you are praised for being ahead of the curve; get it wrong and you are met with a flood of I-told-you-sos. That said, I'm going to push my luck to see if I can provide some insight into the trends that will define web design in 2019 and beyond.
We have seen some vast changes in the past decade: the HTML5 revolution, mobile-first app development and now native features in web apps, plus more new web design tools than you could imagine. With the increasing use of machine learning, cross-platform frameworks and a more diverse developer base building everything, there's going to be some exciting changes in our industry. These are my predictions for the biggest web design trends in 2019.
01. AI gets personal
Artificial intelligence is too hot to not bring up. While it might not be as flashy as a self-driving car, the web can certainly connect to AI. Machine learning is going to take analytics to the next level. In the past, analytics offered more of a reactive approach: log the data and then use it for your next release. 2019 and onwards is going to be about capturing data about how your app is used and improving the user experience by driving the website to change and adapt to this by itself.
This means that, depending on the data available on a user, the application will be able to act like a chameleon and change itself to provide the ideal UX for them. This will create truly personalised sites that behave differently and show different features depending on the individual using it.
02. Voice interfaces take over

Soon, voice will start to take over from traditional inputs
With the explosion of voice assistants such as Alexa and Siri, conversational interfaces are bound to become a natural part of an application's fabric. As more users become accustomed to interacting with the web using their voice, developers will need to ensure they can offer a seamless experience, even in web applications. Imagine having users sit on their couch and view their social media feed or tell their favourite voice assistant to pull up and read a news article for them – all without traditional inputs.
03. Accessibility becomes a requirement
Accessibility is no longer a luxury; it should be an absolute requirement. We're seeing this pop up more and more, and this trend will just continue next year. Something that we have pushed hard with Progress Kendo UI is to follow common accessibility guidelines like WCAG 2.1 and WAI-ARIA, to ensure our web components follow accessibility requirements out of the box.
This positive trend in accessibility focus will continue in the web. Whether this comes from development practices naturally emphasising accessibility, or governments and legislature stepping in to enforce adherence, we will have more accessible applications.
04. Web apps get an AR makeover

AI will no longer just be for games
Augmented reality will take the web by storm in 2019. AR is already commonplace in scenarios like Snapchat filters or Pokémon Go, but its use of AR will only expand to cover not only social media and games, but also everyday applications.
The beauty of AR is that it does not require full immersion via a clunky headset, as with VR. Instead, it can be used with the phones that we walk around with in our pockets today. Why should AR be limited to just the native mobile applications on a device? Why not use it on the web? Offering AR services through your web application without needing it to be installed as a native app can have huge benefits from a UX perspective.
Imagine being in a grocery store and doing a quick web search for a recipe. AR integration could provide users with turn-by-turn navigation through their mobile device to find all the ingredients within that store – all within a web app.
05. Developers flock to the web
In the past, everyone stuck to their favoured programming language. Then along came HTML5 and JavaScript went from being the language only for web to almost a universal programming language.
Of course, JavaScript has its own set of choices. While I cannot predict the rise and fall of JavaScript frameworks, I believe that once the dust settles, developers will realise that the basic concepts of these frameworks are completely transferable. This shifts the focus to better programming habits and architecture of web applications, rather than being akin to picking your favourite flavour of ice cream.
Frameworks such as NativeScript and React Native will also play a big part in bringing more developers to web technologies, since they provide a single codebase for web and native mobile applications.
Additionally, concepts like progressive web applications (PWAs) will continue to blur the line between native mobile apps and web. Developers will then be able to purely focus on the user experience without worrying about specific platform choices.
Web Assembly is another technology that is bringing more developers to the web. Thanks to Web Assembly, C++, C#, Rust and other programming languages can now target the web. Projects like Blazor, which leverages .NET in the web, take advantage of the promise of Web Assembly and will help open the web to even more languages. This means that in the future, all developers can be web developers, regardless of programming language.
06. Size matters again
We're going to start seeing developers trying attempting to make applications as small as possible. Previously the size of an application would be the biggest focus for web developers. However, recently this has taken a back seat as developers increasingly focus on their new favourite framework.
The average application has grown significantly in size, and although bandwidth has increased tremendously, it's important to remember that only certain people and areas will benefit from this. The size of our applications will hit a tipping point and we will see the trend go the other way, with devs once again taking pride in making their applications as small as possible. This not only means app that will feel faster, but it's also important for markets with slow and expensive internet connections, where every byte is precious.
07. The workforce gets more diverse
Online courses make training more accessible for more people
Beyond the technology, I believe what we see as the average developer and their background will also change. We already see this happening today but code camps will continue to provide us with more diversity in the developer workforce. Although not all coding camps are created equal, the overall concept is a great way of providing programming skills to an audience that would not normally have a chance to learn about development.
The emphasis on learning the basic tools and concepts of development and then continuing this education on the job is already proving to be a very good way of creating great developers. This trend will most likely continue and is a big step on the way to create a richer and more diverse community of developers, which is ultimately better for everyone.
This article was originally published in net, the world's best-selling magazine for web designers and developers. Buy issue 311 or subscribe.
Read more:
-
If you're so excited about Black Friday that you can't even concentrate on anything long enough to work out how many sleeps it is until the big day, then trigger warning: this probably isn't going to help.
But if you care about is getting the best Black Friday and Cyber Monday deals, then you'll know that for your best shot at scoring a bargain, it helps to have a bit of advance information. And as this post from Forbes reveals, you can already find out what some of the big names have lined up for Black Friday thanks to an ever-growing collection of leaked ads over at BestBlackFriday.com.
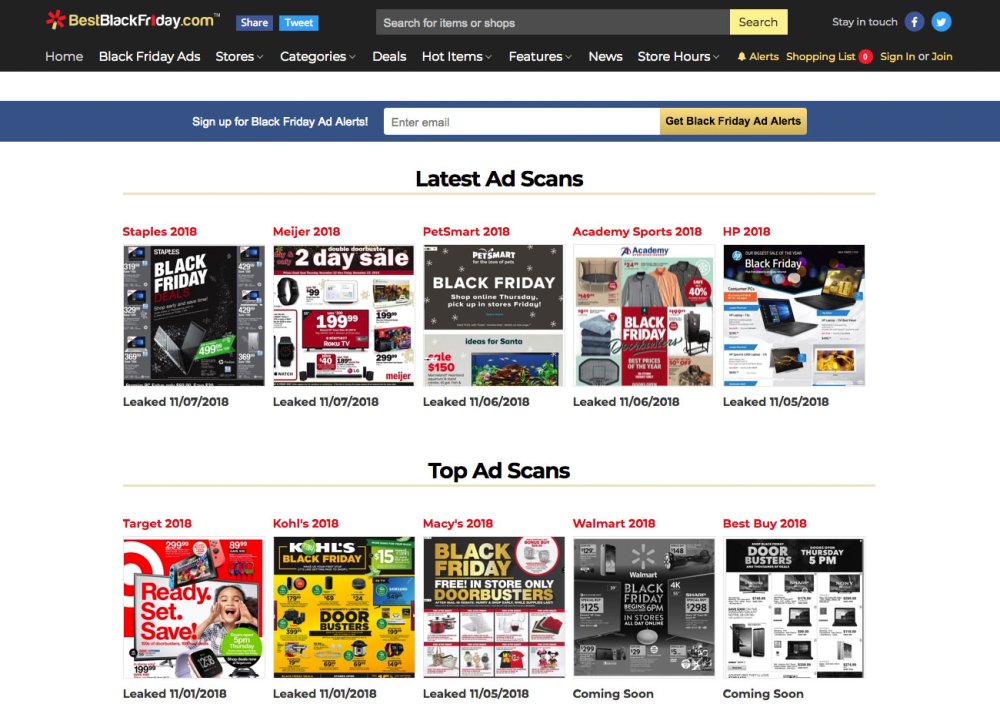
BestBlackFriday.com is gathering together the ads you want to see as they leak
The site already has leaked ads from the likes of Target, Staples and even HP, with some great deals on display including $330 off an HP Pavilion Core i7 laptop at Staples, $100 off a PlayStation VR from both Target and Meijer, plus some great laptop deals direct from HP including a limited number of 15t laptops reduced from $1,239.99 to just $499.99. saving you $740.

There are some great HP deals lined up, but you'll need to move fast
If you're hoping to snag some early Black Friday Apple deals then you're going to be disappointed for the time being; as yet there aren't any to be seen, and they're unlikely to surface until much closer to the big day. And we've yet to see the Black Friday ads from Walmart and Best Buy, which are sure to feature a lot of serious deals that you won't want to miss; Walmart Black Friday deals are likely to be the best for iPhone savings in the States, so keep an eye out there. And don't miss our post on Apple Black Friday deals if you're hoping to making some savings on Apple products.
For now you can check out the ads leaked so far on BestBlackFriday.com, read more of our predictions via the posts below and start planning your Black Friday and Cyber Monday strategy accordingly. Good luck!
Related articles:
-
Every year, Coca-Cola releases a Holidays Are Coming advert. Every year, it features a big red Coke truck strewn with twinkle lights, which is now synonymous with Christmas in many parts of the world. The 2018 advert (watch below) features all the classic accompaniments: a classic Santa, smiling children running through snow, a catchy jingle featuring sleigh bells.
Much less famous is Kevin the Carrot. But Aldi's festive vegetable, who first graced our screens in 2016, is stealing some of Coke's thunder this year with a Christmas campaign that looks very familiar. In the advert, a large truck winds through a snowy landscape; the sleigh bell jingle kicks in. This truck is orange rather than red (although you'd have to eat a lot of carrots to spot that), but other than that it's undoubtedly Coke-esque. Aldi has even purchased a real-life festive truck, which will be joining Coca-Cola's on its own tour of the UK.
While it's clearly a parody, people are not happy. Some are calling plagiarism; others feel that Aldi has ruined the perfect magic of a vaguely christmassy truck pedalling sugary drinks; some are missing the joke altogether. Here are some of our favourite Twitter comments so far.
However, it seems Coca-Cola isn't too upset to have gained a rip-off road-mate. In the spirit of giving, Coke has got in on the joke, with its GB Twitter account offering Kevin a hand.
Whether you think it's a smart parody or a festive travesty, one thing's clear: Aldi has won everyone's attention with this year's Christmas campaign. Let's see if it pays off.
Read more:
-
When I was first learning to create character rigs in Maya way back in 2002 while working on the Playstation 2 title Superman: Shadow of Apokolips, the rigs we used weren't most efficient, and Set Driven Keys (SDKs) were used for nearly everything.
The hands were driven by them and so were the facial expressions, in fact nearly every control had some sort of SDK involved. Don't get me wrong, the Set Driven Key is a powerful tool in Maya, but you might have to plough through a load of Maya tutorials to figure it out. It can be time-consuming to set up, and is easy to break and a pain to fix. Plus, your scene size can end up bloated by animation curve data.
Over the past few years I have been experimenting with another approach in Maya, but this time for more high-end rigs as opposed to game ones. One which is more efficient and in most cases easier and much quicker to implement into a rig. The process should give you the basics of rig creation.
In this tutorial, I will be taking you through the steps of rigging a character's face, but rather than focusing on the more basic areas like joint placement and weight painting, we will be looking at an often overlooked aspect of Maya… the utility nodes.
The word nodes can seem like an intimidating one and be associated with highly complicated rigs involving locators, splines and other complex systems, but don't worry. With this setup you will be using a combination of blendShapes, joints and nodes to make a highly flexible character capable of a wide range of emotions.
Once you have followed this process you can then adapt this rig for another character, adding more controls to simplify animation and make it easier to create 3D art. There's also a video to accompany this tutorial.
Find all the assets you'll need here.
01. Create mesh topology
Make sure your edge loops follow muscle lines
Before you start to build your rig, you need to do some investigation work. The model you are rigging and its topology are critical to how well the character will move, especially if, like in this instance, you are focusing on the face. It's important that the topology is not only clean but that the edge loops follow natural muscle lines. If they do the face will deform in a much more realistic way.
02. Make foundation shapes

Create your first batch of blendShapes
Once you are happy with the topology it's time to start creating your first batch of blendShapes and doing this now will also highlight any trouble areas with the mesh early on. These blendShapes are full facial poses covering all the main expressions needed, but sectioned into key areas like the mouth and eyes. We are looking for the fundamental shapes here like a smile, frown and so on, as well as the upper and lower eyelids fully closed.
03. Add more shapes

Remember to add blendShapes for both wide and narrow mouths
With this rig you are going to rely on eight main controls to manipulate the lips so it's important to also add blendShapes for a wide mouth as well as a narrow one which could also double as the pucker. This is so manipulating a single control can essentially pull around the corner of the mouth to achieve a wide number of expressions and move between all four blendShapes at once.
04. Split the blendShapes
Split your shapes into left and right sides
With the main shapes created, it's time to move to phase two. What you need to do next is split them into left and right sides meaning you can pose them independently. A quick way to do this is to create a blendShape node and then edit its weights, as illustrated in the box on the left. This will limit its influence to just one side of the model meaning you can then duplicate it and keep this copy to create your specific side.
05. Build the skeleton
Next up, build your skeleton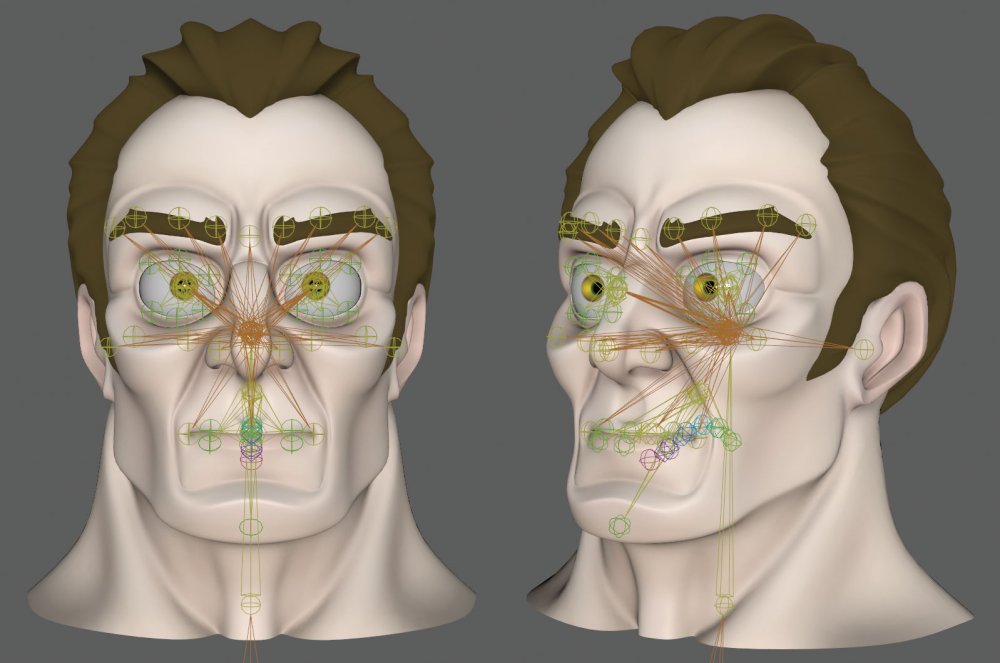
The next stage in the facial rig is to build your skeleton and as mentioned earlier, for this setup we are going to be using both joints and blendShapes to pose the characters features. I like to use blendShapes as they can give you more precise shapes, but then the joints can help to push and pull areas of the face around to give you more flexibility.
06. Controls or a UI?
Whether you use controls or a separate UI is up to you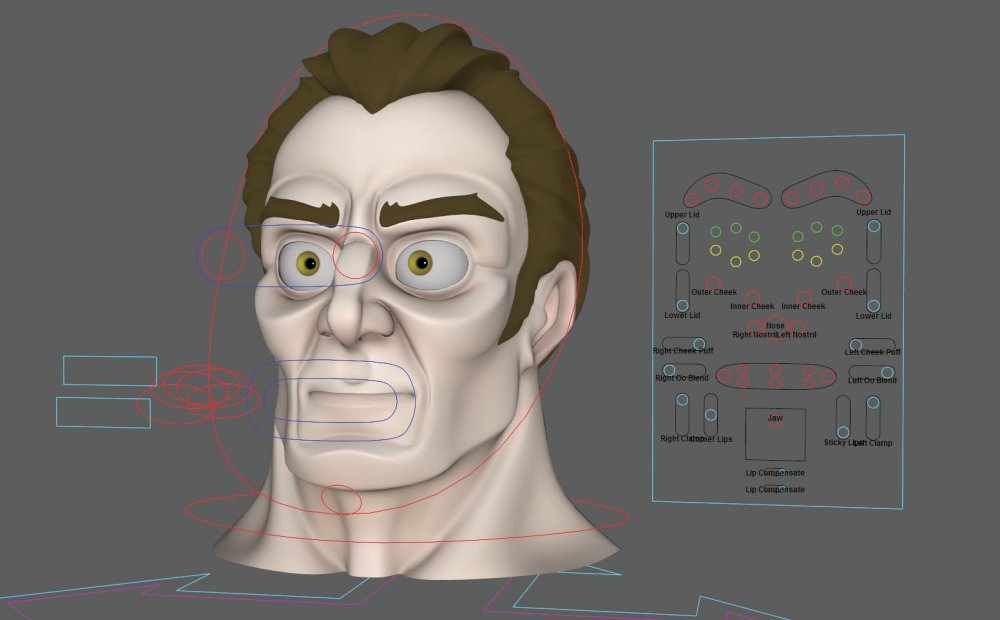
Whether you create controls which float in front of the character's face or use a separate user interface is up to you, or more likely up to the animators who will be using your rig. Now it's time to start creating these controls and for this tutorial we will be using a combination of the two. A main UI will be used to control the majority of the blendShapes, but a series of controls will also help to manipulate the rig in places where it needs to move in all three axes.
07. Use direct connections
Avoid scenes like this by using direct connections
When using a separate UI as we are, you have to approach the rig differently. Traditionally you could use Constraints to tie a specific joint to its master control and in turn this control would naturally follow the head. With a UI, the controls are static and don't follow the head so using Constraints will lock the joints to the controls meaning if you move the head the joints stay where they are. A way around this is to use direct connections instead of constraints.
08. Driver locators
Direct connections have their own issues you'll need to work around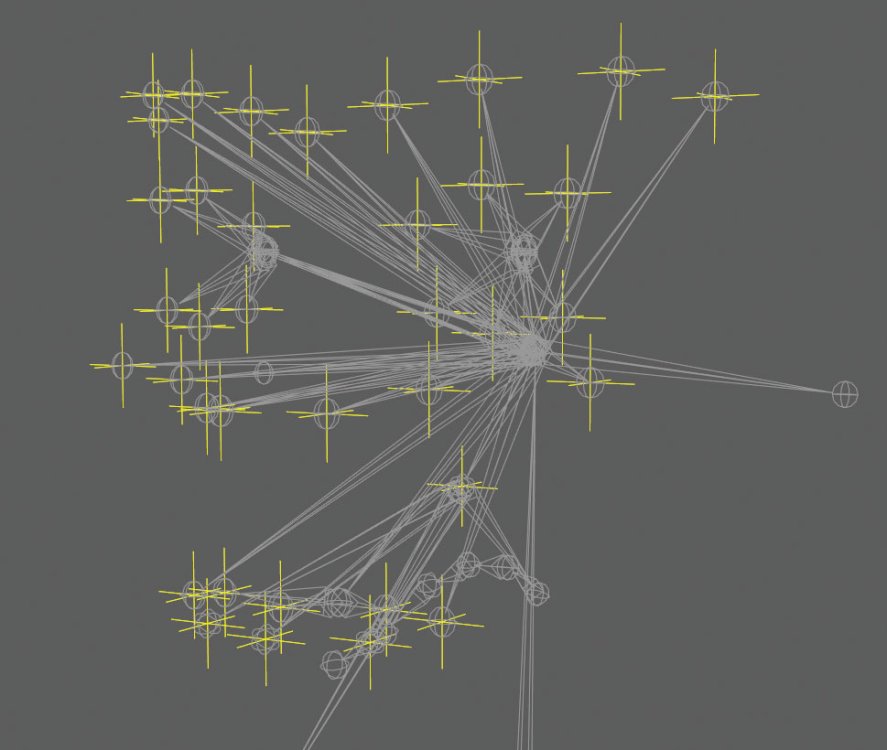
But using direct connections via the Connection Editor will force the translations, rotations and scale attributes to match those of the controls. Your joints inherently have translation values applied which will end up changed when connected. You could work on an offset system or you could create a locator in the place of each joint, freeze its transforms and then Parent Constraint the joint to the locator. So the locator, now with zero attributes, will drive the joint.
09. Connect the locators
Use the Connection Editor to hook up controls to the locators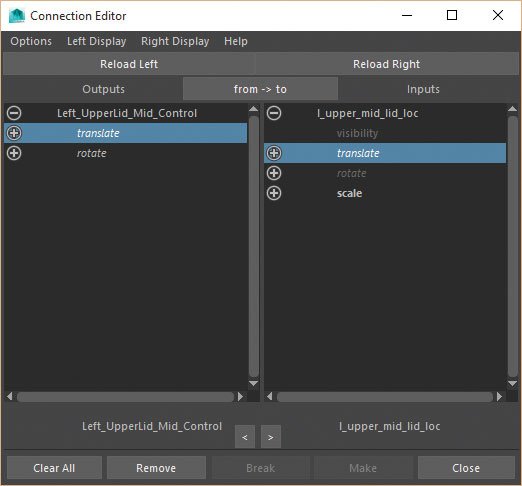
With the locators now in place and the joints parent constrained to them, you can connect the controls from the UI's attributes to the locators using the Connection Editor. If the locators are also parented to the head control they will follow its movement regardless of where the UI controls are. Also, the joints will now move relative to the head's position and not be locked to the UI meaning you can also place the UI anywhere in the scene.
10. The condition node
A condition node, yesterday
It's time to start connecting the blendShapes and introduce the first utility node, which will be the Condition node. This is my favourite utility node and what it does is take a value, like the Y translation of a control and, if it goes over or under a specific value it outputs another value. As an example, if the control goes over 0 in the Y translation then we can trigger the smile blendShape, if not, it is ignored. So let's set this up.
11. Bring everything in
Just bring it all into the node editor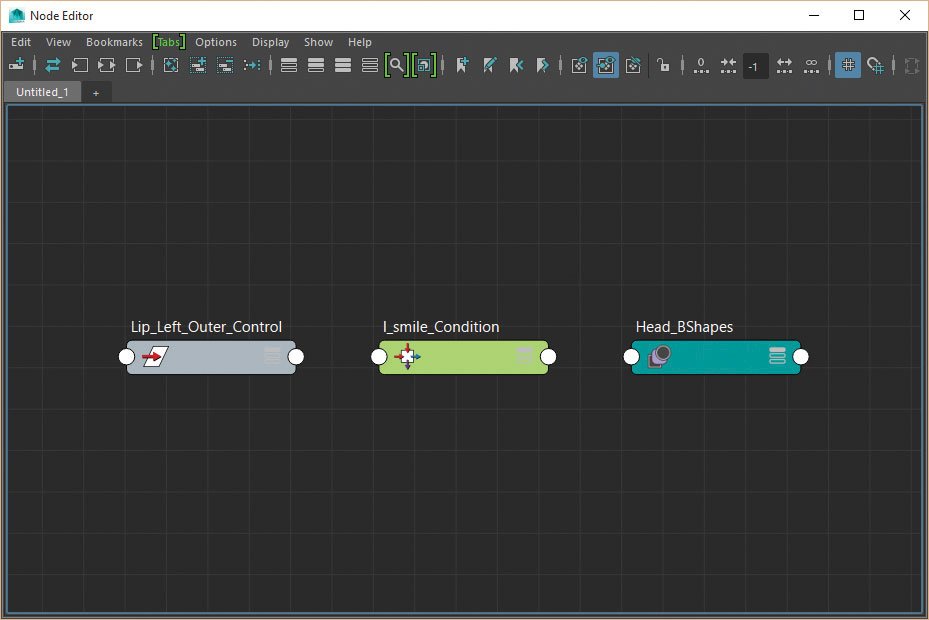
Open the Node Editor and select the Lip_Left_Outer_Control, clicking the Add Selected Nodes to Graph button to bring it in. Now press Tab in the Node Editor and start typing Condition in the small window and select it from the menu below to create it. Finally select the main blendShape node on the character's head model, called Head_BShapes, and follow the first step again to bring it into the Node Editor.
12. Connect the node
This is where it starts to get a bit complicated; hang in there!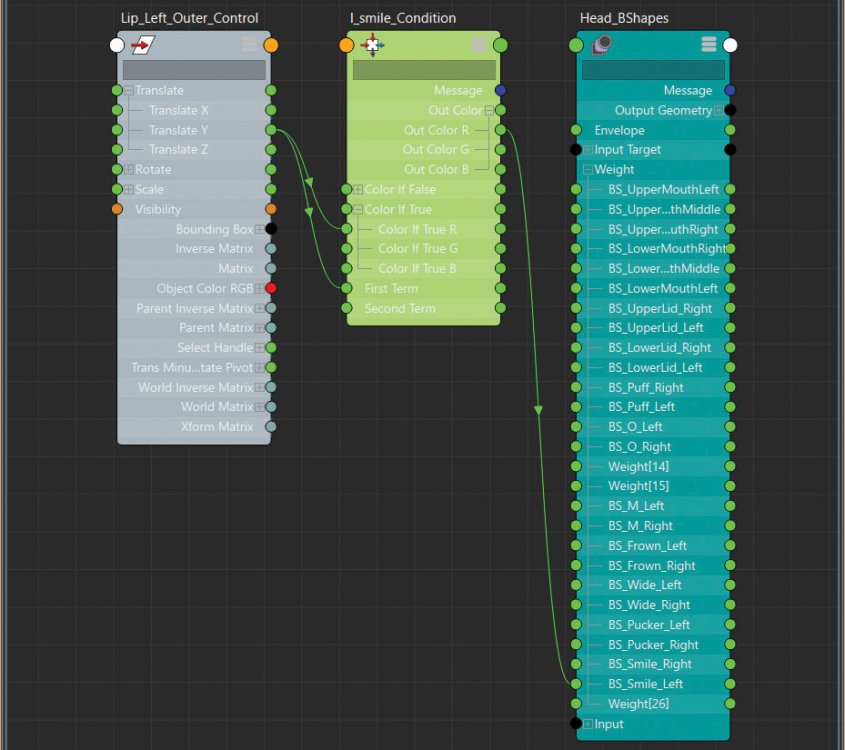
Now connect the Lip_Left_Outer_Control.translateY attribute to the First Term attribute in the Condition node.
Leave the Second Term as 0 and change Operation to Greater Than.
Next connect Lip_Left_Outer_Control.translateY to the ColorIfTrueR. (This means when the First Term is Greater Than the Second Term it will use the true value.)
Connect the OutColorR attribute to the Left Smile blendShape attribute and move the control to see what happens.
13. MultiplyDivide node
Slow down the smile blendShape's movement a bit
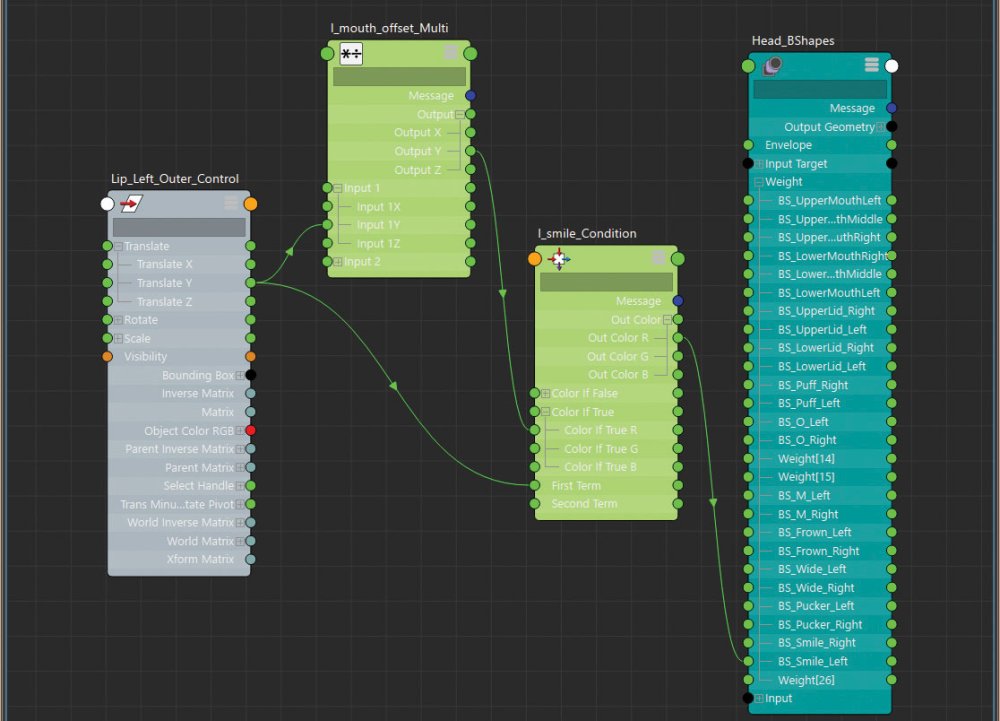
The smile blendShape is now triggered only when the control is moved in the Y axis, but it may be influencing it too much. You can use a multiplyDivide node to reduce its influence and slow down the movement. In the Node Editor press Tab and create a multiplyDivide Node.
Connect the Lip_Left_Outer_Control.translateY attribute to the input1Y attribute in the multiplyDivide node and its OutputY attribute to the ColorIfTrueR attribute on the Condition Node.
14. Adjust values
Change the Input2X attribute to alter how much stuff moves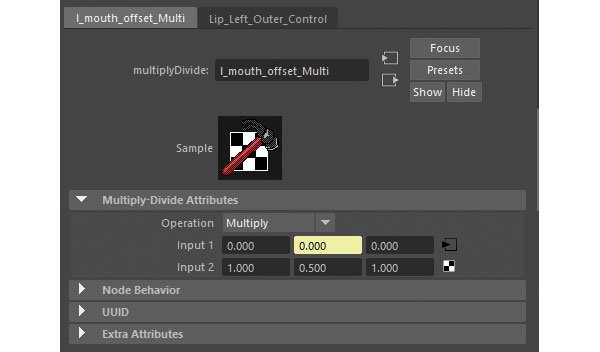
When you move the Lip_Left_Outer_Control, the smile will look no different, that is until you adjust the Input2X attribute in the multiplyDivide node, which is the amount the Input1X value is being divided by. Changing this to 0.5 will halve the amount the blendshape moves because it's halving the Y translation value. Equally, a value of -0.5 will reverse it and half it, which is important to remember when you connect future controls.
15. Connect more controls
Use the same process to trigger the wide mouth blendshapes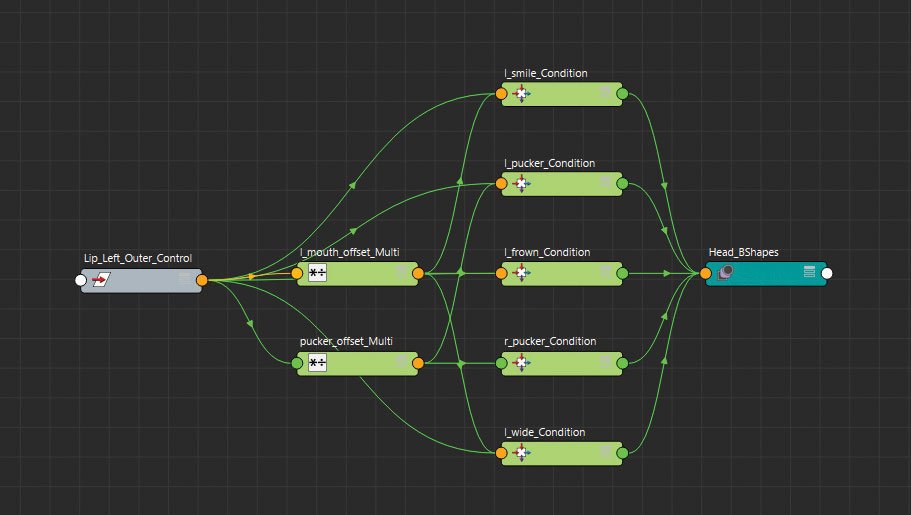
That's just the smile blendShape added, but you can now follow the same process to make the X translation of the control trigger the wide mouth blendShapes. With the opposite directions, so a minus X and Y movement, trigger the pucker and frown shapes, making sure you also change the Operation in the Condition node to Less Than. This will ensure that those blendShapes are triggered only when the value drops below 0 rather than above.
16. UnitConversion node
Use a simple direct connection for jaw movement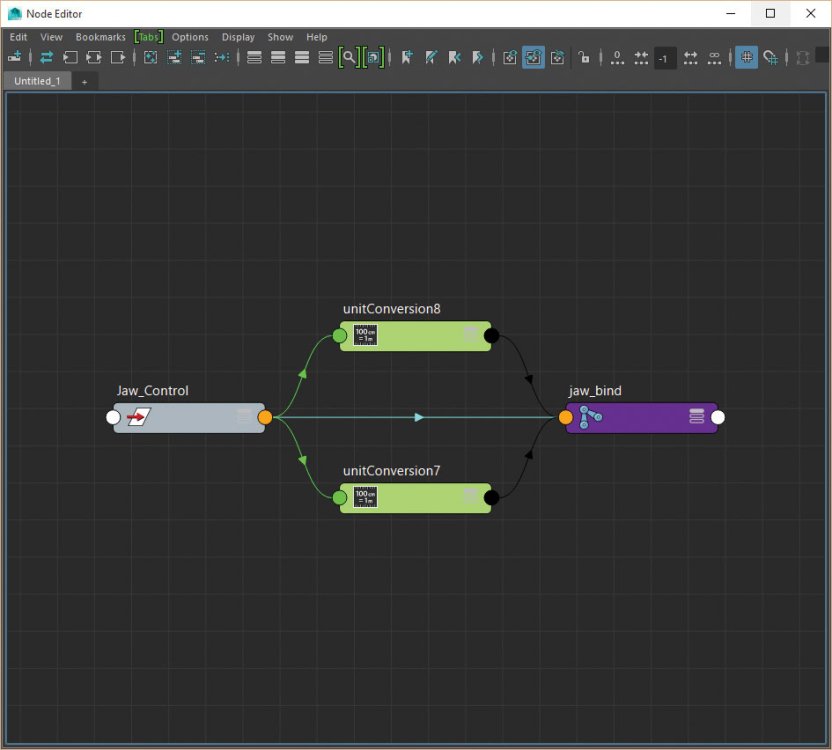
You don't always have to create a new node to edit the influence a control has over something. With the jaw movement, rather than use a utility node you can use a simple, direct connection to make the translations of the control effect the jaw joints' rotations. When connected Maya will automatically create a unitConversion node by default between the connections which you can use to your advantage.
17. Slow the jaw
Edit the Conversion Factor attribute to slow the jaw down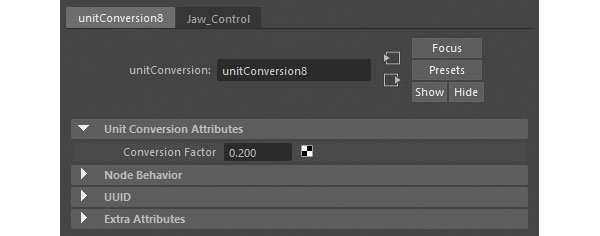
If you find your jaw is rotating too quickly you can then edit the Conversion Factor attribute found in the unitConversion node, rather than introducing another multiplyDivide node to slow it down.
18. BlendColors node
Use the blendColors node to blend between two other values or controls
With just these few nodes you can see how much we have achieved and from here you could happily work your way around the face and connect up the remaining controls. We can, however, do more with the help of the blendColors node. Even though this can work with your typical RGB values, you can also utilise this node to blend between two other values or controls, making switching and blending easier.
19. Make sticky lips
Make lips stick together with the blendColors node
An important part of any mouth rig is for it to have the ability for the lips to stick together, regardless of where the jaw is. Imagine the character needs to chew something, even though the jaw is moving the lips need to remain sealed. To help achieve this you can use the blendColors node to dictate whether the lower lip driver locators follow the jaw or the upper lip control.
20. Lip groups
Divide the lip control locators into three groups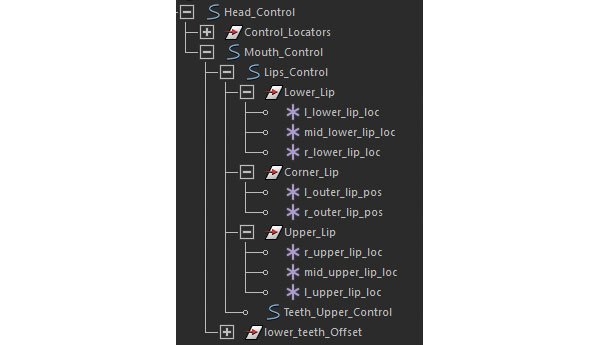
First you need to divide the lip control locators into three groups. Upper_Lip, Lower_Lip and Corner_Lip and make sure their pivots are in the same place as the jaw joint. This is so they rotate around the same point. Next bring the StickyLips_Control, Lips_Control, Lower_Lip group and also the Jaw driver locator into the Node Editor and create a new blendColors node.
21. Connect the lips
Hook all these things up to a bunch of other things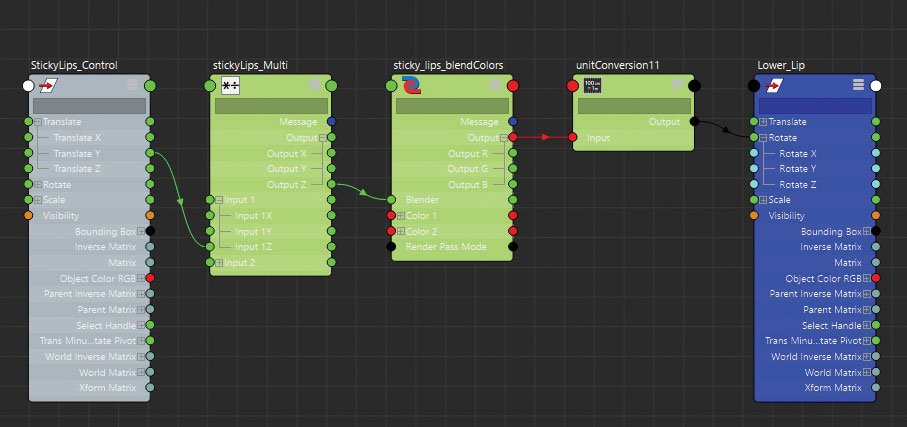
Connect the Lips_Control.rotate attribute to the blendColors.color1 attribute. Repeat with the jaw locator connecting its rotations to the blendColors.color2 attribute.
Connect the blendColors.output into the Lower_Lip group's rotation attribute. If you manipulate the Blender attribute on the blendColors node the lower lips will blend between the two values.
Connect the StickyLips_Control's Y translation into the Blender attribute so the control drives it.
22. Blink-tween shape
You may need to create a halfway point blendshape for when eyes are partially closed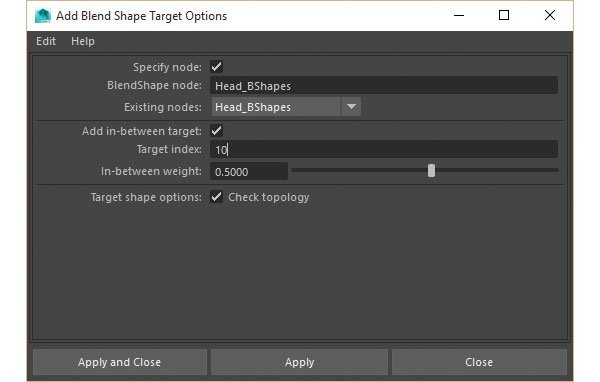
As an extra tip you may find that due to the linear nature of blendShapes, the eyelids move through the eyes when activated rather than over them. In this instance you may need to create a halfway point blendShape for when the eyes are partially closed. This can then be added as an in-between target on your blendShape node, which is then triggered up to a specified point before the main shape takes over.
23. Honorable mention
Shout out to the Reverse and plusMinusAverage nodes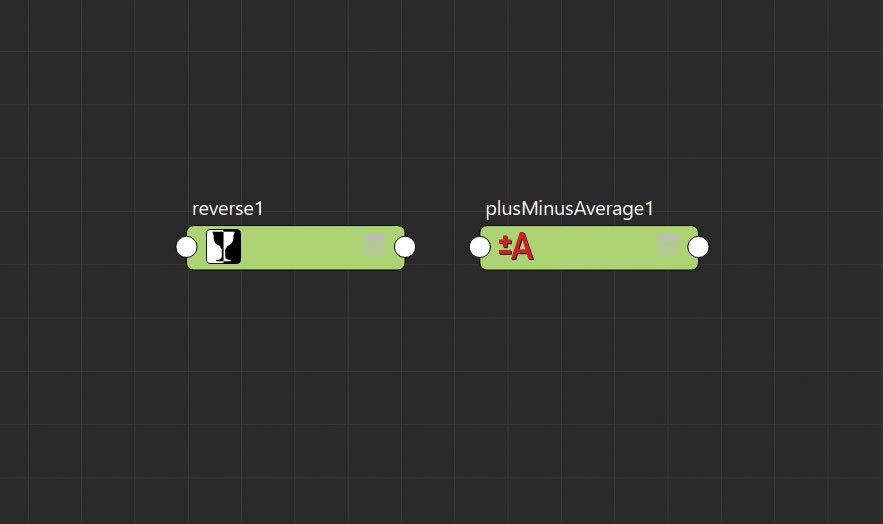
I couldn't end the tutorial without mentioning a couple of other handy utility nodes which have helped me over the years. These are the Reverse and plusMinusAverage nodes. The names are pretty self explanatory with the Reverse node effectively inverting a given value, the plusMinusAverage node is similar to the multiplyDivide node, except it allows you to perform different mathematical equations.
24. Time to experiment
Now go ahead and play around with it all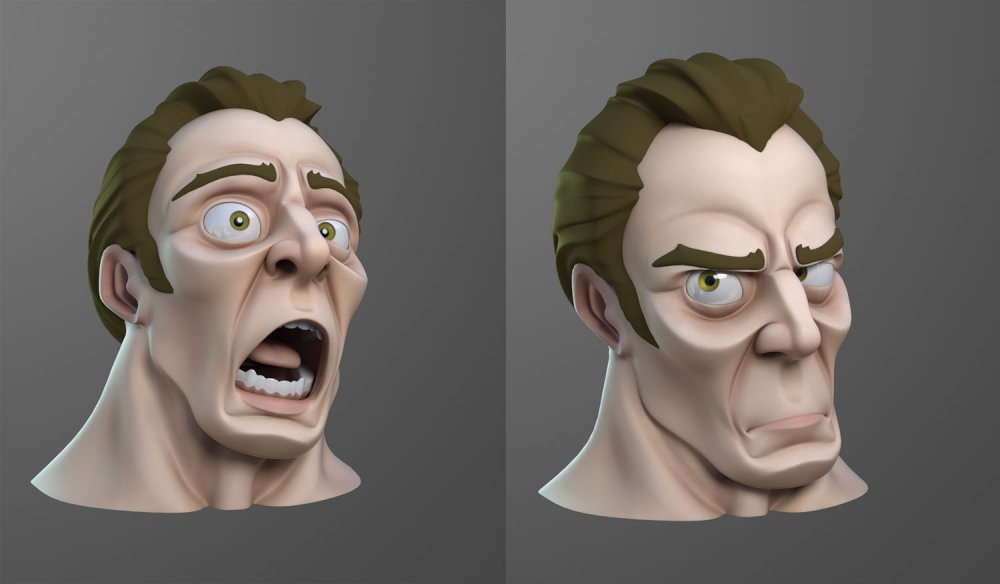
If you would like to see more of this rig, download the accompanying video and associated files, and feel free to take a look at how the rest of the character has been set up.
This article originally appeared in 3D World magazine, the world's best selling magazine for CG artists. Subscribe here.
-
You're reading The Short History of Website Building [Infographic], originally posted on Designmodo. If you've enjoyed this post, be sure to follow on Twitter, Facebook, Google+!
![The Short History of Website Building [Infographic]](https://designhost.gr/applications/core/interface/imageproxy/imageproxy.php?img=https://designmodo.com/wp-content/uploads/2018/11/The-History-of-Website-Building-747x420.png&key=749df4d87da2a446b86a0ffe369ccd7b4c6d1b8d58364ff5762f88a9790ec28b)
Website design has come a long way in a relatively short time. From zeros and ones to lines of code to intuitive website builders, designing for the web has become more accessible. But how did it all evolve? From significant …
-
Firmware updates won't address the problem, so admins need to take other action.
-
The inventor of the World Wide Web, Tim Berners-Lee, has launched a global campaign that aims to save the online world and protect the people who use it. Citing the profit-first actions of ecommerce websites and fake news as some of the problems with the web, the campaign's 'Contract for the Web' has already attracted signatures from over 50 organisations, including Facebook and Google.
The announcement was made at the opening of the Web Summit hosted in Lisbon. During his talk, Berners-Lee asked for governments, companies and individuals to support what he has dubbed the 'Magna Carta for the web'. With half the world set to be able to get online in 2019, the contract has come at a pivotal time.
"For many years there was a feeling that the wonderful things on the web were going to dominate and we’d have a world with less conflict, more understanding, more and better science, and good democracy," Berners-Lee told the Guardian. "But people have become disillusioned because of all the things they see in the headlines."
The web is functioning in a dystopian way
Tim Berners-Lee"Humanity connected by technology on the web is functioning in a dystopian way," he added. "We have online abuse, prejudice, bias, polarisation, fake news, there are lots of ways in which it is broken. This is a contract to make the web one which serves humanity, science, knowledge and democracy."
As for its principles, the contract demands that governments make the internet available to its citizens all of the time. Meanwhile, for companies, Berners-Lee wants them to commit to making the internet affordable and accessible to all.
Respect for consumer privacy and personal data is another headline feature, as well as ensuring that technologies are developed to ensure the web becomes "a public good that puts people first".
Early signatories to the contract include Facebook and Google, both of which have made headlines recently for their actions involving data handling and censorship. Yet despite this, Berners-Lee remained optimistic that corporations are looking to improve.
"People in the big companies are concerned about truth and democracy," he says. "They don’t want people to look back and say theirs was the platform that misled people to vote against their own best interests."
"The genie may seem to have come out of the bottle, but the internet has surprised us many times. Things change."
Related articles:
-
Chances are you’ll have heard of 4K – after all many of us now have 4K TVs – but what about 8K? Naturally display manufacturers always want to upgrade us to the latest standards, but as creatives we’re obviously interested in the latest upcoming standards.
While we’ve seen some 5K monitors appear – and we’ll look some of the models available below - 8K should be seen as the next step from 4K for TVs and video production and will become standard in the computing world, too. But although we’re starting to see some 8K displays become available, there’s hardly any 8K video content out there. That’s not such a problem in the computing world as it simply means you can fit more pixels - and so more desktop and higher resolution content - on your screen.
But it does mean that mass adoption of 8K TVs and monitors are some way off, probably another decade. In terms of monitors, it’s certainly several years from now before they are a serious option in terms of price. If there are more 8K panels out there, the prices will come down.
So if you’re looking for a monitor now it’s still worth taking the plunge, especially with Black Friday and Cyber Monday almost upon us.. You probably want to check out our guide to the best 4K monitors and take a look at the 5K options below, too.
What is 8K resolution?
8K images are 7,680 pixels horizontally by 4,320 vertically. It’s not quite 8,000 pixels wide – hence the 8K name - but it’s close enough. Like 4K (3,840 by 2,160) has double the pixels but four times the resolution of Full HD (1,920 x 1,080), 8K has four times the resolution of 4K (and double the number of pixels). So therefore, 8K is 16 times the resolution of Full HD.
All this means that the pixels on 8K displays will be indistinguishable to your eyes because there are over 33 million of them.
Like 4K, 8K will also be referred to under the umbrella name of Ultra High Definition (UHD) although it will be interesting to see how manufacturers distinguish that for consumers.
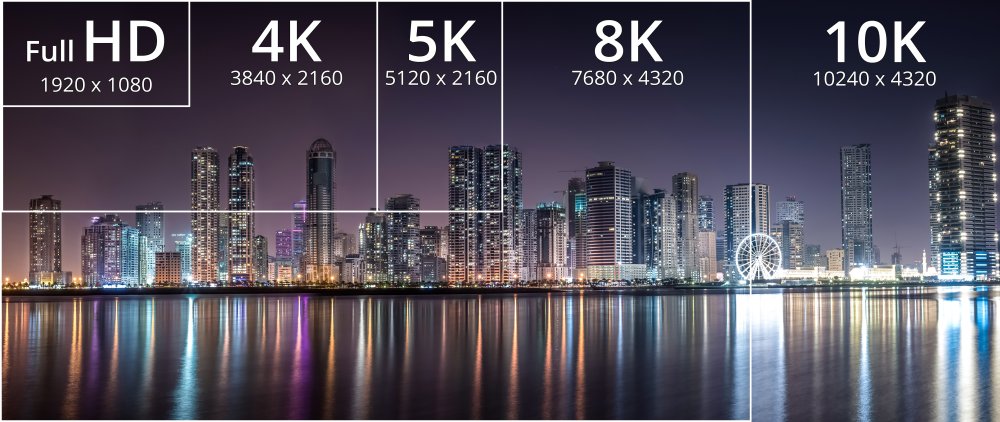
So what’s out there?
8K monitors will hit the market over the coming years but somebody fired the starting gun early – in 2017 in fact. And that was Dell with its 32-inch UltraSharp UP3218K. It’s expensive at over £3,000 and needs two DisplayPort 1.4 connectors free on your powerful graphics card to display the full resolution at 60hz.
Talking about graphics, there aren’t a huge number of graphics chips that currently support 8K – you’ll need a latest-gen AMD Radeon Pro or Nvidia GeForce card to make full use of the resolution.
The main problem with using a computer with 8K at the moment is that user interface elements aren’t geared up for such a high resolution – an app like Photoshop will only scale its user interface to 200 percent, which isn’t enough for comfortable use.
Dell’s 8K display is clearly ahead of its time, but it’s not looking as futuristic as it did a year ago. That’s because TV manufacturers are also starting to release the initial batch of 8K sets. There are several reasons why manufacturers like Samsung are keen to leap and not just because they like to say they were first. They also want to pull the market with them, so all manufacturers will currently be looking at their options for 8K. Another reason is that 8K content isn’t necessarily required from the off; the powerful image processors inside these TVs will be able to upscale content – so 4K content to 8K. It’s also true that 8K will have impact in the Far East far earlier than in Europe and the US; Japan is expected to launch an 8K TV channel in time for the Tokyo 2020 Olympics, for example. But it’s clear that easily 8K content is a way off. There’s also a problem with the delivery of it – it will need a lot of bandwidth to deliver it, potentially 80-100Mbps, so streaming 8K via broadband connections is also a way off.
So we’ve put together a short buying guide to the 8K display that’s available now plus a couple of 5K options if you want to upgrade your existing display.

Even though this display will look amazing on your desk it’s hard not to wince at the quite considerable price tag. But for your high outlay you will get the future here and now. But unless you’ll need to edit 8K over the next few years or deal with particularly high-res photos, don’t expect to future proof for a decade in the future. By the time 8K is a fixture, this screen will surely outdated, its IPS screen technology in particular replaced by some of the specifications we’re seeing in high end TVs now, such as OLED – Dell itself has experimented with a 30-inch OLED monitor itself.

This fully-featured and height-adjustable Iiyama display is a budget way of getting that extra K – if a display that costs over £600 could ever be called budget. It’s also one of the only 5K options currently available. It also boasts blue light reduction tech for late night working.
The Iiyama has an LED display as you’d expect from a monitor at this price point (many significantly less expensive 4K monitors also have high quality IPS LED panels). Talking of 4K, the equivalent 4K Iiyama is around £160 less, so you’ll need to really want those extra pixels to make this a worthwhile purchase.
This smart black IPS LED 5K display has a super-thin bezel but a super high price compared to the Iiyama above; is it really worth the extra? In pure price terms no, but it does boast the compelling addition of Thunderbolt 3, meaning you can attach a single cable directly to one of the ports on your 2016 or later MacBook Pro for both 5K display data and power, too. That’s right you can charge quickly (85W) from the same cable that carries all those pixels. There are also three USB-C downstream ports for connecting up other peripherals. What’s more, the macOS-optimised LG Screen Manager can also be used to divide up your screen into different frames depending on what you need.
Read more:
The secrets of good logo craft revealed
in Ειδήσεις από τον χώρο του Design και Hosting
Posted · Report reply
In today’s world of fast-paced consumerism and multi-platform media, it takes smart logo design to successfully attract – and retain – people’s attention. This month’s issue of Computer Arts (issue 286) speaks to the creatives, businesses and design elite working to achieve timeless logos design – delving into the techniques the best brands are employing to create logos equipped to communicate their message in 2019 and beyond.
Buy Computer Arts issue 286 now
We speak to leading creatives about how they deal with mental health problems
The issue also sheds light on the pervasive problem of mental health issues in the design industry. We question those affected, and ask what can be done. With so many creatives striving to achieve perfection in their output, it’s vital to highlight the importance of mindfulness, and why sometimes it's okay to not be okay.
Today's logos must work across multiple platforms if they are to stand out
Save up to 60% on a Computer Arts subscription
Elsewhere, Ruth Hamilton speaks to renowned illustrator Yuko Shimizu to learn more about her journey from PR professional to award-winning illustrator; Andy Culbert reveals the best branding practices key to gaining the attention of Gen Z; and design studio The Beautiful Meme talks us through how it built the identity for Twentytwo, a new lifestyle-drive workspace in London. And we’ve barely scratched the surface!
Take a closer look at what's inside Computer Arts issue 286 by scrolling left to right through the gallery below.
Computer Arts is the world's best-selling design magazine, bursting at the seams with insight, inspiration, interviews and all the best new design projects. For all this delivered direct to your door each month, subscribe to Computer Arts. Right now you can save up to 60%, and receive a free Computer Arts tote bag when you subscribe.
Related articles:
View the full article