-
Content Count
15,132 -
Joined
-
Last visited
Never -
Feedback
N/A
Posts posted by Rss Bot
-
-
It's a busy time in the world of rugby. 2019 sees the Rugby World Cup take place in Japan, and next year's annual Six Nations Championship is just around the corner. Ahead of these events, Engalnd fans just have enough time to get used to the recent rebrand of England Rugby courtesy of London-based studio Onwards. Created to encompass everything from poster designs to social media platforms, the new look is centred around diversity.
England Rugby, formerly known as Rugby Football Union, was keen on the idea of diversity because it reflects the changing and more inclusive nature of the game. What was once seen as an upper-class, elitist sport has evolved into a more open and multicultural game.
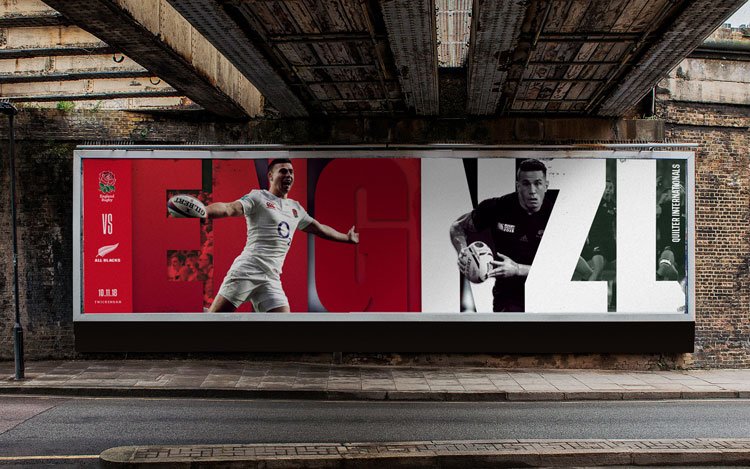
The new identity captures the changing nature of rugby
To get this message across in its rebrand, named 'The Game of Our Lives', Onwards developed an identity based on a timeline device. "This linear system creates a home for storytelling in the brand, enabling us to showcase in a huge array of diverse content - from social posts to grassroots imagery to elite footage, while always remaining on brand," says the studio.
These themes are brought to life with imagery from social media and the sans-serif typeface Tusker Grotesk. This typeface is used throughout the branding in a range of weights and styles to communicate that people of all shapes and sizes can get involved with the game. Its bold style also reflects the tough nature of the game, with different textures and layering systems evoking its rough and ready nature.
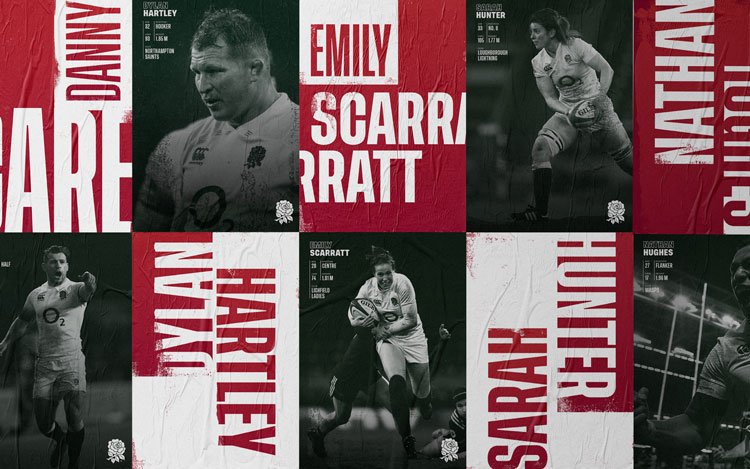
Text is used in a dynamic way throughout the rebrand
Fans will be relived to see that the logo of the England rose has remained unchanged. The red and white's distinctive colour palette has also been retained, by and large.
England Rugby's head of brand, Ed Curran, is confident that the new identity is the perfect showcase of where the sport is at the end of 2018. "Onwards have designed an outstanding identity that enables us to communicate flexibly to all our audiences and has breathed new life into our brand.
"As an organisation we have a wide remit and this new brand gives us a platform to speak in a far more engaging way to supporters and players alike."

The new identity has been specially built with social media in mind
Related articles:
-
Want access to a seemingly endless supply of vector graphics? Look no further than StockUnlimited Vector Plan: Lifetime Subscription. This store features 500,000+ Premium vector designs, with thousands more being added every month.
All content is royalty-free, and you can use it for both commercial and personal use, whether you need the vectors for web banners, newsletters, blogs, or presentations. If you're an entrepreneur, blogger, graphic designer, or advertiser, this is an essential subscription to have.
There are no hidden fees, and you can download as many as you want, as often as you need. Get it now for just $34.99.
Related articles:
-
There’s a lot of competition when it comes to jobs in the creative industries, so you need to make sure you stand out from the crowds. One of the best ways to get yourself and your work noticed is with an online portfolio, and it doesn’t need to be as time-consuming or complicated as you might think.
Coding optional portfolio platform Format offers a comprehensive toolset to help you create a professional-looking website with ease. Whether you’re just starting out in the industry, or a seasoned pro, Format offers full customisation, flexible layouts and premium fonts to enable the creation of a portfolio that showcases your talent and personality in all its glory. Here are four reasons why you need to do exactly that.
Easily found, easily hired
The creative industry is competitive, yes, but it’s also booming, which means there’s plenty of jobs for the taking. However, the downside to this is it means potential employers have very little time to find, and therefore hire, new talent, so you have just seconds to make a lasting impression. Format’s fully flexible, customisable website themes will enable you to create an online portfolio that’s so impressive, hiring managers will race to hit the ‘contact’ button. Remember, the easier you are to find, the easier you are hire.
Time is money
Your clients are busy people, but you are too, right? Time is money for a creative and you no doubt have very little to spare, so the last thing you need is to be spending hours updating your portfolio. With Format, you can stay relevant at the click of a button, simply add your best new work and tailor your portfolio per application at the click of a few buttons. Simply update, save and voila!
Stay ahead of the game
Keeping up with the fast pace of the creative industry is vital if you want to succeed. And with Format you’re already one step ahead. As well as being able to create a kick-ass online portfolio, Format’s platform provides access to e-commerce, client proofing, marketing and blogging tools too. So if one day you want to sell your designs online or create a marketing campaign, Format has you covered.
The key to success
There’s still a lot to be said for traditional portfolios, however very nature of the medium means getting any feedback can be a slow and tricky process. The beauty of an online portfolio is, even though it may seem daunting presenting yourself to the world, it provides a huge amount of scope for constructive feedback. Especially with Format. The Format support team is made up of creators, just like you, who are available to answer any questions you might have about your website and how best to present yourself, so ask away and get your portfolio in the best shape it’s ever been.
There’s no doubt about it, having an online portfolio is a must if you’re serious about making a career in the creative industries. Format provides all the information and tools you need to create a fully customisable, stand out portfolio, without the need to navigate tricky programming. So what are you waiting for? Get started with Format today and watch the commissions come rolling in.
-
Affinity Designer is a popular vector art tool. As well as Mac and Windows versions, Serif recently released Affinity Designer for iPad.
Nowadays, if you are designing for the web and apps, you need to be working with multiple devices and resolutions in mind. This can lead to multiple artboards and serious headaches when it comes to keeping things uniform. Fortunately, Affinity Designer can help you streamline this process a little more, with something called constraints.
In this tutorial we will briefly go into the fundamentals of constraints and how they work. Watch the video below for an overview, or read on for five essential tips for using constraints in Affinity Designer.
Also don't forget to check out our articles on how to use grids and how to use the Export persona and how to use the Pen tool.
01. Parent and child objects
Child objects will scale relative to the parent container
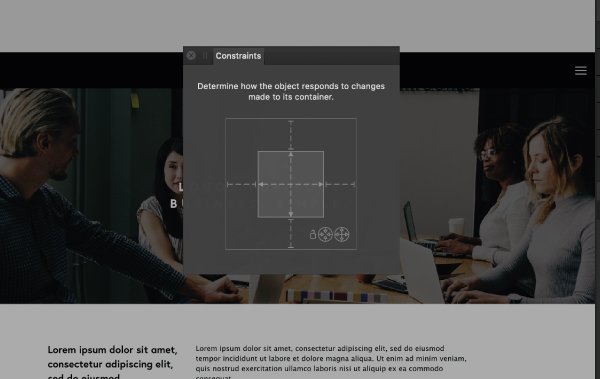
Constraints work by using parent and child objects. Your selected object is the ‘child’, and the container is known as the ‘parent’. Child objects will scale relative to the parent object.
For example, if you alter the size of your artboard and your child object is anchored to your artboard, it will respond with the change. You will need to toggle the various options to achieve your desired outcome.
02. Toggle constraint options
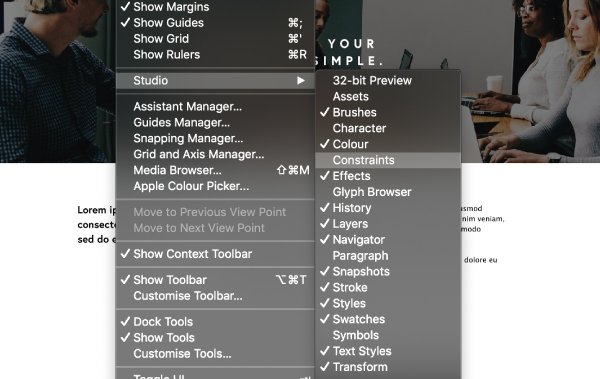
To enable constraints, go to View > Studio > Constraints. From there, you'll get a popup menu showing the constraint options. The inner square is where you toggle the constraints of your child object, and the outer square is your parent object.
03. Apply constraints
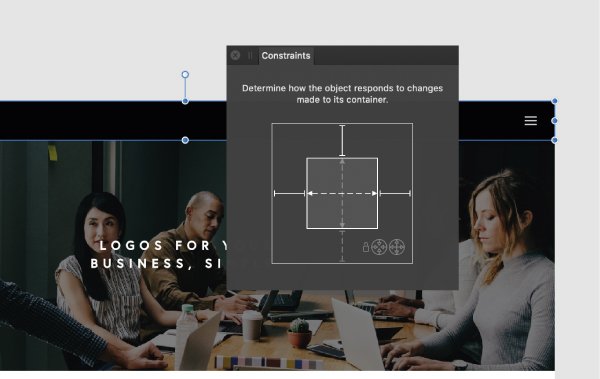
These options will dictate how your content anchors to the artboard
As we mentioned before, anchoring objects to the artboard will cause them to resize with the artboard. However, in order to maintain the spacing between objects and avoid distortion, we need to set certain rules.
In this example, I'm working with a website header, logo and menu navigation. For the header (pictured above), I enabled constraints on the left, right and top of the object. This means that the header will be anchored to the left, right and top of the artboard, no matter how the artboard is scaled.
For the site title I enabled constraints on the left and top of the object. If you were to enable the right container/parent constraint, the design would distort. The navigation is similar, but with the right side enabled, because it sits on the right. Once you have practised this a couple times it will make much more sense! It might also help to watch the video above and see this in action.
04. Paste constrained items
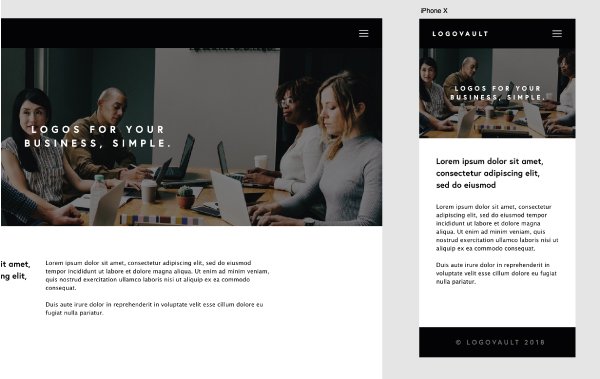
Pasting a design into a different sized artboard will cause it to resize
My original design was based on an iPad screen. Now, when I paste it into an iPhone X-sized artboard, my header, logo and navigation button will automatically adapt to the narrower container. This is great because it keeps my design and spacing uniform across different artboard sizes.
05. When to use constraints
Using constraints is a great tool to save you pockets of time in places. However, I would advise that you use them sparingly and carefully. They're great for simple things like headers and footers, but any content-heavy designs (and images in particular) will require some tweaking.
Read more:
-
You're reading 10 Websites with Data Visualization Driving User Experience, originally posted on Designmodo. If you've enjoyed this post, be sure to follow on Twitter, Facebook, Google+!
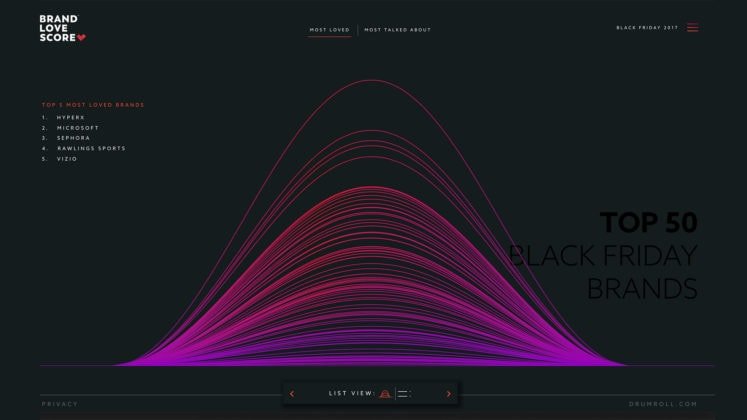
As an instrument for enriching user experience in website design, infographics have come into our life pretty much recently. But that’s not the first time that developers used stats in personal portfolios or corporate websites to win over visitors with …
-
You're reading Don’t miss it! On Cyber Monday, Divi creators offer their biggest discount ever, originally posted on Designmodo. If you've enjoyed this post, be sure to follow on Twitter, Facebook, Google+!

Cyber Monday is typically chock-full of exceptional offers, deals, and bargains. Unless you’re paying close attention however, a real gem is apt to go unseen, and elude your grasp. This time around, we want to make sure you don’t miss …
-
The incidents affected millions, just as Black Friday, Cyber Monday and the holiday shopping season kicked off.
-
When it comes to digital art and painting tools, they don't come much better than Corel Painter 2019. Powerful and diverse, the software provides digital artists with all the tools needed to create show-stopping artwork. And right now, it's at its lowest ever price thanks to the Black Friday and Cyber Monday weekend. So if you're in the market for some quality new creative software, now's the time to buy!
The 2019 iteration of Corel Painter includes some seriously impressive new features and updates. In this set of short videos, senior concept artist Magdalena Proszowska goes on a tour of Corel Painter 2019, including information and demonstrations on all the software's latest innovations. For more information and special offers, visit Corel Painter today.
Take a tour
You may have never even considered the colour of your user interface before, but the new darker UI functionality in Corel Painter 2019, which you can see in action here, may well make you sit up and take note. A feature perfect for night owls, the dark UI particularly helps with colours, making selections much easier, especially when choosing subtle shifts in saturation or hue.
The video also showcases a small selection of the over 650 icons that have been redesigned to be more user-friendly, as well as a look at the new colour wheel, which is now transparent and can be placed anywhere on your canvas. Proszowska wraps this video up by demonstrating some of the 36 new brushes that have been added to Corel Painter 2019's toolset.
New brushes
Speaking of new brushes, want to know more? As we mentioned earlier, Corel Painter 2019 includes 36 new brushes, all of which can be easily found by typing '2019' into the search brush panel. In this video, Proszowska demonstrates some capabilities of the new oil painting brushes, including the Real Bristle Soft brush from the enhanced Sargent category.
It's here you can also see one of Corel Painter 2019's performance updates in action, with Proszowska stating any users with multi-core processors, with the support of AVX2, will notice up to a 50 per cent increase in brush speed.
Step-by-step
In this final video, Proszowska shares her workflow within Corel Painter 2019, demonstrating how to easily navigate the UI and experimenting with blenders to create interesting textures.
Want to get started with Corel Painter 2019? You can download a free 30-day trial or get a 30 per cent off the full version (limited time only) right here. -
Amazon typically leads the way when it comes to best Cyber Monday deals, and this year is no different. The online retail giant has been sharing discounts since early November, and today there are some great Amazon Cyber Monday deals for you. There are a whole load of deals on offer, but we’re here to help. In this post you'll find our pick of the very best Amazon Cyber Monday deals.
To make the most of these offers, we’d recommend signing up for Amazon Prime, if you’re not a member already. This gives you access to Amazon's Lightning deals 30 minutes earlier than everyone else. If you don't want to commit to Prime, you can sign up for a free 30-day trial – just make sure you cancel the trial before the 30-day limit. Scroll down for our pick of the best Amazon Cyber Monday 2018 deals.
Aside from bookmarking this page, if you’re serious about bagging a bargain this Black Friday and Cyber Monday, you'll need an Amazon Prime subscription. One of the key benefits is that you'll get access to Amazon's Lightening deals 30 minutes earlier than everyone else, giving you a better chance of success.
Lightning Deals are time-sensitive promotions that last until the deal expires or the available stock runs out. Amazon launched extra Lightning Deals every day leading up to and over the Black Friday weekend last year – the best ones can start and end in minutes, so those extra 30 minutes are often invaluable.
Prime membership will set you back $12.99/£7.99 per month ($6.49 if you're a student) or $119/£79 annually. But if you're not a Prime subscriber already and don't want to commit, you can sign up for a free 30-day Amazon Prime trial and you'll be eligible for Lightening deals (as well as all the other Prime benefits). You can then cancel any time within that 30 days with no strings attached. Just don’t sign up yet – wait until 1st November.
11 of the best Amazon Black Friday and Cyber Monday deals last year
To give you an idea of the sort of discounts we’re expecting this year, here’s a selection of some of the best savings we saw last year – and the good news is we saw similar price cuts over Prime Day this summer.
While we can’t promise that we’ll see these deals again, this information should help you make a better judgement call now as to whether a deal is worth grabbing.
Looking for something specific? Here are the best Amazon Black Friday and Cyber Monday prices on our favourite gear for designers, illustrators and artists...
Stay with Creative Bloq to get the best Amazon Black Friday and Cyber Monday deals in 2018
We’ll be working around the clock to curate all the best Amazon Black Friday and Cyber Monday deals for designers, artists and creatives on this page. We don’t know how good this year’s discounts will be - but we can tell you that our expects will be picking through all Amazon’s offerings and posting only the best-value deals here. So bookmark this page and check back in November.
Related articles:
-
Did you miss the chance to snap up a huge bargain on Black Friday? Never fear, there's still time to save on a range of top tier creative and design products thanks to Cyber Monday. We've been busy curating a list of the best Cyber Monday 2018 deals for all your artistic needs, however we thought this amazing Wacom Cintiq Pro 24" discount deserved extra special attention.
Wacom leads the way when it comes to creating world-class pen displays, and with the Cintiq Pro range digital artists get to bring their work to life in a way that feels traditional and intuitive. This is because Wacom Cintiq Pro 24 offers Wacom's most powerful range of tools and capabilities, all in a 4K creative pen display.
Users get to take advantage of industry-leading color accuracy (99% of Adobe RGB), plus with the LCD display artist get to examine and modify even the tiniest details of their creations. What's more, the Wacom Cintiq 24" comes with a Wacom Pen 2. This popular tool is Wacom's most accurate and sensitive pen, packed with tilt recognition and able to deliver virtually lag-free tracking.
Shoppers in the US are able to save a whopping $500 on the Wacom Cintiq 24" when ordering from Newegg, with other sites offering a similar reduction, too. At this price its uncertain how long stocks will last, so if this is the product and price for you, be sure to add it to your cart.
Related articles:
-
If you like to unwind after a hard day designing with a spot of gaming, you're certainly not alone. And the good news is that there are plenty of Cyber Monday deals on games and gaming just waiting to be snapped up.
The best we've seen on the Nintendo Switch is Nintendo Switch Neon and two games: The Legend of Zelda Breath of the Wild and Mario Kart 8 for just £299. This saving of £50 is really pulling people in though, 322 of these have been sold in the last hour alone. So act now if you want it!
Read more:
-
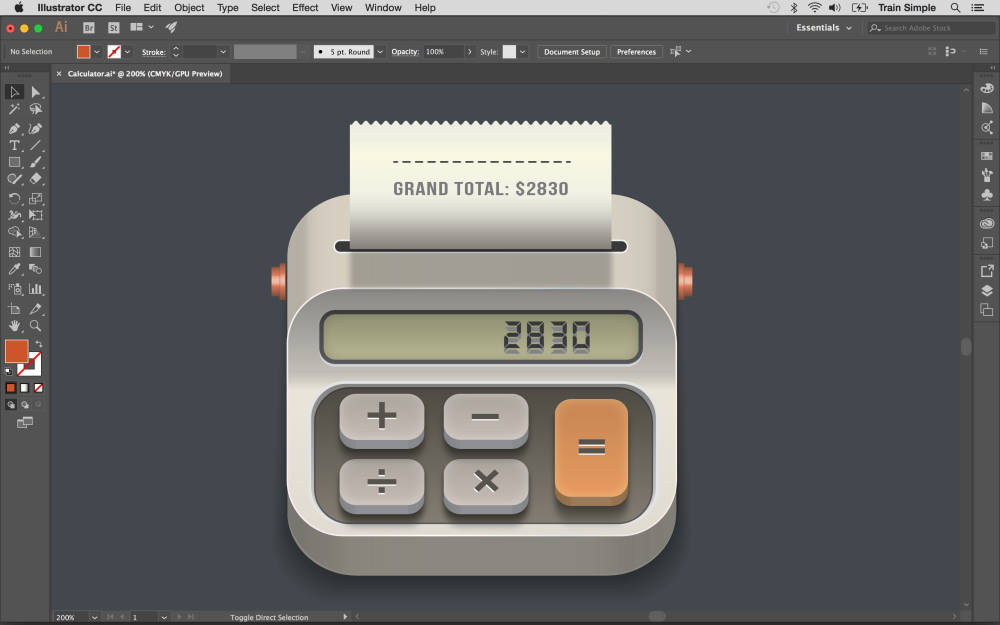
In this Illustrator tutorial, I’ll show you how to create a calculator app icon in Adobe Illustrator CC. We’ll use different shape tools, pen tool, along with the 3D features of Illustrator. Hopefully you will learn few handy tips along the way.
You will also need to download a couple of free fonts for this tutorial: DS-Digital and Bebas Neue. If you don't already have it, you can get Adobe Creative Cloud here.
But first, let’s have a look at the final result:

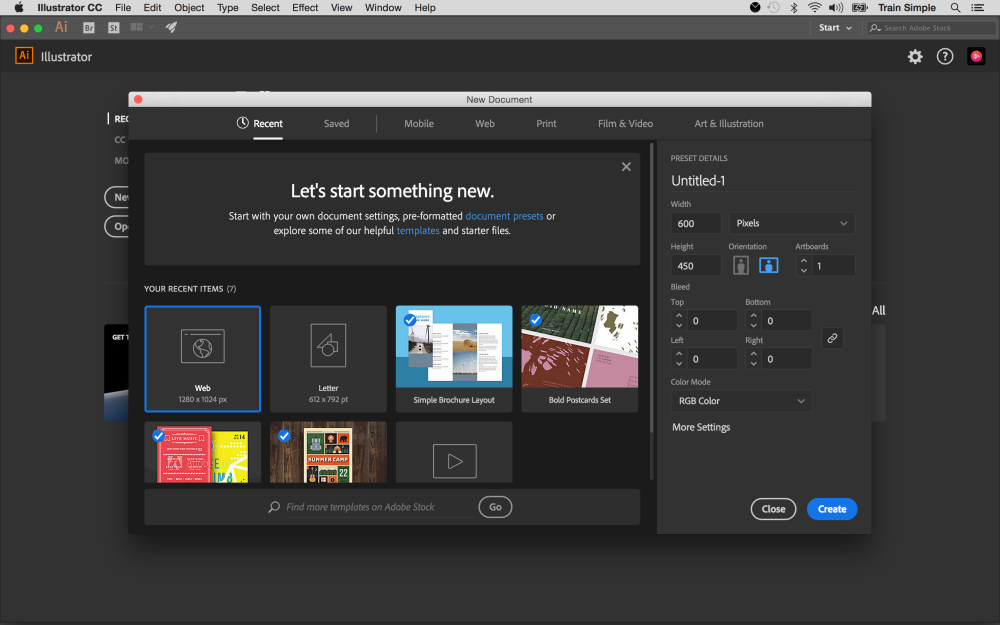
01. Open a document
Click image to enlargeCreate a new document in Illustrator with 600px width and 450px height.
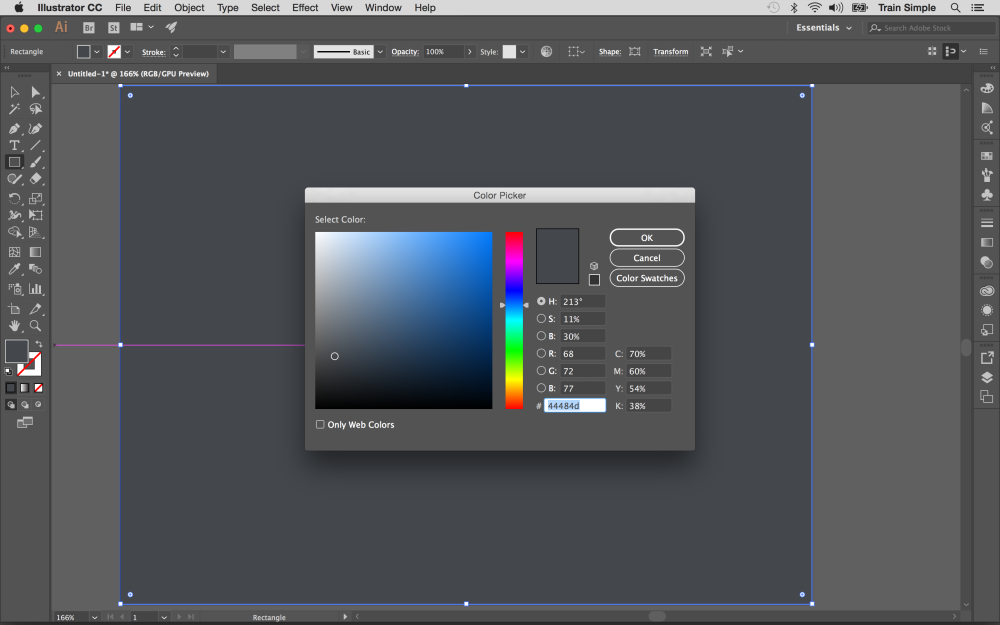
02. Create the background
Click image to enlargeSelect the Rectangle Tool (M) and pick #44484D fill color to draw a rectangle covering the canvas as the background.
03. Make the base
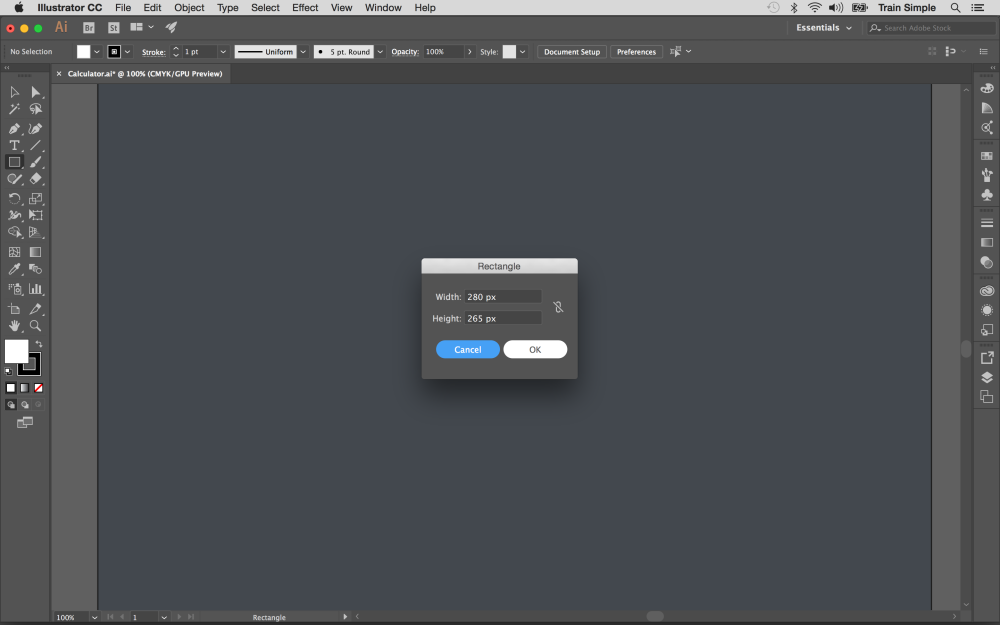
Click image to enlargeWe’ll start by creating the icon’s base. So select the Rectangle Tool (M) and click the canvas to view options window. Enter 280px width, 265px height and hit OK to draw a rectangle as shown below. Pick #E7DED0 as the fill color.
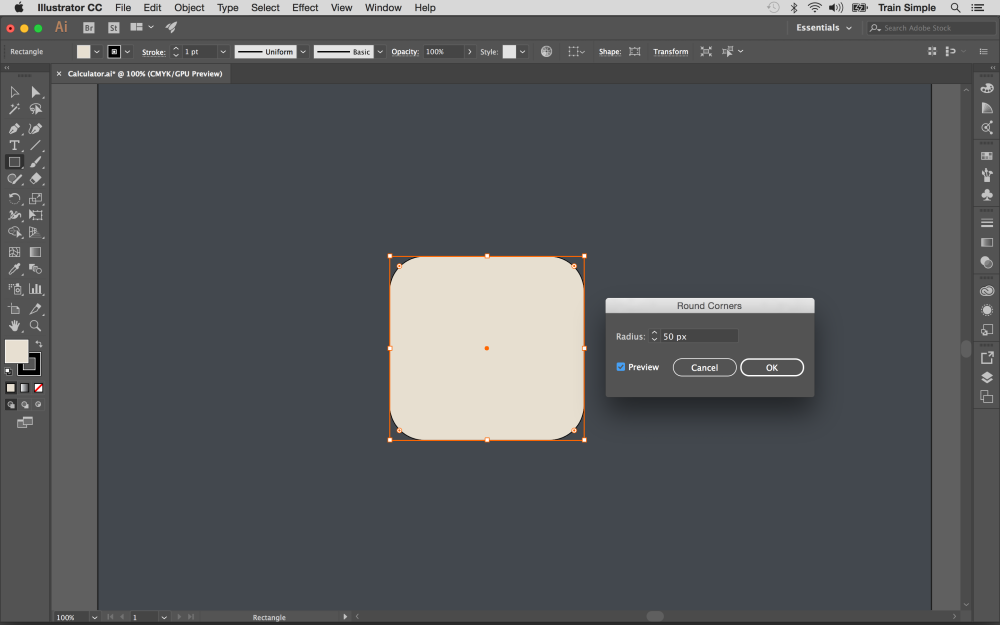
Next, we’ll convert it into a rounded rectangle. Select this rectangle with the help of Selection Tool (V) orby clicking the ring-shaped target present at right side of respective layer. And go to Effect > Stylize > Round Corners. Enter 50px for the radius and hit OK.
Click image to enlarge04. Set effect
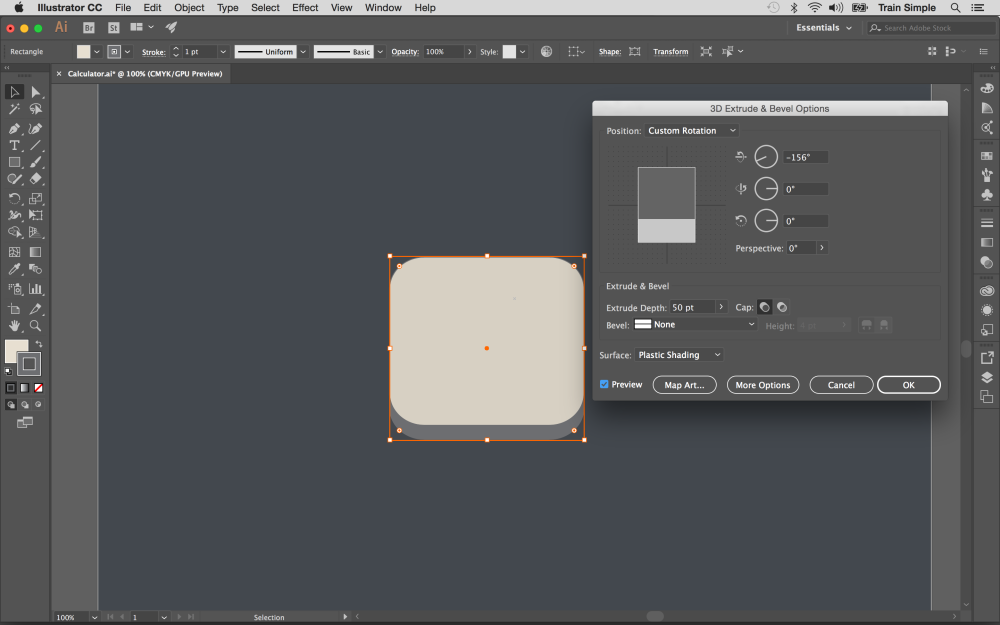
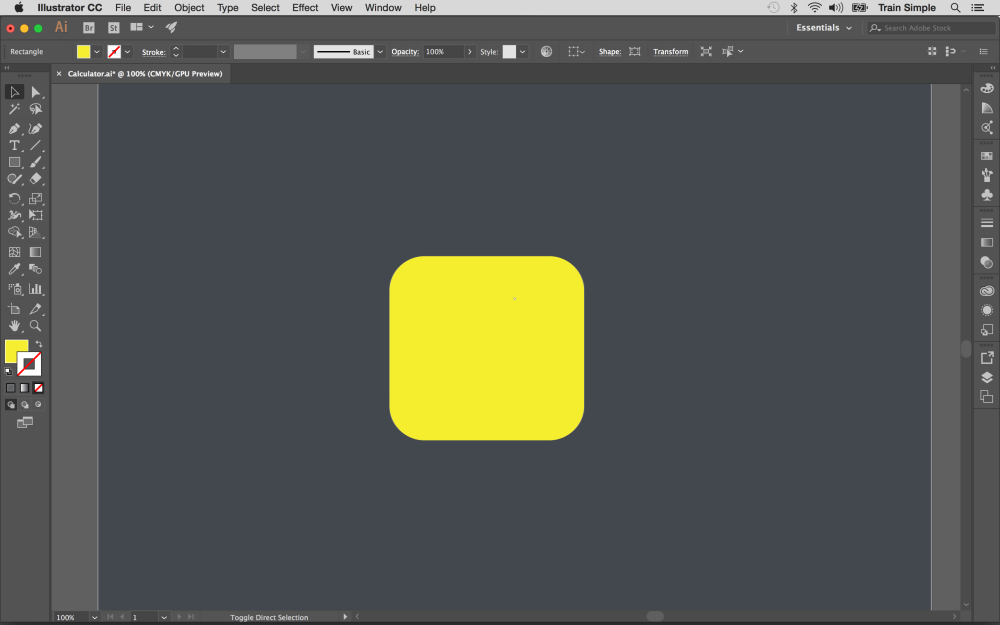
Click image to enlargeSelect this rectangle and go to Effect > 3D > Extrude & Bevel. Apply given settings here.
05. Apply a gradient
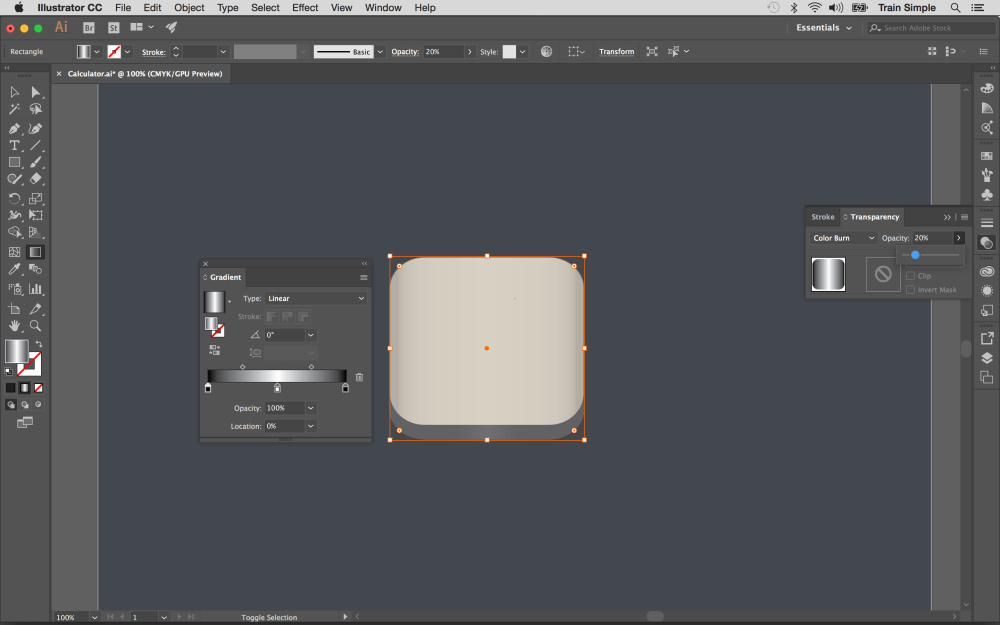
Click image to enlargeTo apply subtle gradient over the base, draw a rectangle covering the entire 3d shape using any fill color. Now convert it into a rounded rectangle with 50px corner radius.
Now replace its fill with a Black-White-Black gradient using Gradient Tool (G). Change its blending mode to Color Burn with 20% opacity in the Transparency Panel (Shift + Ctrl+F10).
Click image to enlarge06. Create another rectangle
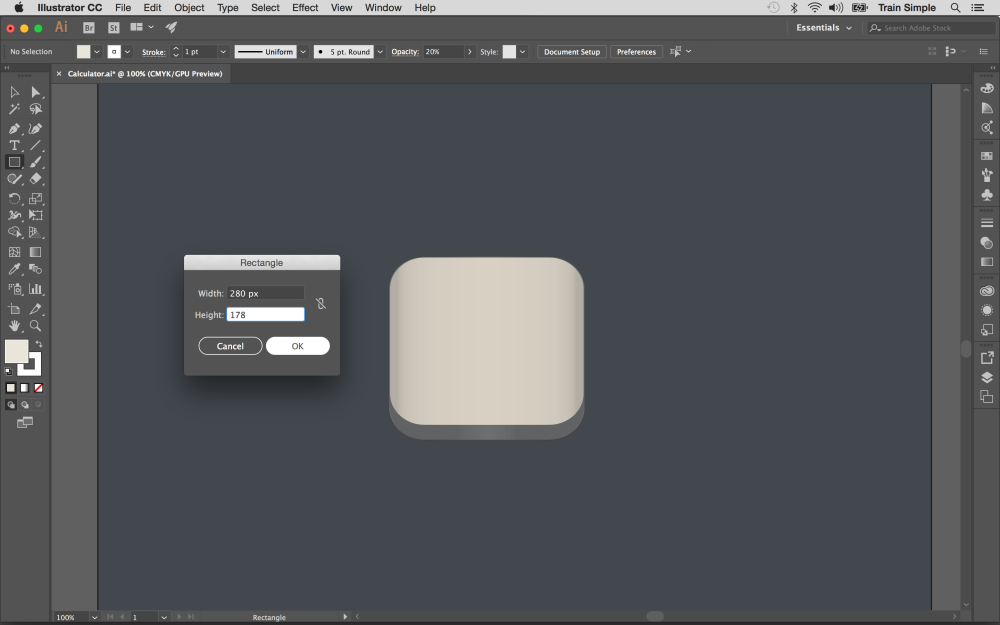
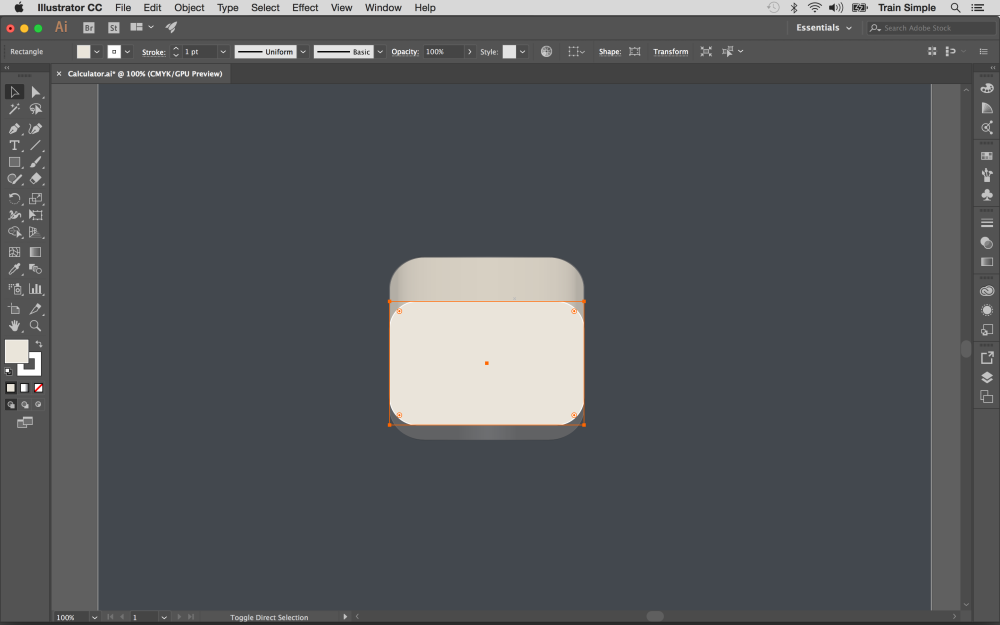
Click image to enlargeNext, draw another rectangle with 280px width and 178px height using #E9E3D9 fill color and white color stroke. Choose 1pt stroke weight from top control bar.
Now convert it into a rounded rectangle by 40px radius.
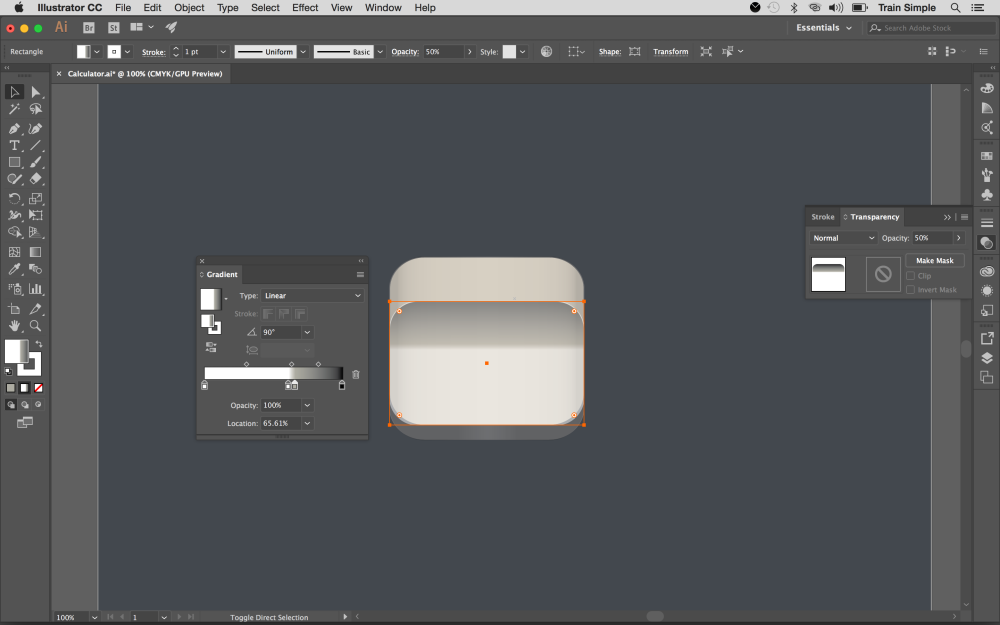
Click image to enlargeAfter that, apply following gradient on it and change its blending mode to Multiply with 50% opacity in the Transparency Panel (Shift + Ctrl+F10).
Click image to enlarge07. Make rounded rectangle
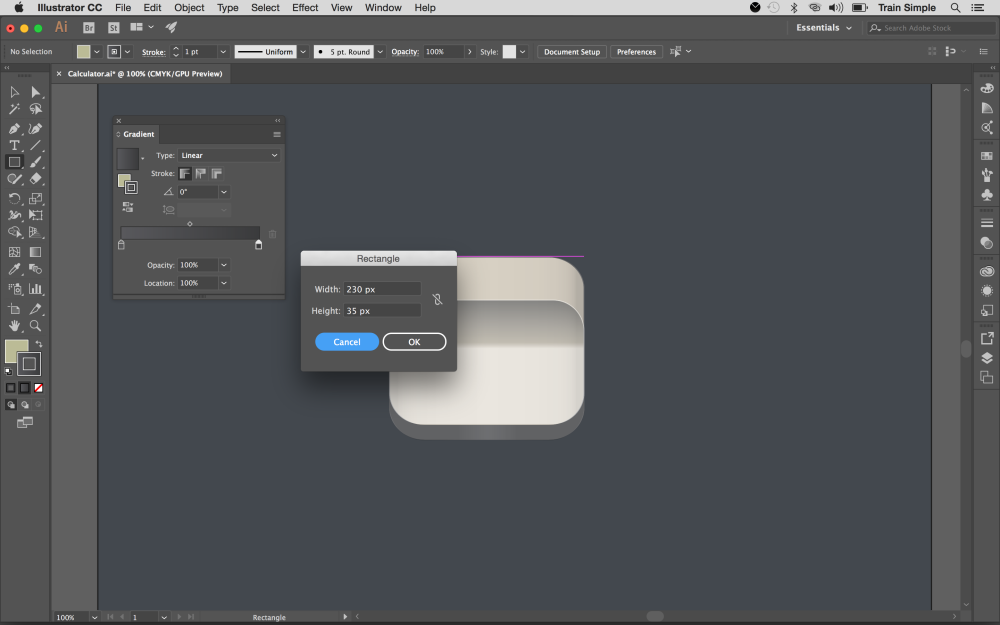
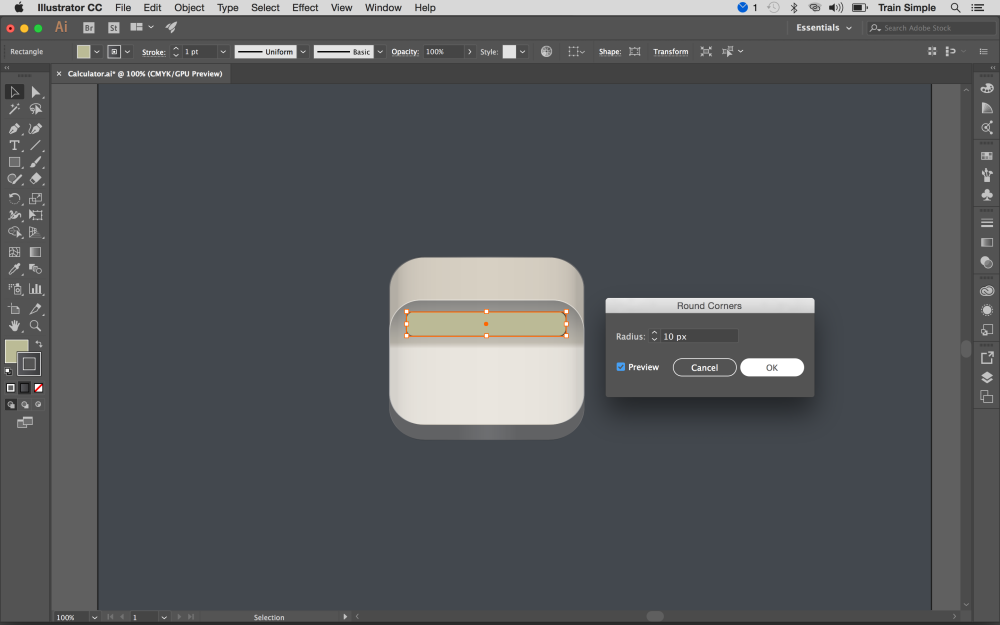
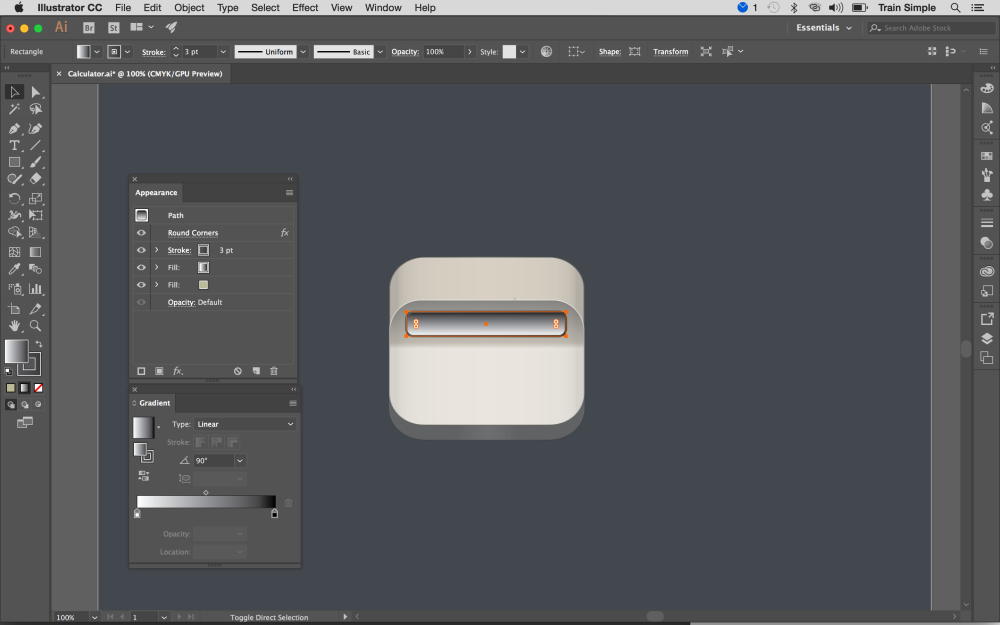
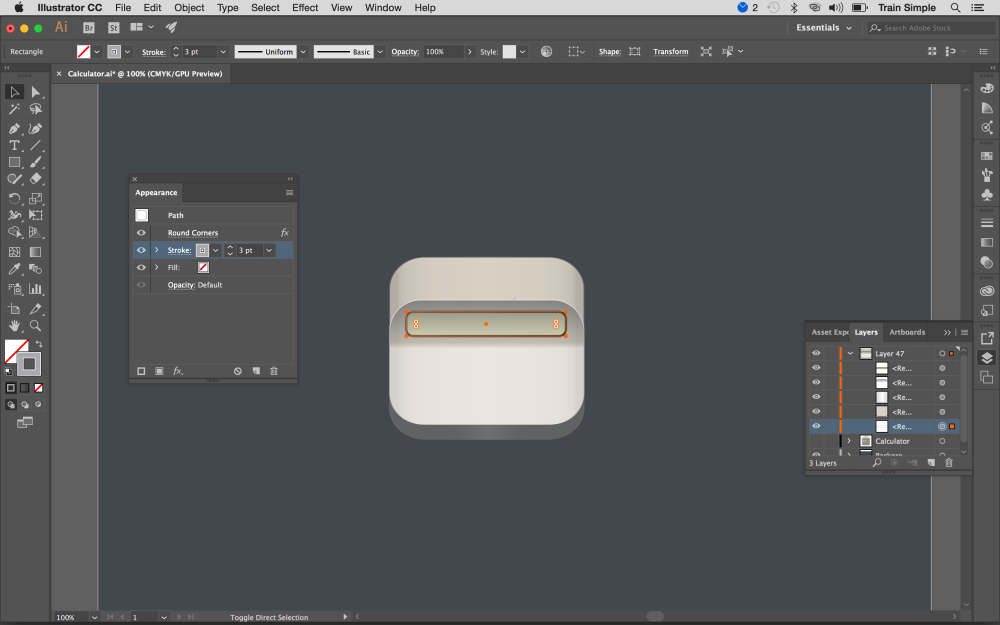
Click image to enlargeDraw another rectangle of 230px with and 35px height using #BCBA95 fill color and for stroke apply light to dark grey gradient as shown below. Select 3pt stroke weight from top control bar.
Convert this rectangle into a rounded rectangle by 10px corner radius.
Click image to enlarge08. Make a glow effect
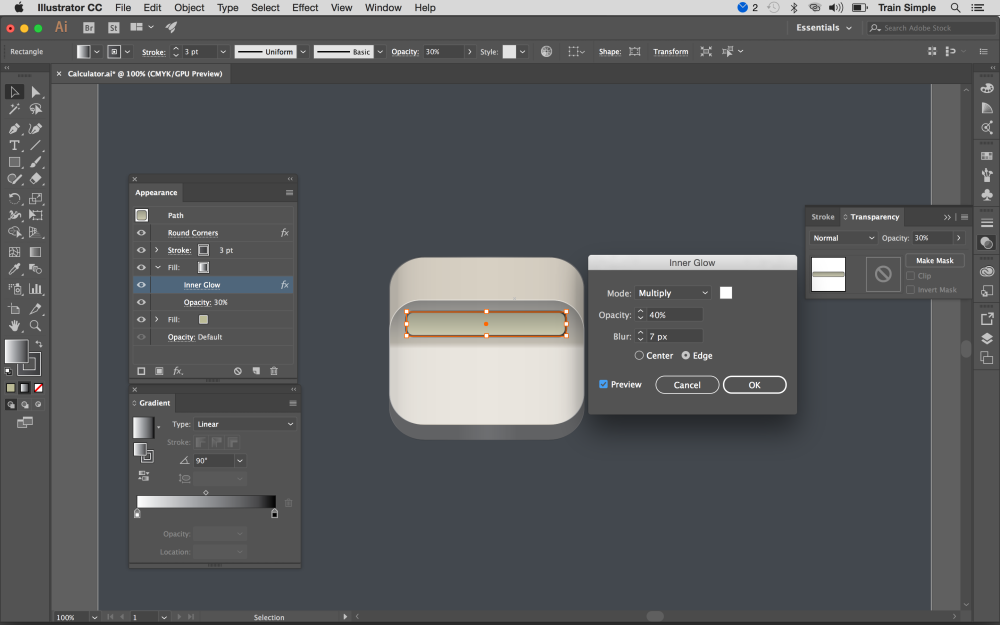
Click image to enlargeNext, select this new rectangle and go to Window > Appearance to view the Appearance Panel or press Shift + F6. Now select the fill attribute and click the icon of Duplicate Selected Item at the bottom of Appearance Panel to duplicate the fill. And replace this new fill with Black & White gradient at 90 degrees as shown above.
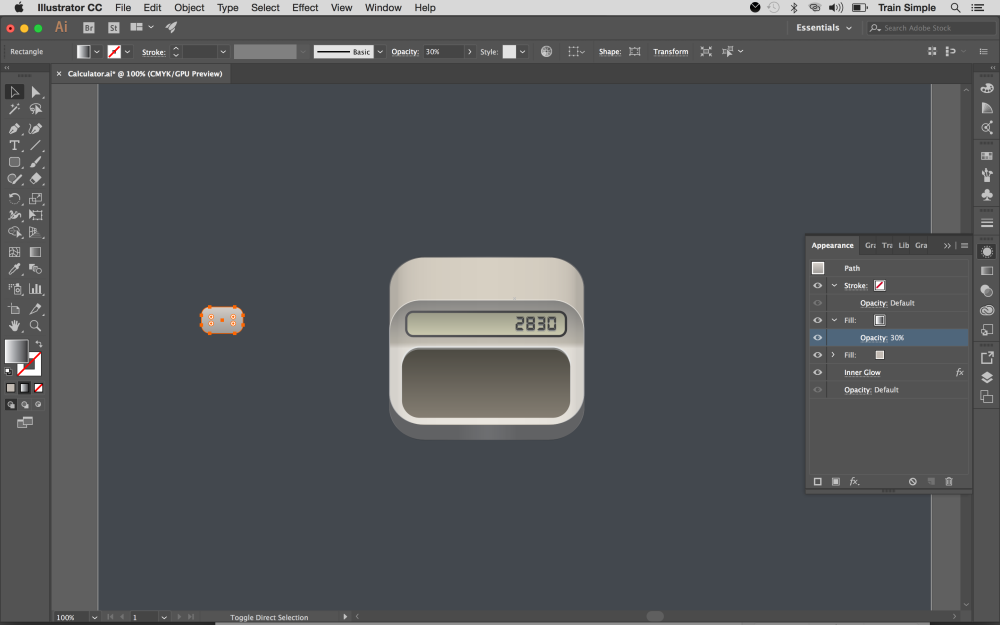
Keep this rectangle selected and go to Effect > Stylize > Inner Glow. Apply given settings here. Once you are done, change gradient fill blending mode to Multiply with 30% opacity.
Click image to enlarge09. Copy rectangle
Click image to enlargeSelect this new rectangle and press Ctrl+ C to copy and press Ctrl+ B to paste in back. Drag this copy 1-2 steps downwards. Now remove its fill attributes by dragging them to Delete icon at the bottom of Appearance Panel and give it 3pt stroke of #D1D2D4 colour.
10. Add text
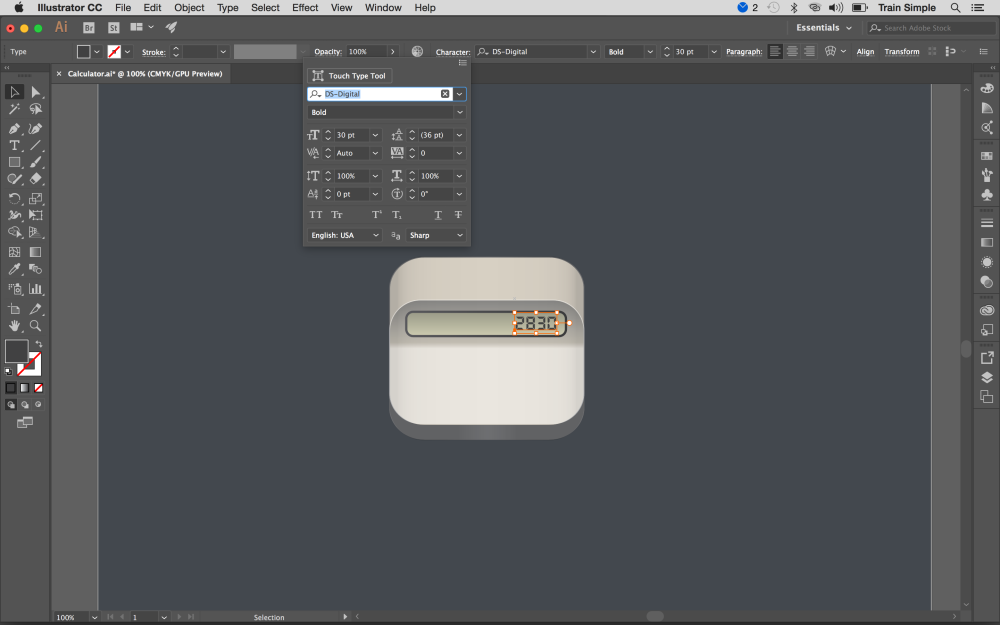
Click image to enlargeNext, we’ll add some text over the screen. Pick the Type Tool (T) to type the text using #404041 fill colour. I have used DS-Digital font here.
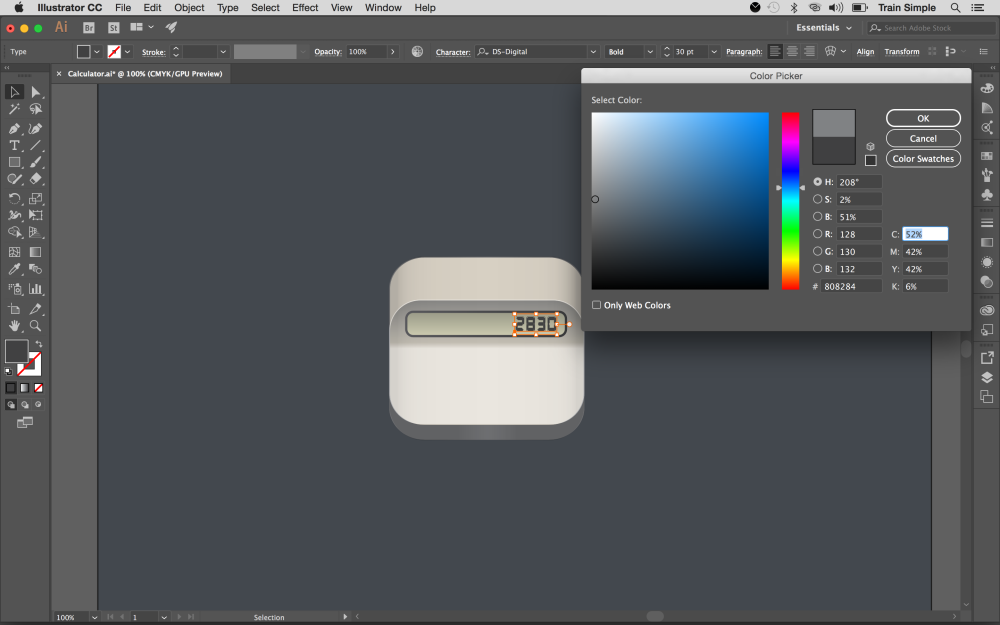
Now press Ctrl+ C to copy and press Ctrl+ B to paste in back. Drag the copied text 1-2 steps downwards and change its fill colour to #808284.
Click image to enlarge11. Make the base
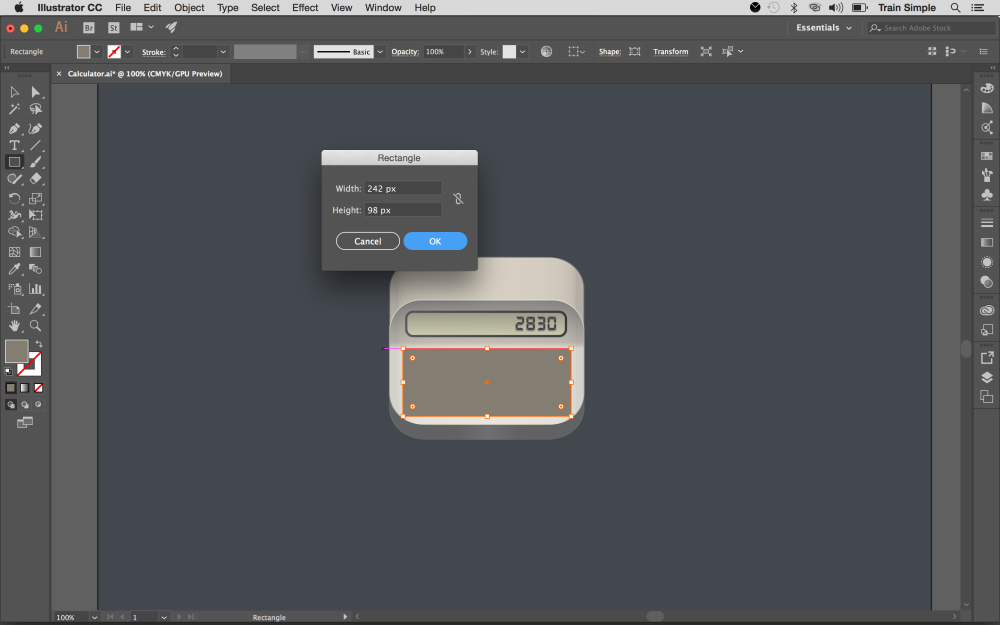
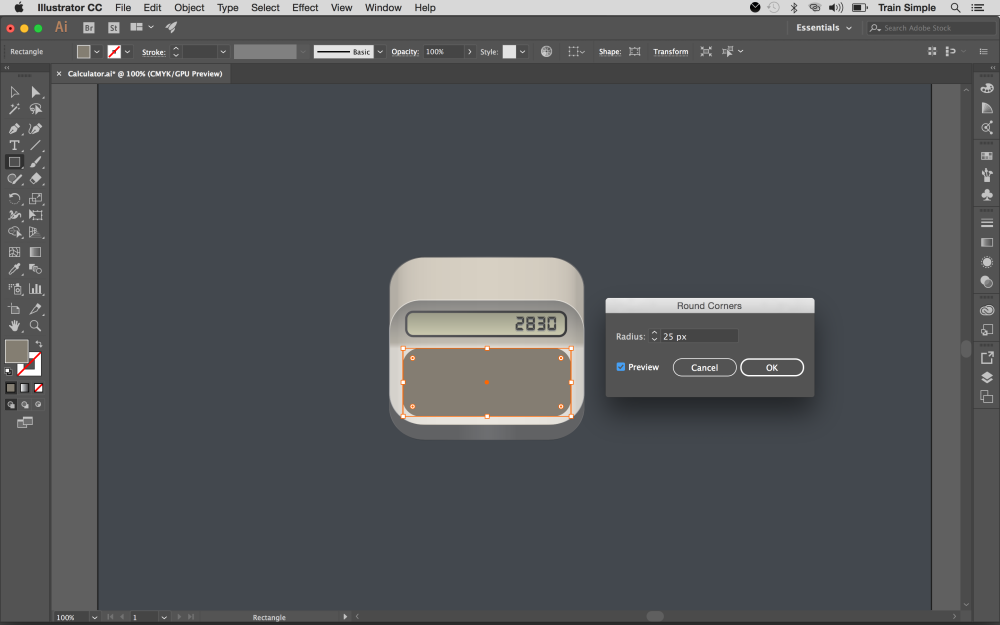
Click image to enlargeNext, we’ll create button’s base. Select the rectangle tool to draw a rectangle with following dimensions using #847D72 fill color and same light to dark grey gradient on the stroke as used in step 7. However, choose 1pt stroke weight here.
And convert it into a rounded rectangle by 25px radius.
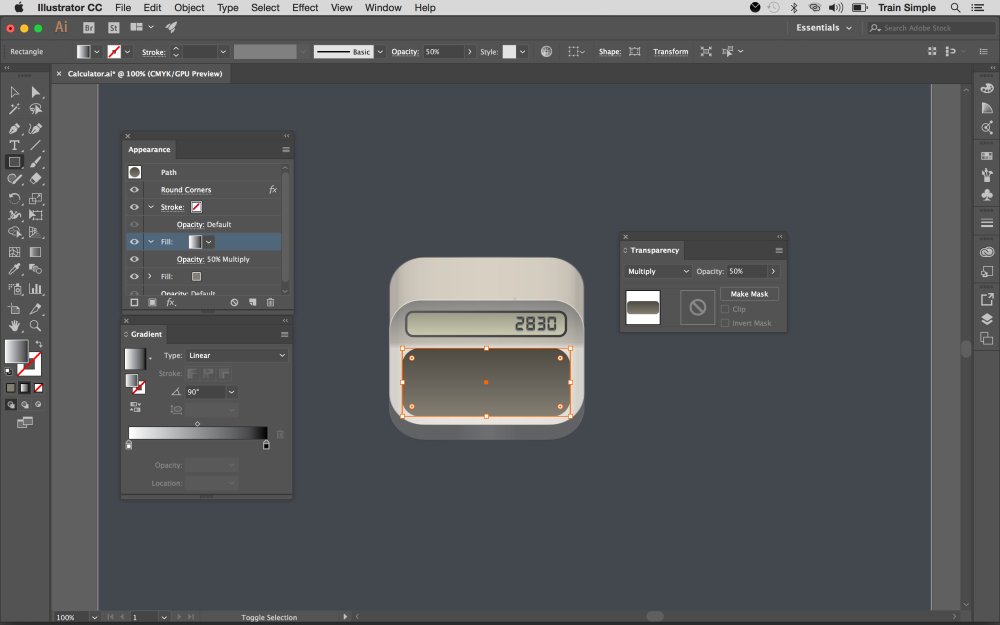
Click image to enlargeAfter that, duplicate its fill attribute in the Appearance Panel and apply Black & White gradient at 90 degrees. Change its blending mode to Multiply with 50% opacity.
Click image to enlargeNext page: The final steps to creating an icon app in Illustrator...
12. Add depth
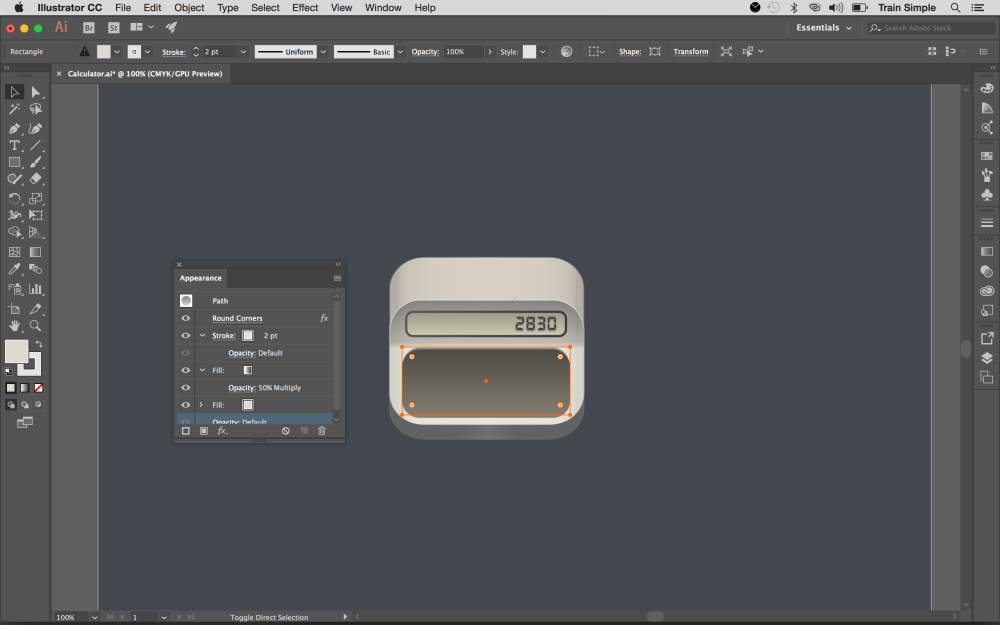
Click image to enlargeNow we’ll give some depth to the button’s base. So, select the shape, press Ctrl+ C to copy and press Ctrl+ B to paste in back. Drag the copy 2-3 steps upwards. Keep the copy selected and change its stroke color to #E2E2E1 with 2pt stroke weight and fill color to #DDD9D3 in the Appearance Panel as shown above.
13. Create 3D button
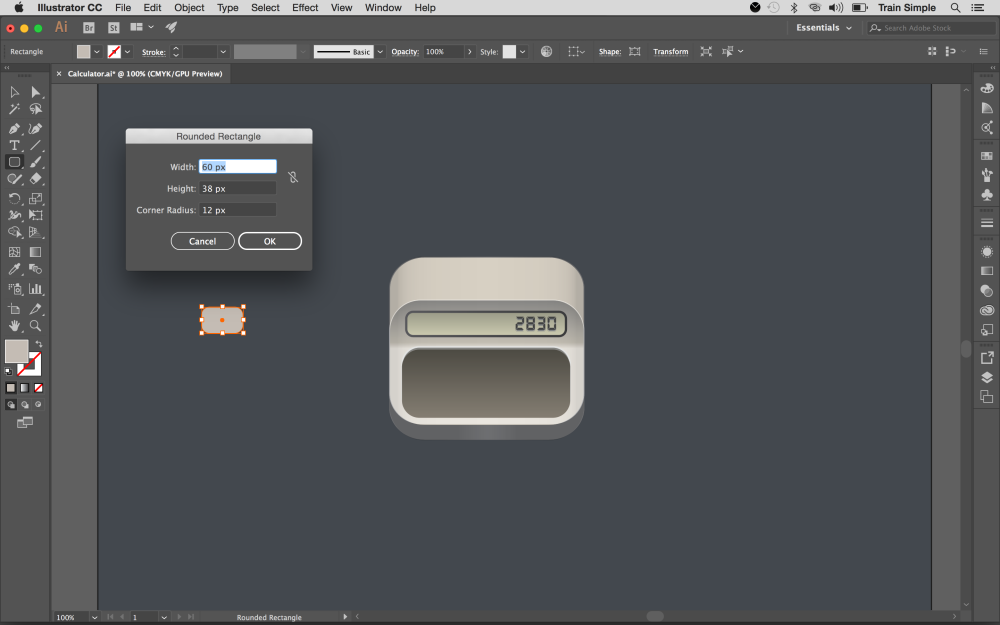
Click image to enlargeNext, I’ll show you how to create a 3d button. Pick the Rounded Rectangle Tool (M) to draw a 60 x 38px rectangle using #C5BCB4 fill color. Select it and make its corners rounded by 12px.
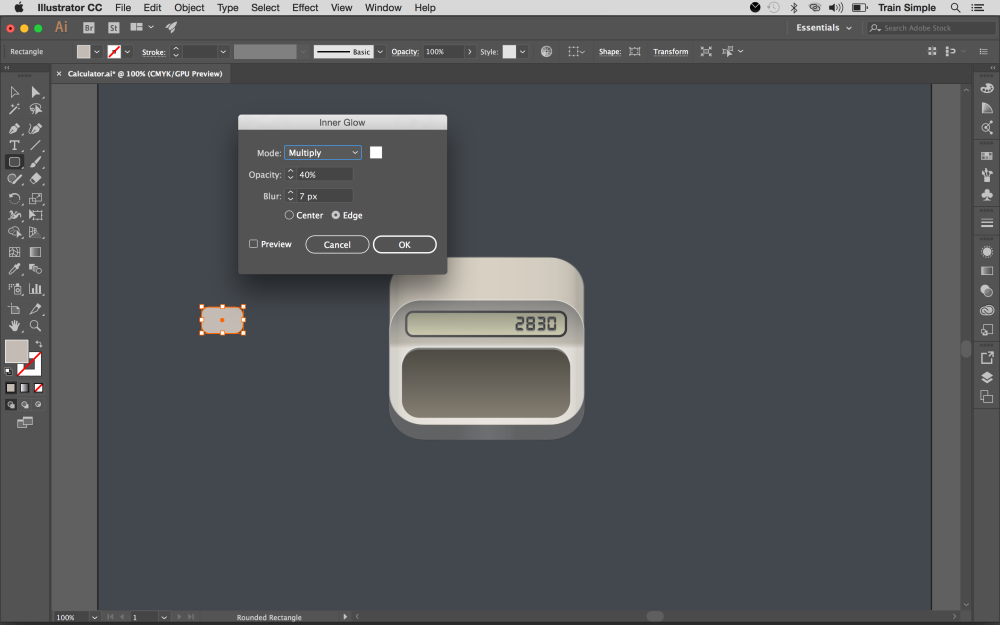
Select the button and go to Effect > Stylize > Inner Glow. Apply given settings here. And apply Black & White gradient on it with Multiply blending mode and 40% opacity as we did in step 11.
Click image to enlarge Click image to enlarge14. Extrude and bevel
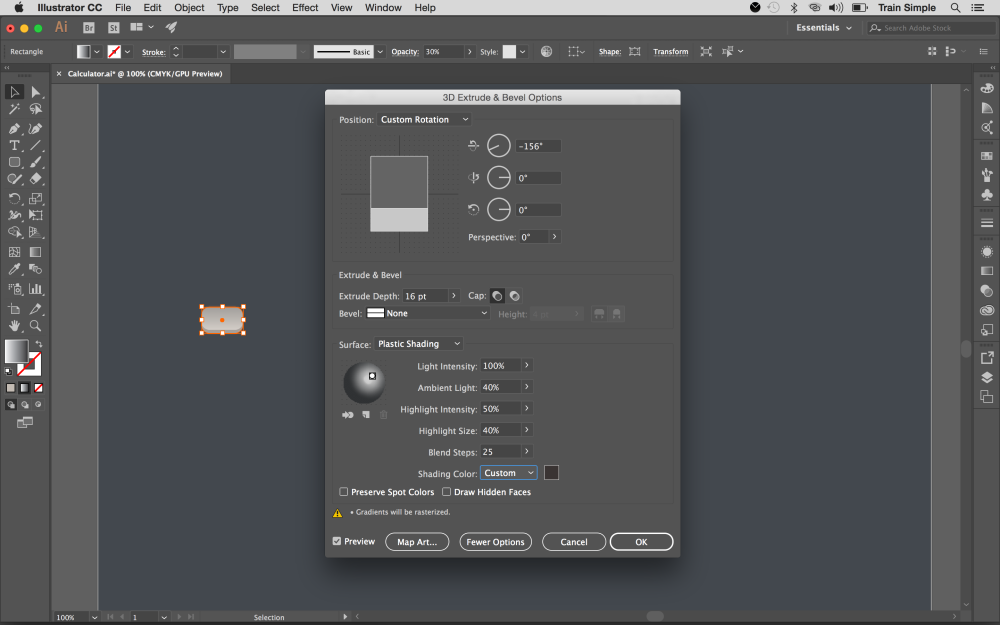
Click image to enlargeSelect the button and go to Effect > 3D > Extrude & Bevel. Apply given settings here.
15. Make the button's shadow
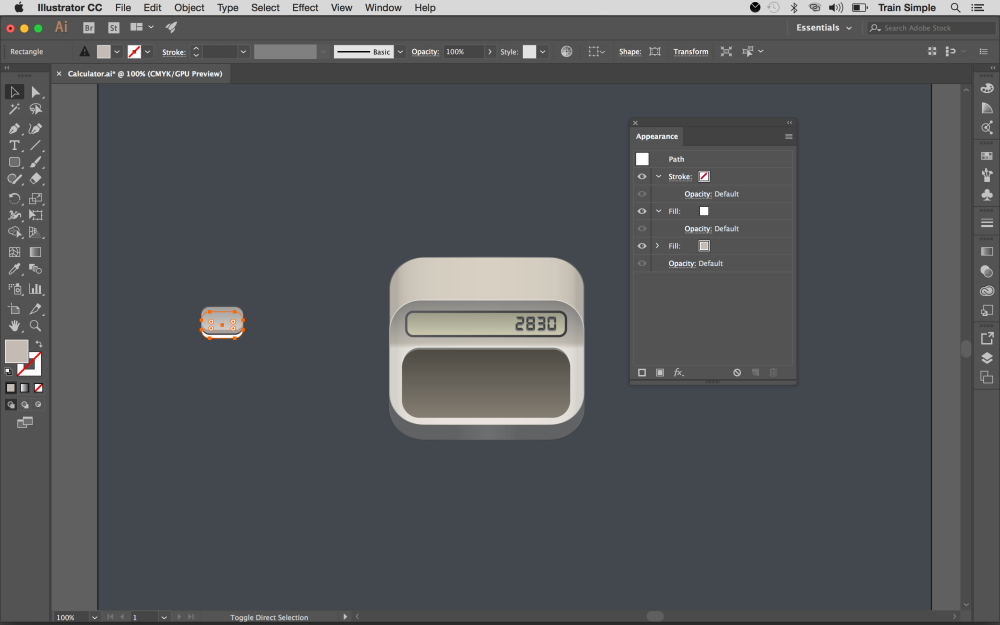
Click image to enlargeWe’ll create button’s shadow now. To do so, duplicate the button. Select the bottom copy and remove all the effects in the Appearance Panel. Now change its fill colour to black and hit the down arrow twice to move it down. Duplicate it and change fill colour of the copy to white. Hit the down arrow on your keyboard 6-7 times downwards as shown above.
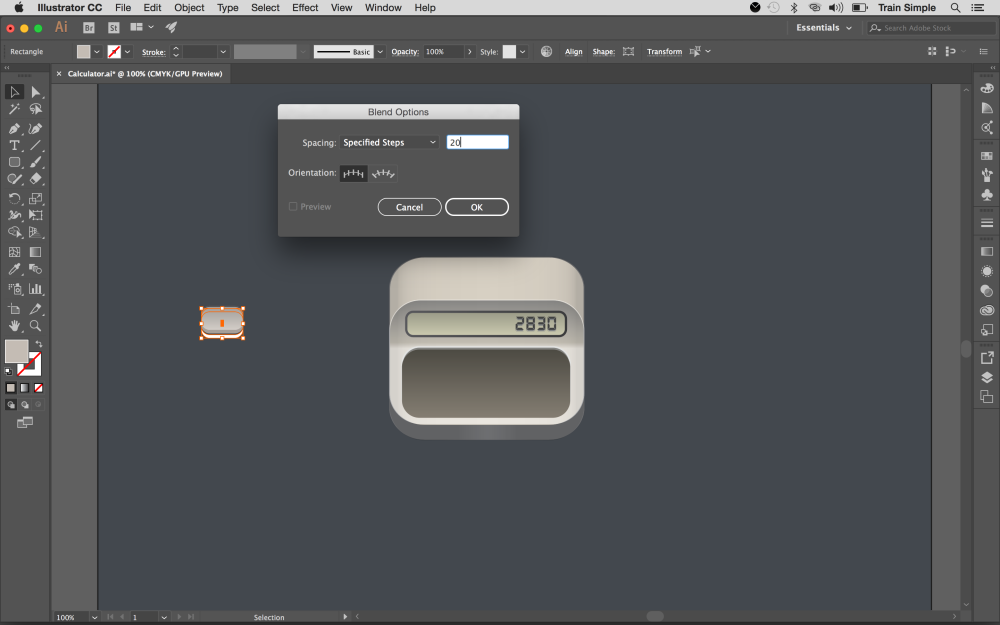
Select both the black and white shapes and go to Object > Blend > Blend Options. Choose Specified Steps with the value of 20 and hit OK. Once again, go to Object > Blend > Make to blend them. Once you are done, change blended shape mode to Multiply with 60% opacity in the Transparency Panel.
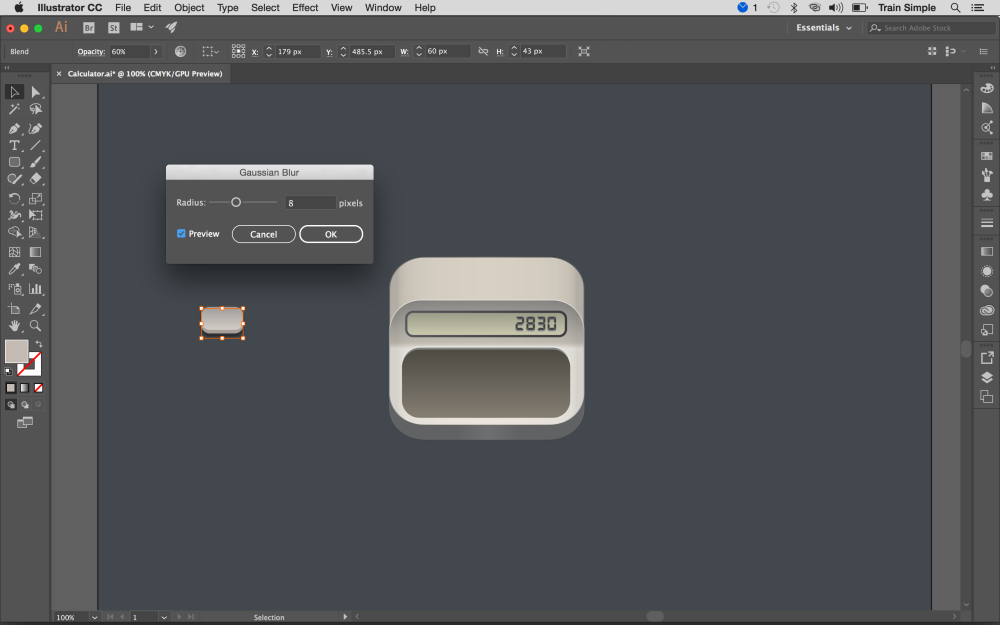
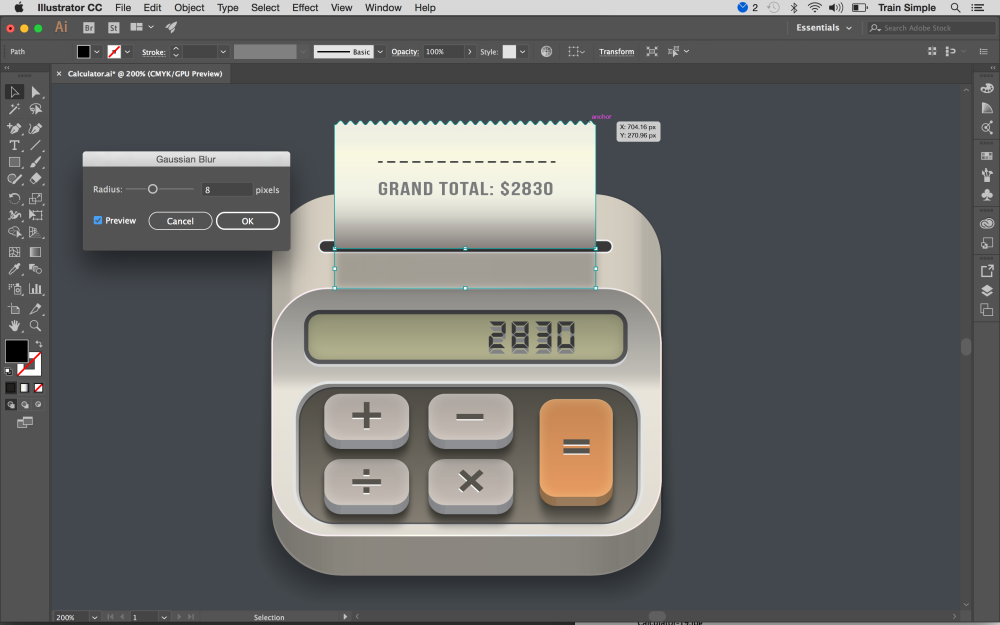
Click image to enlargeSelect the shadow and go to Effect > Blur > Gaussian Blur. Apply 8px Gaussian blur effect on it.
Click image to enlarge16. Apply the symbol
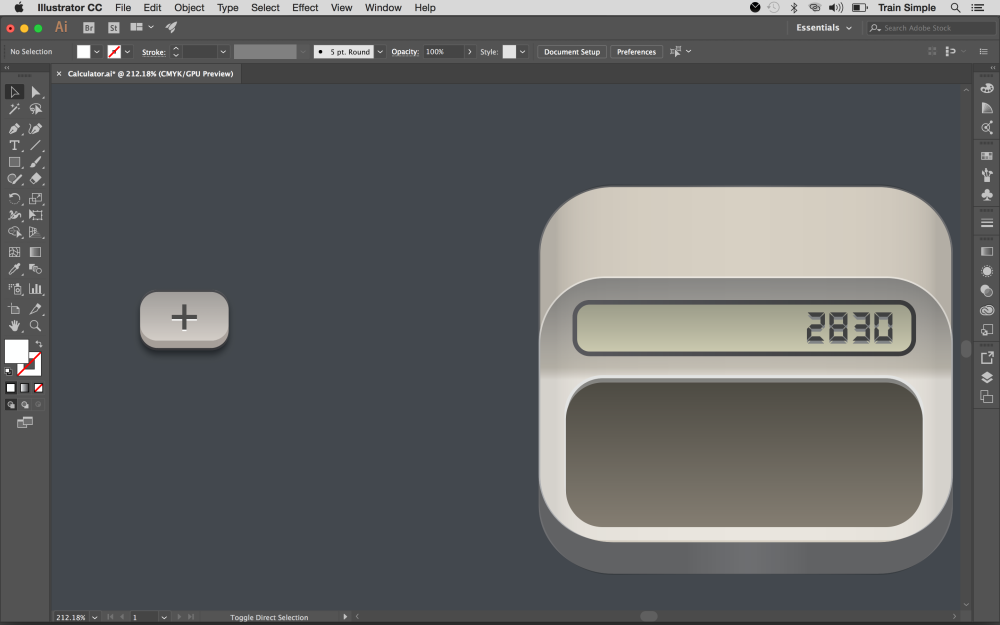
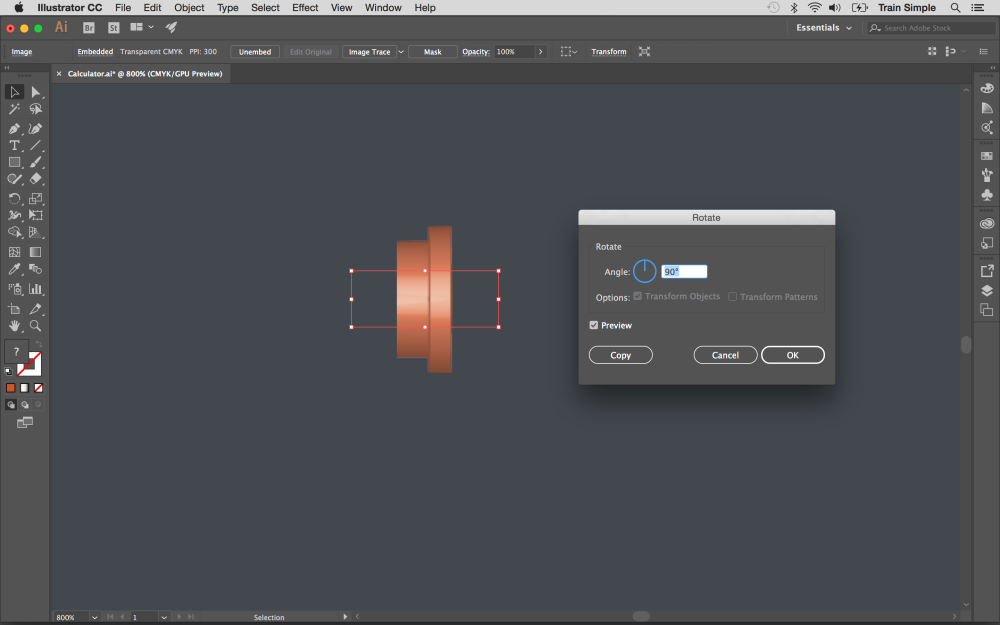
Click image to enlargeTo apply symbol over the button, draw a small rectangle with #56524C fill color. Select it and go to Object > Transform > Rotate. And rotate it at 90 degrees and hit Copy option to make the + symbol. Make its copy, turn the backside copy white and drag it 1-2 steps upwards.
17. Make more buttons
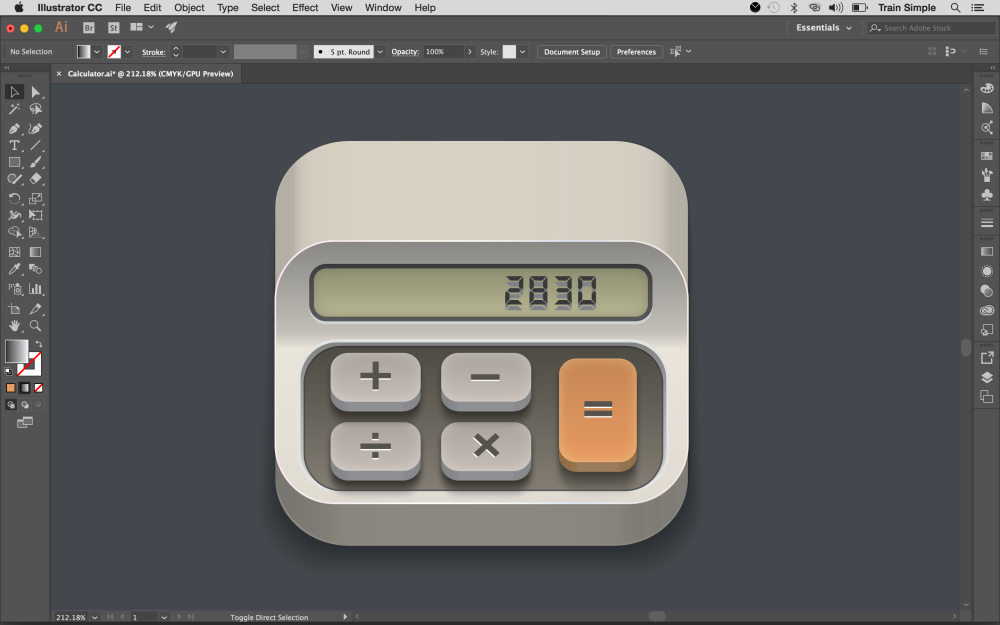
Click image to enlargeYou can make as many buttons as you want by using the same technique. And make the shadow of icon the same way as explained in step 15.
18. Fill in colour
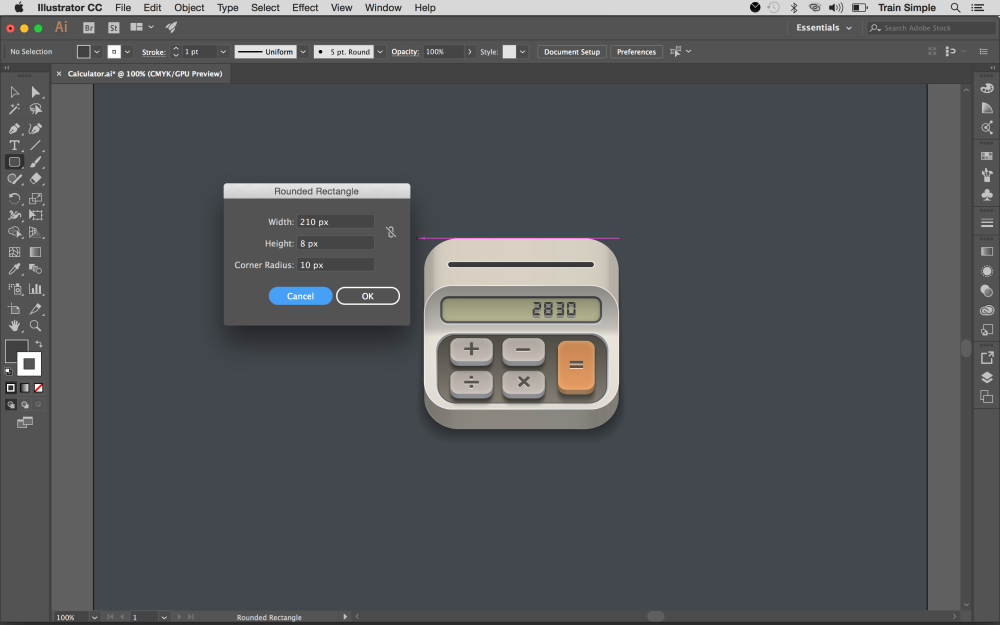
Click image to enlargeNow pick the Rounded Rectangle Tool, click the canvas to view options window and enter 210px width and 8px height here. Give it #404041 fill colour and #F1F1F2 colour stroke (Stroke weight: 1pt).
19. Make the paper
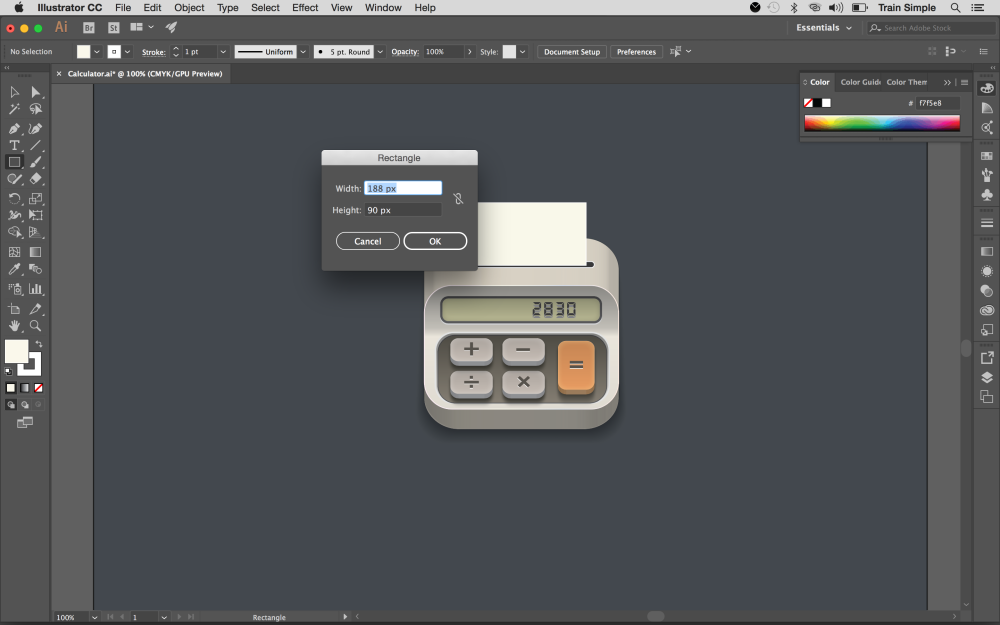
Click image to enlargeTo make the paper, draw a rectangle with following dimensions and #F7F5E8 fill color.
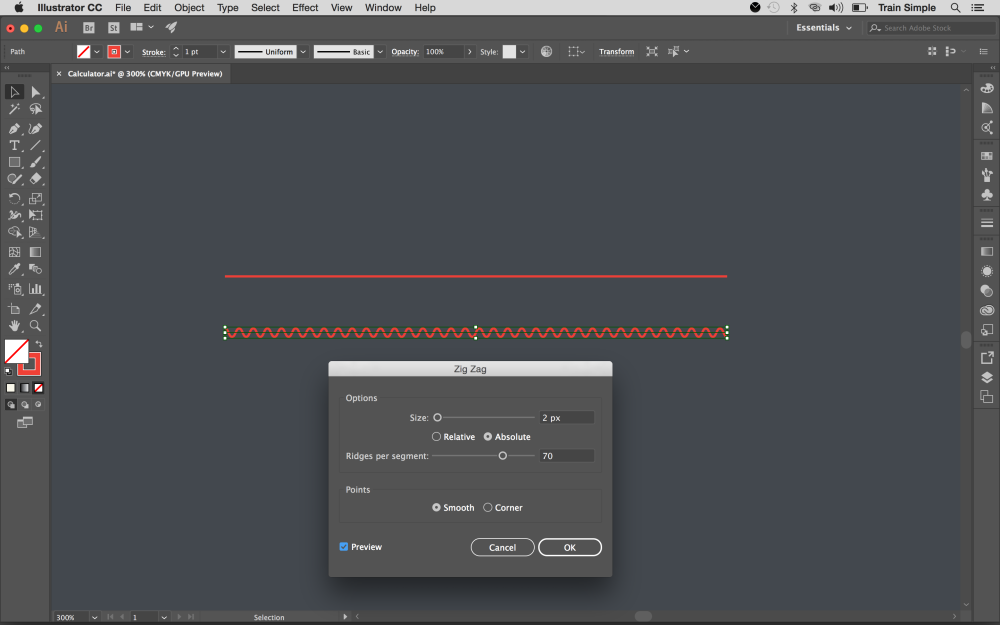
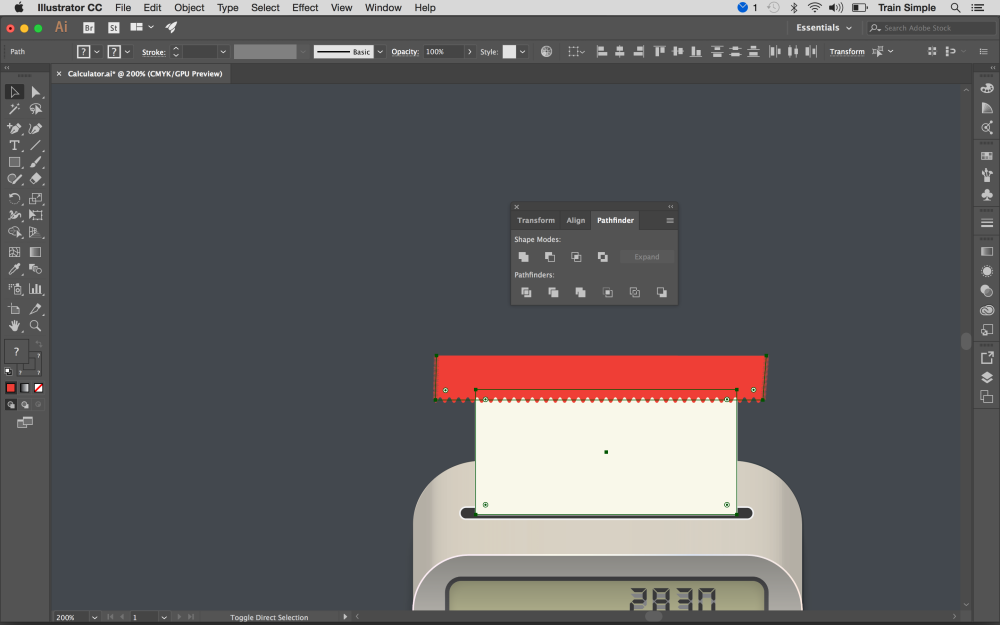
Pick the Pen Tool (P) to draw a small line using any colour as a stroke. Select it and go to “Effect”> “Distort & Transform”> “Zigzag”. Apply given settings here to make the path wavy. Now draw a rectangular shape by clicking one end of the wavy path using Pen Tool (P) and close it on the other end. And give any fill colour to the resulting shape.
Click image to enlargeNow place this shape over the top edge of paper, select both shapes and hit “Minus Front” in the Pathfinder Panel (Shift+ Ctrl+F9).
Click image to enlarge20. Apply gradient to paper
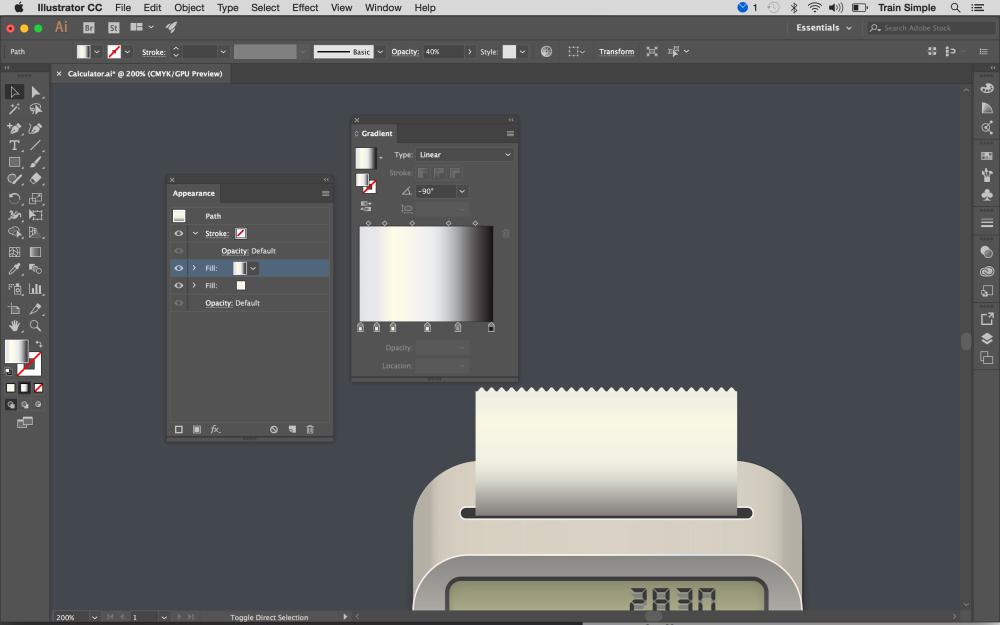
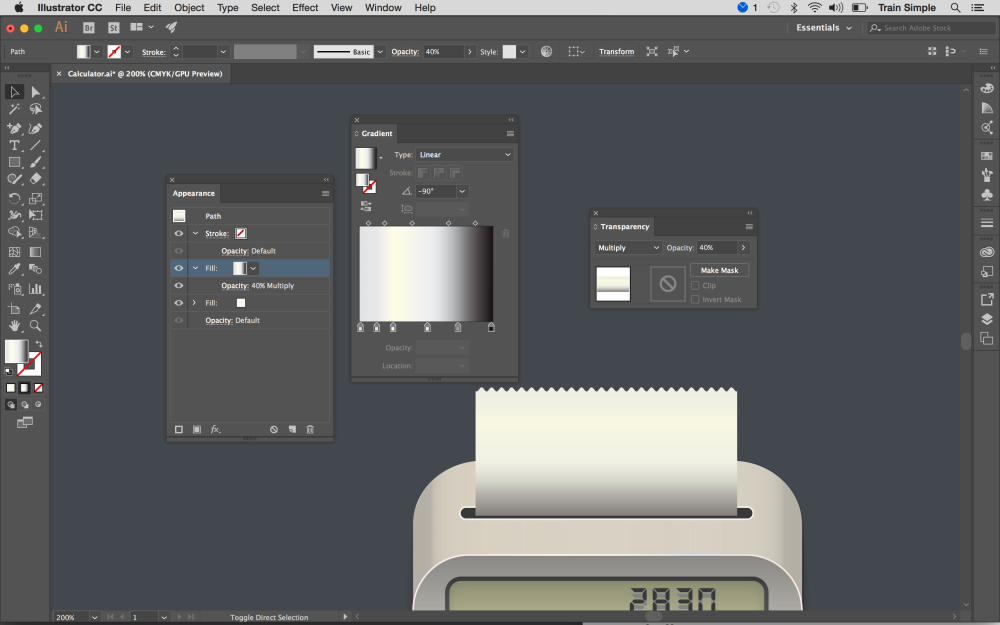
Click image to enlargeSelect the paper, duplicate its fill attribute in the Appearance Panel and apply given gradient on the copied fill.
Change gradient fill blending mode to “Multiply” with 40% opacity.
Click image to enlarge21. Add text
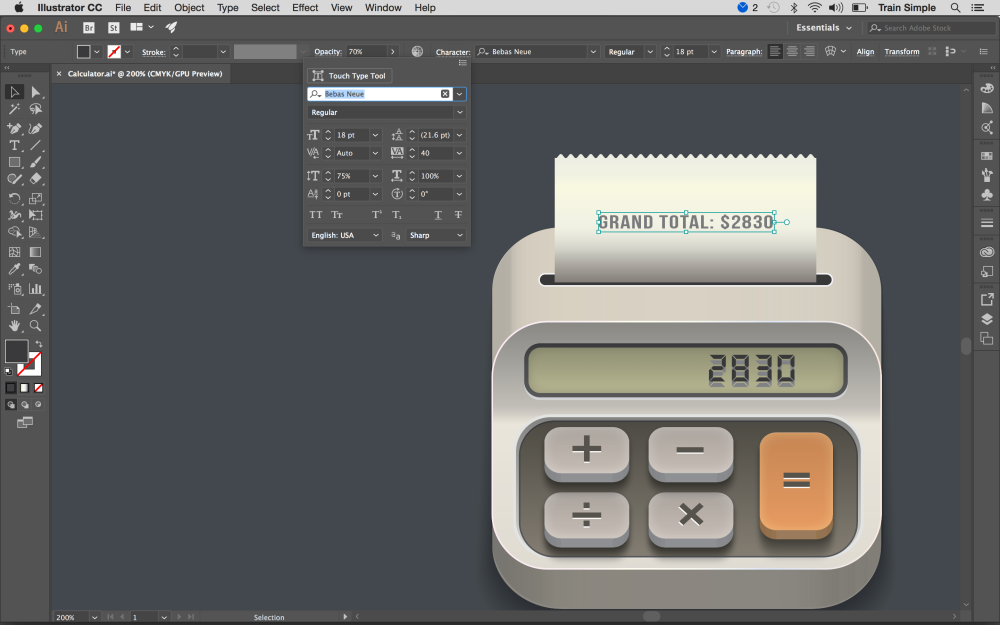
Click image to enlargeI’ve used “Bebas Neue” Font to type some text over the paper with given settings.
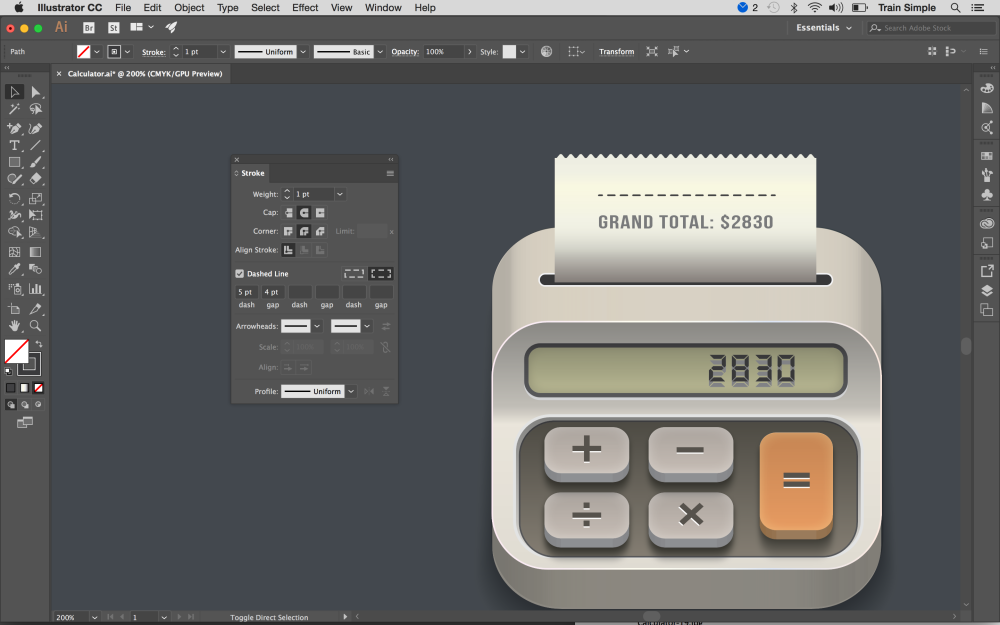
To make dashed line, draw a straight path using Pen Tool (P) with no fill color and #404041 color stroke (Stroke weight: 1pt). Now apply given settings below in the Stroke Panel at the top control bar.
Click image to enlargeTo make paper shadow, draw a rectangle as shown below with black fill. Apply 8px Gaussian blur effect on it and change its blending mode to “Multiply” with 30% opacity.
Click image to enlarge22. Draw a knob
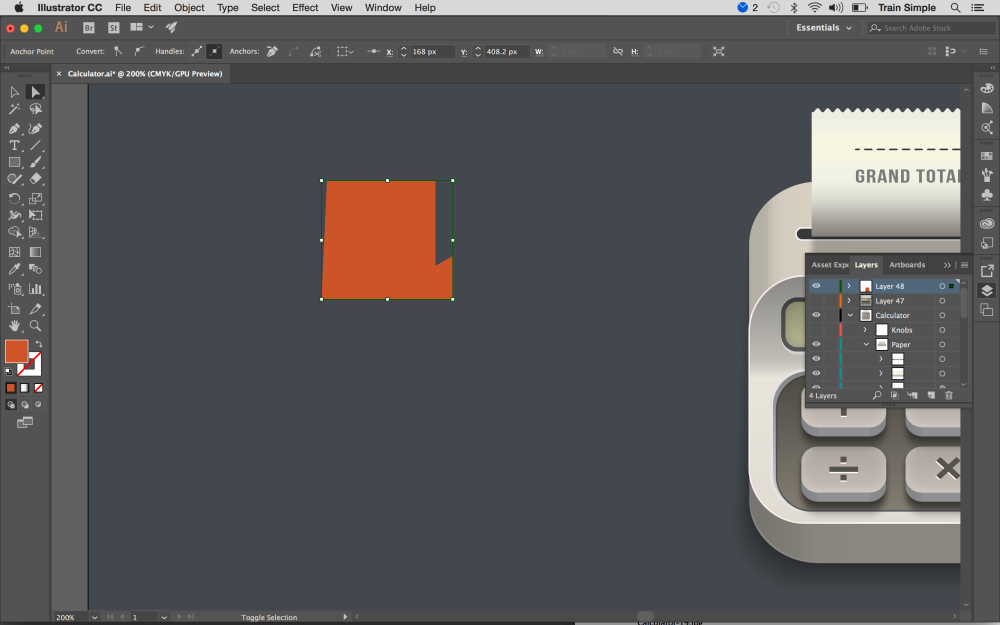
Click image to enlargeNext, we’ll draw a knob. Draw the following path using Pen Tool (P) and give it #DF7F5E color fill with no stroke.
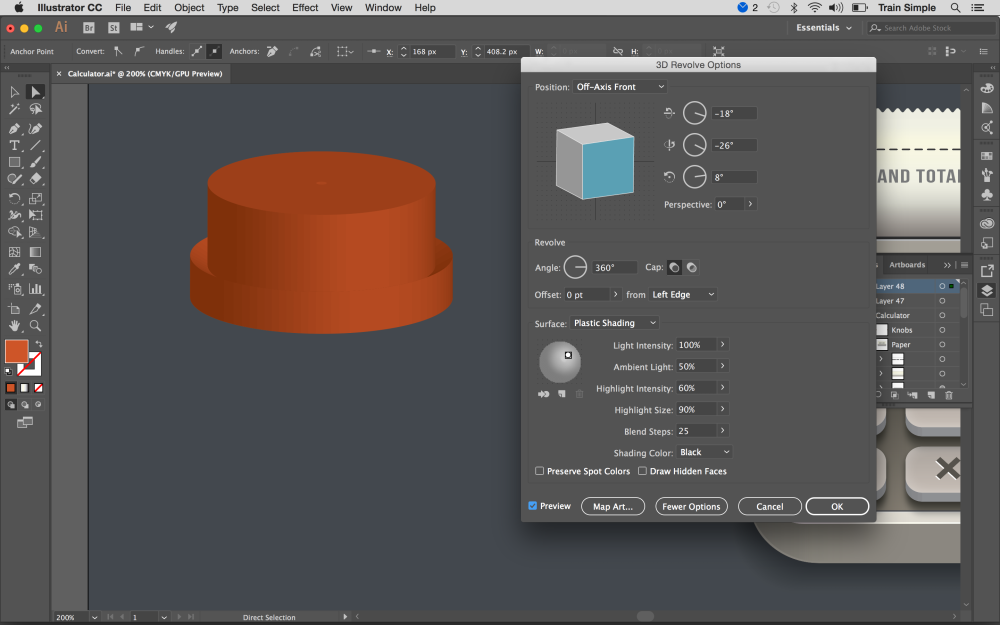
Select the shape and go to “Effect”> “3D”> “Revolve”. Apply given settings below.
Click image to enlarge23. Place the knob
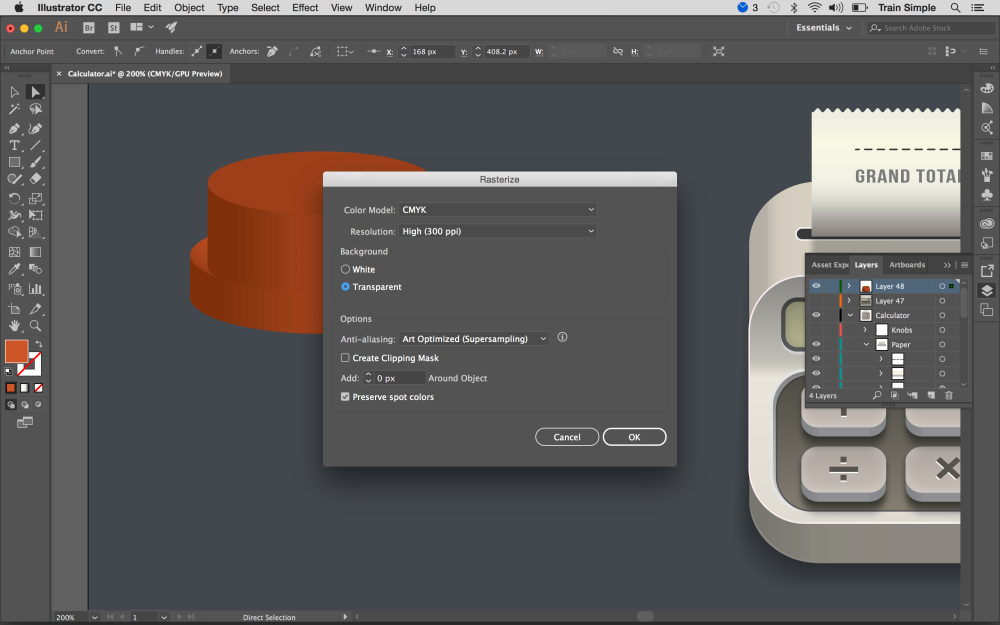
Click image to enlargeTo place the knob parallel to the calculator we have to rasterize it first. Select the knob and go to “Object”> “Rasterize”. Apply given settings above.
After that, rotate the knob at 90 degrees and hit “OK”. To reflect it you have to rotate it at 180 degrees and hit “Copy”.
Click image to enlargeNow position both knobs as shown below.
Click image to enlargeRelated articles:
-
We're in the middle of the biggest change in UI design tools since the beginning of design tools in the 70s. Code-based design tools are picking up traction and getting ready to take over a market dominated by old school illustration tools.
So should you consider adding a code-based tool to your design workflow? Well, if you're working on interfaces and you're only using image-based tools, you're limiting how expressive you can be in the digital world. Also, you're probably unwillingly creating tension between design and engineering specialists on your team.
Read on for five key reasons to consider the switch. Or, for a quick history lesson on the creative tooling landscape, scroll to the bottom.
01. Advanced prototyping
Image-based tools, as you now know, were originally meant to introduce illustration work to the world of computing. This paradigm was never meant to serve highly complex, interactive user interface design. No wonder image-based tools are highly limited when it comes to designing interactivity.
Modern image-based tools enable you to link static artboards together. Some will even animate the changes between artboards. That may be enough for simple landing pages, but if you try to design an interactive form with validation, a sortable table, or in fact, any advanced pattern, you'll run into significant difficulties.
Image-based tools don't support text-fields, states of components, conditional interactions, variables, and so on. One could argue that they don't support anything that we really need to design interactive interfaces. If you're designing dynamic interfaces, code-based tools are for you. Above, you can see a credit card form designed entirely in UXPin.
02. Realistic fidelity
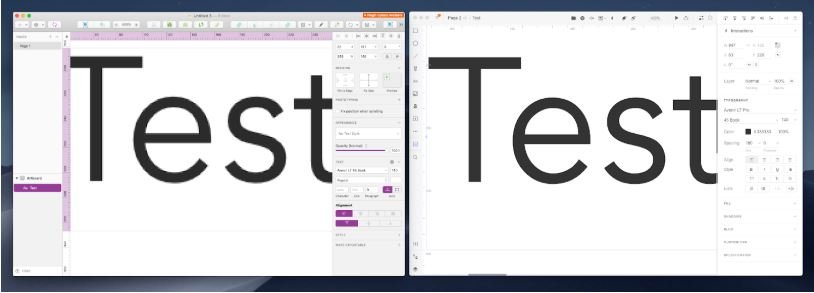
Text with the exact same spec rendered in an image-based tool Sketch (left) and code-based tool UXPin (right) – the text in UXPin will look exactly the same in the final product rendered in the browser
Image-based design tools will render of all the elements on screen, based on proprietary rendering engines. Code-based tools use browser rendering engines. This technicality has a massive impact on the design and development process. When designed in an image-based tool, text, colours, gradients and so on will look very different once an engineer codes them into the final version of the product. Those differences tend to lead to misunderstandings between design and engineering and slow down product development.
Code-based tools render all the design elements exactly like the browser does. The design will be identical to the final product.
03. Interactive, reusable components
All modern design tools enable you to save reusable components (symbols). Image-based tools, however, save static representations of elements represented on the canvas – no states or interactions are saved to be reused. However, with code-based tools you can save full interactive components in shared libraries. Just imagine how much time you and your team could save, if you weren't forced to recreate all the interactions every single time.
Here you can see an interactive component (a password with advanced validation) designed entirely in UXPin and saved in a shared design systems library.
04. Common constraints
Image-based tools allow for completely unrestricted creativity. Designers can create designs that are difficult (or completely impossible) to recreate in code. While that's fine for illustration work, it's unacceptable for user interface design. After all, our designs have to be coded as final products.
Code-based design tools exist within exactly the same set of constraints as the engineering environment. If something can be created in a code-based tool, it can be created in code.
05. New possibilities
The closeness between design and code, and the browser rendering engine mean that interface designs powered by code-based tools can exceed anything created in image-based tools, and give rise to some truly amazing designs. Code-based tools are able to understand code, and hence, render it!
UXPin's Merge technology (currently in alpha) is able to bring production-ready React.js components to the design editor. Advanced components such as datepickers are completely impossible to recreate in an image-based design tool. In a tool like Merge, they appear in an interactive form right inside the code-based editor, within seconds. Technologies like this may well be the final nail in the coffin for image-based tools. No vector image can even get close to this.
Where do design tools come from?
If all this has made you wonder why you're still using image-based tools, don't feel too embarrassed – 40 years of image-based tools have kept us all hostage. Only in the last year have designers globally started to ditch image tools for code-based solutions. The history of design tools still has an enormous impact on the market today. Let's take a look at the origins of today's tools.
The first design software was conceived at Xerox Parc in the 70s. Xerox Alto OS, and later Xerox Star, came equipped with the very first illustration software. The Xerox team dreamt of a personal computer that could be used for creative work. It sounded very bold in the days where computers could display nothing but text.
Interestingly enough, Xerox's early implementation of design tooling introduced a lot of patterns used by design tools today. Selection of elements, editing of the stroke, pencil drawing, colour selection… all of these features are almost identical today to how they worked in the 70s.
This is clearly visible in the first mass-adopted design tool: MacPaint, introduced with the first Apple Macintosh in 1984. This raster graphics illustration tool proved that Xerox Parc's dream was very close to reality. Computers could be used for creative work. It was a true revolution.
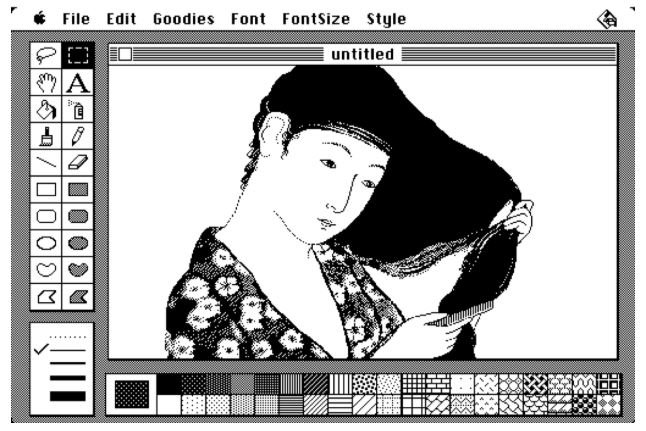
Apple MacPaint (1984)
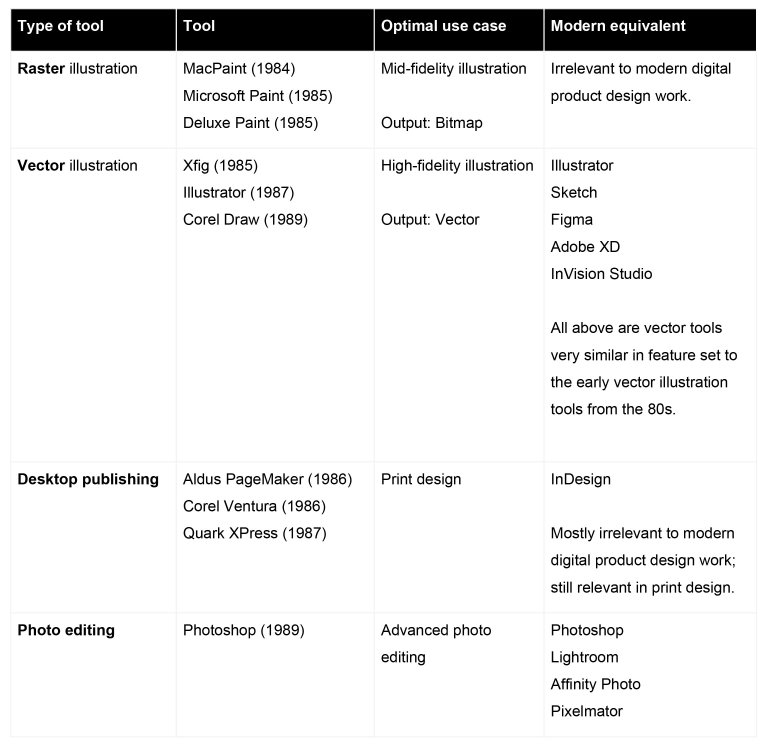
Following Apple's success, design tools started to emerge in all parts of the market. Just a year after its launch, MacPaint had a competitor from Microsoft (Microsoft Paint, 1985) and Electronic Arts (Deluxe Paint, 1985). Professional vector illustration tools followed suit in the following years, with Xfig, Illustrator and Corel Draw rapidly taking illustration to the next level.
On the desktop publishing end, things also accelerated with emergence of Aldus PageMaker and Corel Ventura in 1986, and Quark XPress the following year. Books, brochures and other print materials were easier to design and prepare for production than ever. Finally, photo editing tools joined the party in 1989 with the launch of Photoshop.
What all these tools had in common was that they were never meant to be used to design software. All these tools dealt with static creativity and were optimised for creating and editing images that, more often than not, were supposed to be printed.
No wonder the majority of design work in the 80s and very early 90s was all about print. Interfaces were mostly left to be designed by people who could code them (Creative Selection by Ken Koncienda is a great reference for those who want to learn about early software design at Apple).
Design tools in the 80s and their modern counterparts (click the icon in the top right to enlarge)
Then, suddenly, the design market changed completely. The internet exploded in the mid-90s and generated a massive need for web design. To answer the call, two groups came to the market: webmasters (coding designers of the early web) and graphic designers from the print world.
Though their processes were very different, both actually used the same tools; the tools that were generating images of the interfaces (Photoshop quickly dominated the market). Why? First of all, there were no other tools but those image-based solutions. Secondly, early web design needed exported image layers from design tools to create visually rich interfaces.
Until CSS3 (first support for border-radius property started with Firefox 2 in 2006, but we had to wait until 2009-2010 for full browser support) it wasn't even possible to create rounded corners of elements without images placed on the background. Early web design needed all those layers from Photoshop.
Today, the situation is quite different. To create a website or web application, we're only using images as illustrations, icons or photographs. No one needs layers from an image-based design tool to create elements of the user interface.
Despite that dramatic change, the old tools survived in the design workflow. While raster editors were replaced by vector tools (Sketch, Figma, Studio, XD and so on), the basic principles did not change. All the vector tools outputted vector graphics, exactly like the tools in the 80s. And these historic ties had a massive negative impact on modern design process.
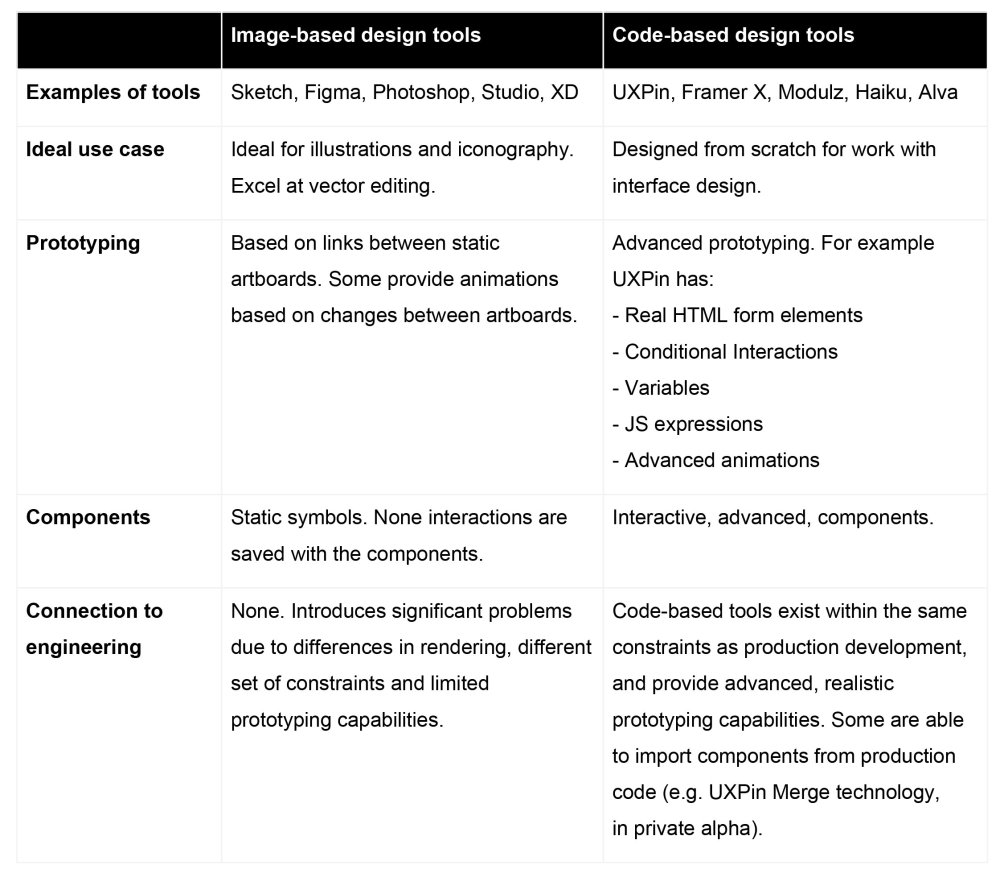
Two paradigms of design tools (click the icon in the top right to enlarge)
Due to the significant limitations of the image-based design tools, a new paradigm of design tools emerged on the market. Code-based design tools use browser rendering engines to render a designer's intent on screen and thus, without requiring any coding expertise, bring designers to the world of web developers.
On the surface, image-based and code-based tools may look similar. They all provide a pretty much identical drawing capabilities. The key differences are well visible in any interactive work. Modern image-based tools can only provide limited interactivity (typically linking static artboards with some animations of changes).
On the flip side, code-based tools provide a fully interactive environment that allows for fast prototyping of realistic interfaces. This is possible because code-based tools render elements visible on the screen with HTML, CSS and JavaScript. Designers may not be aware of it, but the same technology used in the final product is used to design it.
-
Adobe has slashed the price of its full Creative Suite of apps by almost half in an unbelievable Adobe Cyber Monday deal. The software company is offering an almost 40% discount on its All Apps package. That means you can now pick up Adobe’s entire collection of 20-plus creative desktop and mobile apps, and more, for just £30.34/€36.29/$22.99/month, instead of £49.94/€60.49/$52.99/month – a rare deal indeed.
Unfortunately, the offer isn’t open to everyone worldwide. But if you’re based in Europe, the Middle East, Africa, Brazil or Japan, you can claim the 39% discount.
Save almost 40% on Creative Cloud now
If you’re based in the Americas (apart from Brazil) or the Asia-Pacific region (Australia, China, India and more), however, Adobe is offering a comparatively more modest 25% discount on Creative Cloud. That’s still a quarter off the normal price though, which is a sizeable discount.
Students and teachers get lucky too, with an additional 20-25% discount – that's on top of the 60% discount already offered.
The offers are valid until 28 November, so if you’re interested, you'll need to sign up by then…
What’s included in the Creative Cloud All Apps plan?
Adobe's Creative Cloud All Apps plan includes:
- The entire collection of 20+ creative desktop and mobile apps, including Photoshop CC, Illustrator CC, and Adobe XD CC
- 100GB of cloud storage
- Adobe Portfolio
- Adobe Fonts
- Adobe Spark with premium features
- The option of up to 10TB of cloud storage
The programs are fully integrated, so you can work between them (and different devices) seamlessly – whether you’re out and about or in the studio. Built-in templates help you jump-start your designs, while step-by-step tutorials will help you sharpen your skills and get up to speed quickly.
This deal expires on Wednesday 28 November 2018.
Related articles:
-
There have been a few great GoPro deals this Black Friday and Cyber Monday weekend, but this is the cheapest price we've seen for a 2018 GoPro. Don't be confused: GoPro released its original Hero a few years ago, but this is the revamped 2018 version. Usually it'll set you back $199.99 (already great value for what you get), but in its Cyber Monday sale Best Buy has dropped the price by $70 to just $129.99. A top GoPro Cyber Monday deal if ever we saw one.
For that, you get waterproofing up to 33ft, a 2-inch touchscreen, Wi-Fi and Bluetooth connectivity for easy file transfers, and smooth 60fps performance at 1080p. There's also a curved adhesive mount, flat adhesive mount and mounting buckle thrown in. It gets an average of 4.6* (from 254 reviews) on Best Buy. This GoPro is a great-value travel companion, and top entry point for action filming.
Not what you're looking for? Take a look at our mega-roundup of all the best Cyber Monday deals.
-
if you've been holding off buying your tech until Cyber Monday, your patience has been rewarded. Jet has kicked off its Cyber Monday sale with some particularly strong offers on devices – including some amazing iMac and MacBook deals.
Jet has dropped the price of a range of MacBooks by $200-$250, but the top saving is on a 15-inch MacBook Pro with Touch Bar (core i7, 512GB), which has been discounted by a massive $300. Read on for more details.
The best Jet MacBook savings
Read on to discover where the biggest savings can be had. Not quite what you're looking for? Take a look at our roundup of all the biggest Cyber Monday deals, across the board, or explore all of Jet's Cyber Monday deals (if you need to buy for children this Christmas, there are some pretty awesome toy deals in the mix).
-
It's day three of the biggest shopping weekend of the year and the deals are still rolling in. Black Friday and Cyber Monday 2018 show no signs of slowing down, with some of the best deals we seen still being announced. And these discounts on keyboard and mice are no exception. So while you might think you've bagged yourself the best Microsoft Black Friday deal already, these PC accessories may prove otherwise. Let's take a look at what's on offer...
Read more:
-
Black Friday might have been yesterday – but it seems nobody's told the retailers. We've just spotted a brilliant series of Black Friday deals on the excellent Nikon D3500, a camera widely thought to be the best entry-level DSLR in the world right now.
Available at Adorama, these Black Friday weekend deals are valid today only, though. So if you've been thinking about getting into photography, or know someone who wants to, now's your chance.
So what have we found? Well, the cheapest deal sees the D3500 bundled with an AF-P DX NIKKOR 18-55mm f/3.5-5.6G VR lens, for just $396.95. That’s a fantastic $100 discount on a DSLR that was already great value for money.
You’ll make the biggest saving with Adorama’s middle-tier offer, though. If you can find another $100, you'll be able to take home the Nikon D3500 with two great lenses for only $496.95 – down from $846.95. This is the option we'd recommend, if you can stretch your budget that far. With two lenses, you've got a lot of flexibility straight out of the box.
The D3500 is a refreshed version of Nikon’s ever-popular Nikon D3400. It delivers ultra-sharp photos and videos, and faster continuous shooting than its rival, the Canon EOS 750D/Rebel T6i. And it’s perfect for beginners, offering a lightweight, responsive and extremely easy-to-use way into DSLR photography. With $100 knocked off the usual price, this bundle offers brilliant value for money, and would make for a cracking Christmas present.
-
The last 24 hours has seen amazing Black Friday and Cyber Monday deals, and they're still coming in thick and fast. Kicking things off today is this incredible offer from Clip Studio Paint. The successor to Manga Studio (Comic Studio), Clip Studio Paint is a great all-round digital art tool - and right now you can get it half price!
Particularly suited to those developing manga art and comics, with this quality digital art software you can create full colour comics and cartoons, without the need for any other tools. Key Clip Studio Paint features include:
- Pencil and Ink Options - Create original sketches using your mouse or draw naturally with a Pen Tablet. Use scans of your existing paper artwork or import images or photos for use in your manga and comic creations.
- Powerful colour tools - Clip Studio Paint provides all the colour functions you need to create outstanding artwork.
- Simulate real world paint brushes - New dedicated air brush allows you to have multiple air brush effects. Use the tone brush to create a wider array of visual effects. You can also easily create and share your own brush pattern as well.
- 3D Options - New support for 3D objects and figures allows for reference and background materials. Manipulate 3D objects directly on the screen or use preset poses, and simply drag and drop other 3D objects on the canvas.
- Vector Toolkit - Speed up your workflow using the built-in vector tools.
Get 50% off Clip Studio Paint
Clip Studio Paint is available at 50% off wherever you are in the world, see below for the discount in your region.

Offer ends 27 November at 17:00 (Japan Standard Time).
-
When you're busy working on your next creative masterpiece, it can be all too easy to forget that your files are clogging up your computer. And the last thing you need when you're sending files back and forth with clients is for your machine to alert you that it has no more room. That's why it's a good idea to invest in an external hard drive with lots more room to back up your work and ensure that you're never caught short again.
If you're in the market for an external hard drive, we've got some good news! The Black Friday weekend has seen the price of leading external hard drives come crashing down, meaning that you can pick up more digital room for less. And remember, if you want to get involved with these deals early, it's worth signing up for a free Amazon Prime membership trial. Prime members get to access deals 30 minutes before everyone else, and what's more you can cancel your subscription with no strings attached.
So, if any of these external hard drives look like the right product for you, be sure to buy it now. You never how long stocks last at this price, and these are the best deals you're going to find.
Related articles:
-
From Ford data security speculation to the VisionDirect data breach, the Threatpost editors talk about this week's biggest stories.
-
If you're familiar with Apple (who isn't), you'll know discounts and offers is something the company very rarely offers. But, not ones to be left behind, Apple is getting involved with Black Friday and Cyber Monday with its very own shopping event, offering gift cards up to $200/£160 with purchases on select products.
The offer doesn't knock any money off the product prices, which comes as no surprise, however, if you're in the market for a new Apple device, the gift card comes as a nice bonus - and one you're unlikely to see again in the near future.
Here are the offers currently available:
Get a $50/£40 Apple Store gift card with select iPhones
- iPhone 7: From $449/£449
- iPhone 7 Plus: From $569/£569
- iPhone 8: From $599/£599
- iPhone 8 Plus: From $699/£699
Get a $100/£80 Apple gift card with select iPads
Get a $200/£160 Apple Store gift card with select Macs
- MacBook Pro: From $1299/£1249
- Macbook: From $1299/£1249
- MacBook Air: From $999/£949
- iMac: From $1099/£1049
- iMac Pro: From $4999/£4899
- Mac Pro: From $2999/£2999
Want more Apple offers? Check out the Apple shopping event in full right here.
-
All digital artists and graphic designers will know how vital it is to have complete colour accuracy on your machine. The best monitor calibrators don't come cheap, which is why this Black Friday 2018 deal is such a great find. DataColour has slashed the prices of its Spyder5 range, and they're flying off the shelves.
This deal is so popular that that Spyder5PRO has already sold out, but fear not: you can still grab a Spyder5ELITE with a whopping £97 (130€) off. This calibrator offers expert colour accuracy, with room light monitoring and unlimited settings for gamma, white point and advanced grey balancing enabling you to take complete control of your colour workflow. It work on laptops, desktops and projectors, too.
Please note, the online store price is in Euros, so the GBP value may fluctuate slightly depending on the exchange rate.
-
It's no secret that Black Friday is a great time to pick up a bargain on tech. But it's also a top time to bag a bargain on trad art tools. Amazon in particular is a great place to pick up some top art supplies on the cheap - and we're talking 40% off or more. Here we've rounded up the best Black Friday and Cyber Monday deals we've found, so you can upgrade or stock up for less.
Related articles:


3 key steps to planning a character rig
in Ειδήσεις από τον χώρο του Design και Hosting
Posted · Report reply
Making a successful character rig depends on careful preparation. MPC lead rigging technical director, Stephanie Wagner, shares the three steps she takes before beginning a character rig. One of her many projects was overseeing the rigging on the pangolin puppet rig made for The Jungle Book, one of the many 3D movies MPC has worked on.
The finished character in the 2016 version of the Jungle Book
01. Reference is key
Whenever I pick up a new character, I start gathering a lot of references such as slow-motion videos, skeleton images, and learn about the species history and specifics on Wikipedia/YouTube. I have been looking at birds recently; I’m trying to gather a lot of knowledge about their anatomy and how it defines their motion, for example the role of the wishbone and how the pectoral muscles are involved in the lifting of the wings. I like to be informed when I start working on a character so I can rig it with confidence and also assist other departments like animation if questions come up.
02. Place geometry
I start by placing skeleton geometry inside the model followed by a joint layout, skin cluster and a first puppet build. For the puppet, I choose the modules (legs, spine, arms, etc.) needed for the character and add features (e.g. a space switch) based on animation feedback. The core of any rig is still based on joints and a skin cluster. The joint layout is essential to the production of a movie from start to finish. Being confident in placing joints and painting skin weights is a core skill of every rigger in the team, along with scripting, maths, modelling and an interest in anatomy.
03. Work on caching rig
After the initial puppet building and animation/rigging feedback phase, I start working on the caching rig which will later be used on screen. When I am working on a hero character I tend to add a muscle rig as well as correctives and several skin simulations to highlight the most important aspects and anatomical features of the character. It’s still my favourite part of rigging to see a character progress in rigging and come to life in shots. MPC’s rigging department is a candy store of rigging tools artists can choose from. We pretty much have every commonly used Maya tool on steroids and a lot more!
This article was originally published in 3D World. Buy issue 239 or subscribe here.
Read more:
View the full article