

Rss Bot
-
Content Count
15,266 -
Joined
-
Last visited
Never -
Feedback
N/A
Posts posted by Rss Bot
-
-
-
-
The Katyusha Scanner can find SQL injection bugs at scale, and is managed via the Telegram messenger on any smartphone.
-
Microsoft releases a total of 57 security patches, part of its July Patch Tuesday, with 20 rated critical.
-
Microsoft today addressed two NTLM-related vulnerabilities privately disclosed by Preempt Security. The flaws allow for credential relay attacks.
-
Adobe only fixed six vulnerabilities in two products, making it the company's smallest security bulletin of the year.
-
Painting ‘alla prima’ (that is, painting wet-on-wet, in one session) is the ideal technique for embracing the nature of oil paints. There is something about the medium that is so generous. Its fluid, glossy, rich texture enables you to make thick brushstrokes, which can be spread and layered with so much satisfaction.
Also called ‘direct painting’, alla prima is all about being spontaneous and making rapid decisions, as the goal is to produce a painting in one go (often in one setting), without letting any layers dry.
If there’s one thing that painting wet-on-wet can teach us, it’s to be confident. There's no room for fiddling with the brush, no retouching dry layers, and no glazes to hide the mistakes – every brushstroke counts!
Painting alla prima particularly suits working plein air, but you can still apply it to your studio work. In fact, it’s a great way to help add more freedom and spontaneity when working in this environment. In this workshop, we will work from a photo, but will attempt to capture the essence of the scene with the same energy and speed as if we were painting from life.
01. Lay down a base and initial sketch
A warm base helps to emulate a summer glow
Adding a ground to your canvas will harmonise the colours in the final painting. Here, we’ve picked a warm colour to convey the hot summer’s day in the scene. It will also carry a warm feeling across the whole painting.
If you want to accurately transfer the image onto the canvas, you can lightly draw a grid onto the board and copy from a gridded version of the original photo, as we have done here. There’s no need to put details in at this point, it’s just about defining the main shapes.
02. Block in one colour
Build up the mid tones as a whole
Fill the canvas with your mid-tone colours first – you’ll have the chance to add darker and lighter accents after. Start sculpting your painting with strong brushstrokes, to give an early sense of movement, composition and colour.
The paint needs to be thin at this stage (diluted with turps or water). Use large brushes to start with, going smaller as you go more into more detail. Instead of working in small areas, try tackling one colour at a time across the whole canvas – here, we're working on all the greens in one go.
03. Define the shapes
Keep in mind how brushstrokes can affect the composition
The chances are your diluted first marks will now look slightly faded, but now is the time to add some contrast to the scene. The paint can be used pure or with a medium, but it needs to be thicker than before.
The direction of the brushstrokes is also important, as these marks will guide the eye and strengthen the composition. The marks at this stage are often the heart and soul of the painting – they are bold enough to make a statement without being lost in the details.
04. Paint the subject
Break down the figure into abstract shapes to avoid a rigid look
Painting characters can often be daunting or look a little rigid. To avoid this, try to forget you are painting a figure with limbs, and instead depict them as abstract shapes.
Make sure the figure fits into the rest of the painting in terms of tone and colour. A character will look awkward if it is cooler, warmer, lighter or darker than the rest of the painting! Make sure you are consistent with light across the canvas.
05. Add the final touches
Time to fill in the gaps and refine some details
The painting is almost done and just needs final details and a bit more depth. This is the time to adjust any contrasts, such as adding some darker brushstrokes in the shades and highlights in the greens that will convey energy. Make sure the lines of the figure have been refined, and gaps have been filled across the painting.
When working wet-on-wet in oils, watch out for unwanted blending that can happen when adding details. Working alla prima often means having a spontaneous unpolished result – embrace it!
You might also like these art articles:
-
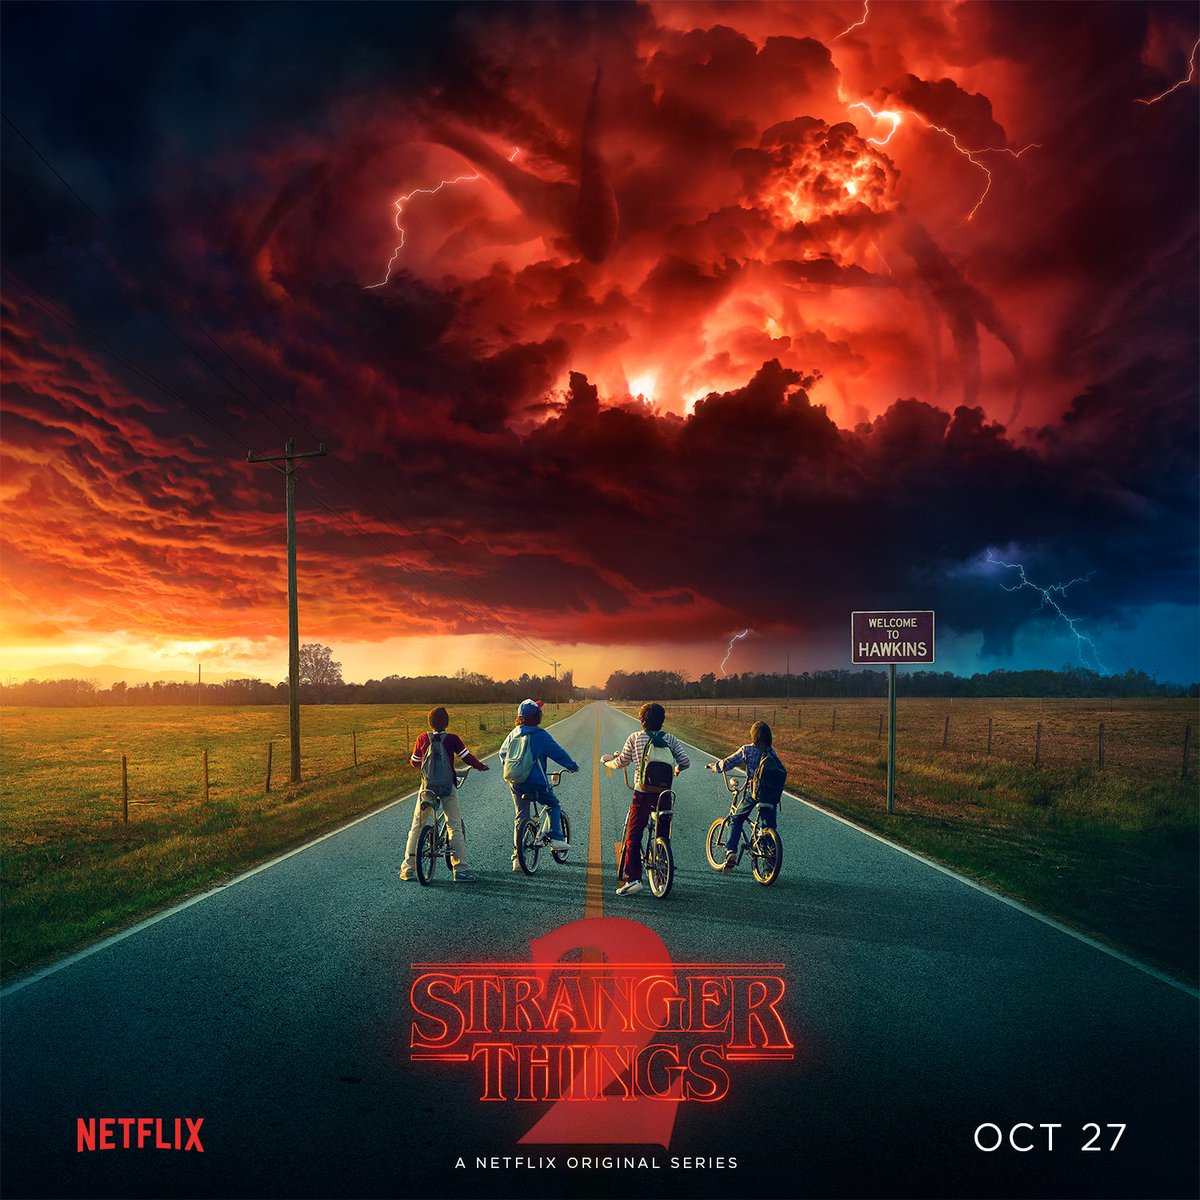
Mark October 27 in your calendar as the day you need to sign back up to Netflix (or at least enrol in another free trial) because Stranger Things is back in town.
You remember Stranger Things, right? The sci-f/ fantasy '80s nostalgia fest was the show on everybody's lips last year thanks to its gripping story, charming characters, and an aesthetic that managed to look retro without appearing dated. It also spawned animated mashups, plus an 8-bit videogame makeover.
Prepare to return to the Upside Down [Click to see the full size poster]
We've already seen how the official poster for the first series was created, but with a second batch of episodes on the way it's only fitting that series two got its own promotional artwork...
First and second series compared – what does the darker look suggest about the content of the next series?
Fans of the show have already exploded with excitement online thanks to the new poster, and it's sure to lead to some rampant speculation – is that the monster from the first series lurking in the clouds, and most importantly, where's Eleven?
We've got to wait a couple of months yet until we find out, but in the meantime there's also a brief video teaser to tide you over.
Related articles:
-
A good mobile app must boast a great UI design and an engaging user experience, of course, but people also judge by appearances. In a crowded marketplace, developers must make sure that their app is beautiful enough to stand out.
I work at EffectiveSoft, a custom applications development consultant, which often advises developers on integrating animations into their UIs in order to win over customers. Get it right, and it really works.
However, that's not as easy as it sounds. Use too many animations or use them in the wrong places, and it can create an irritating or noisy experience. Animations, when used properly, help reduce cognitive load, attract and direct users’ attention, and make an experience easier to follow.
So, when are animations appropriate? This article pulls together some best practices for using animation in mobile apps.
01. Animated app launch screens
Studies show that people expect apps to load instantly, but with complex mobile apps this isn’t always possible. Loading animations can help distract users and make the load time appear shorter than it is. There are a lot of different animation options for load screens.
A simple option is to use an animated logo, as Édouard Puginier has done here in his design for the launch screen of Wit.
App launch screens are prime locations for animations
Other designers like to get more creative, and tie their animation in with the theme of the app itself or the rest of the branding. In the loader design below, Anton Drokov has animated a spacecraft travelling to the stars.
Theme your animations to create excitement as your app loads
02. Animated login screens
Some apps ask users to log in before they launch. Here, an awesome background illustration can help liven up a login screen, and keep new users on side so they’re willing to take the time to log in.
In the login animation below, @herac1es has used a time-lapse animation of a busy city to add momentum to the process of logging in.
Jazz up a login screen with animation
Other apps use animation to distract the viewer while they check the username and password that has been entered. In the space-inspired concept below, Oliver Günther has even designed an error state.
Getting your password wrong has never been so fun
03. Animated onboarding screens
Software developers understand the importance of the onboarding process. This helps first-time users to become familiar with the app – there’s a real risk people will abandon the app if they do not understand how to work with it.
Showing static slides to users is a common approach to the onboarding experience, but animated walkthroughs are much more engaging, as this calming onboarding animation from Zhenya & Artem proves.
Walk users through the app with animation
04. Animated progress and activity indicators
It is common knowledge that people are impatient and hate waiting. Developers do their best to ensure their apps work smoothly and speedily but sometimes waiting is inevitable – for example, when something needs to be loaded or a new element is installed.
Apps often employ animated progress or activity indicators to capture users’ attention. These could be circular or linear, and developers tend to choose indeterminate indicators for operations that are performed quickly, and determinate indicators for actions that take more than two to three seconds.
However, some app designers make their activity indicators more distinctive. For example, Domaso’s circular progress indicator has been turned into a cute cat that stretches as it moves.
What else could be a fun play on the spinning wheel?
Andrey Davlikanoff has also plumped for a cute creature. His tiny snail moves forward to indicate progress.
This is certainly more fun than most progress indicators
Other developers have chosen to tap into our obsession with food. Such indicators are a great choice for mobile apps that deal with food delivery, recipes or cooking. For instance, Giedrius Butkus’ mouthwatering pizza preloader design would fit a pizza delivery app perfectly.
Just hope your users don't get hangry
Roman Kryzhanovskyi has opted for a simpler, geometric design in his Android app server search progress screen.
We love the sonar-style ripple effect (You might have to refresh to make this one play)
Finally, Mark Martemianov has decided to combine a circular and linear progress indicator in his Material Design-style subscription button.
Next page: UI animation ideas for buttons, menus and error pages
05. Animated buttons and controls
Developers extensively make use of animations when it comes to different buttons and controls. A common example might be an animated handset to indicate there is an incoming call – as in this design by Andreas Storm.

Animated toggle buttons are also popular. The toggle switch below, by Tsuriel, enables the user to switch between day and night modes.
06. Menus
Mobile app menus offer plenty of scope for imagination. Most designers use different fonts and backgrounds to make them beautiful. Some go a step further and take advantage of animated buttons and fonts to make their apps to be even more distinctive. This charming menu animation from Anastasiia Andriichuk is a sweet surprise for users.
07. Pull-to-refresh
Both users and developers love swipe-to-refresh patterns. This method for updating content involves a physical interaction between the human being and the app, almost like a dialogue between the two.
This pull-to-refresh animation from Jon Rundle takes a simple approach, with a satisfying elastic bounce effect when the user lifts their thumb.
In other cases, more complex animations can work better. Ramotion’s liquid pull-to-refresh animation for Dribbble adds a touch of fun to the experience.
It's a good idea to use animations that match the overall style or subject of the app. Dmytro Prudnikov’s design for a rentals app gives the user a cheeky peek of a skyscraper in the sunshine.

08. Error pages
In an ideal world, errors would never occur. But realistically, sometimes things don't go to plan. Putting some effort into your error pages can help diffuse the frustration of hitting a dead end. A custom error page can help retain users.
Sathish Kumar's 'no internet' animation shows a bee falling out of the sky when the user's connection isn't working properly.
These kind of animations work well when designed in tandem with other error pages – for example, Kumar has designed an accompanying animation for when something goes wrong, which shows a bee being blown off course – sure to take the sting out of not getting the information you were expecting
Similarly, Scott M Thigpen's design for a weather app introduces an element of surprise and humour when an error page occurs.
Related articles:
-
When you're focused on the design side of things it can be easy to forget just how important good copywriting can be to a finished product – if it doesn't hit the mark then it could quite easily ruin the entire package.
jkr knows the importance of coming up with words to match the quality of the pictures. Here Chris Sharpe, head of brand voice, and design director Brett Sabler discuss the designer-copywriter relationship, and explain how to craft great copy.
You can find the rest of our video interviews with the jkr team here. But before you go, here's some more great advice from Chris and Brett, as they share their three top tips for mastering brand voice.
01. Bounce ideas around
Chris Sharpe often articulates the initial idea to inspire the design team, but it's a two-way thing. "It's nice to have a bit of table tennis back and forth," he says. Both Sharpe and Brett Stabler agree that ideas can, and should, come from anywhere.
"It's just words and pictures at the end of the day," grins Stabler. "It's a 50/50 relationship, and when you work those things in parallel, the end result is much better for it."
02. Know your limits
Finding the correct approach to copywriting depends on the context. "I may be best placed to do it – I can be a chameleon – but sometimes someone with experience in the sector will be a step ahead," reasons Sharpe.
Stabler sees similarities in design: "Any designer can have a go at something, but it may get to a point where, for example, a calligrapher would be better because they're a real craftsman rather than a jack of all trades," he adds. "Part of design direction is knowing where your limitations are, and when you need to find a specialist."
03. Make every word count
"Words are very important to any brand," believes Sharpe. "The back of a pack could make you fall in love with a brand. It might seem like a small thing, but it lifts the whole thing." He gives the analogy of giving someone a gift: "It might be wrapped perfectly, but it's the little card that tells you who it's from that lifts it that notch further, and we like to surprise and delight in that sense."
Stabler gives jkr's work for PG Tips as an example: "On the box, it says '80 lovely cups of tea' rather than a cutout robot telling you that there are '80x teabags'. That human touch often comes through the words more easily than the visuals," he says.
This article originally appeared in Computer Arts issue 266; buy it here!
Related articles:
-
There's never a bad time to start down the career path of a mobile developer, but there's never been a better time than now, with the release of Android O. Learn how to bring your apps to life with the the Android O and Java Developer Mastery Course, on sale for just $15 (approx £12)!
The newest Android OS release, Android Oreo, is available for developers now. That means there's no reason not to start learning all about the new capabilities to this operating system. Even if you're starting with next to no coding experience, this course will have plenty for you. It will introduce you to Java, the Android Studio, IntellJ IDEA, and other key tools used to create apps for Android.
The Android O and Java Developer Mastery Course usually retails for $200. Right now, you can save 92% off that price and pay just $15 (approx £12). For under $20, you can learn how to build apps for Android, so snag this course today!
-
Renowned Italian designer Massimo Vignelli, creator of the classic American Airlines logo, once said that designers use far too many typefaces. But with so many great free fonts around, it's no surprise that creatives' collections are ever-growing.
Vignelli's all-purpose toolkit features household names like Garamond, Bodoni, Helvetica, Univers, Futura, Caslon and Baskerville – between them spanning three centuries of type design history. And few designers would disagree that all of the above are timeless, albeit well-worn classics.
But sometimes something a little different is required of a display face, to give it that extra punch. Sometimes the ubiquitous serifs of Times New Roman just don't quite cut it. Whatever your needs, the following list of top fonts that often get overlooked should really come in handy.
We've split our list into display fonts, serif fonts, sans serif fonts and slab serif fonts to help you find the font you need. We'll start with display fonts...
Display fonts
01. F37 Bella
Bella is a classical Didot-inspired beauty
Based on letterforms of American typographers John Pistilli and Herb Lubalin, and Swiss typographer Jan Tschichold, F37 Bella is an award-winning display font by Rick Banks. Designed in the classical French Didot style but with a contemporary geometrical twist, Bella contains alternatives and covers an extensive range of Latin-based languages, including Western and Eastern European.
02. Eames Stencil
If you're looking for a great stencil font, look no further than Eames Stencil
When you're looking for a great stencil font that's beautifully designed and not in the least bit cheap-looking or gimmicky, this House Industries favourite should be your first port of call. This top font is part of the broader Eames family, developed in homage to the late great Charles and Ray Eames. The curves in the stencil font were inspired by the curvature of bent plywood.
03. Otto
Otto is Non-Format's first commercially available font
Otto is a stunning font from talented design duo Non-Format. Featuring a combination of delicate lines with flashes of block colour, it's a unique display font with two personalities that works well in large formats.
04. Poster Bodoni
This Bodoni display version from the 1920s is something extra special
Okay, so Vignelli already ticked Bodoni off the list – and a beautifully classy Didone-style serif it is too, thanks to the craft skills of Giambattista Bodoni in the late 18th century. But this display version from the 1920s is something extra special for setting large, high-impact type where the extreme contrast between the stem thickness really comes into its own. A top font that's perfect for setting large, high-impact type where the extreme contrast between the stem thickness really comes into its own.
05. Cumulus & Foam
This surreal display font combines simple, ultra-thin lines with bulbous, cloud-like forms
Designed by Stefan Kjartansson for YouWorkForThem, this utterly unique, quite surreal display font combines simple, ultra-thin lines with bulbous, cloud-like forms to give Cumulus & Foam its tagline, "the most beautifully grotesque font of our time." Although Kjartansson proudly asserts that it doesn't work as a typeface, this top font's "ugly beauty" and "disciplined chaos" can certainly add character to a project.
Next page: serif fonts
06. Linotype Didot
Didot is great for adding a classic, timeless elegance to your work
This Bodoni alternative was also developed in the late 18th century, and the mutual influence between the two contemporaries is apparent. Both share characteristic sharp, seductive serifs and harsh angles. But with more space allowed for its counterweight, Didot feels like a slimmer version of Bodoni. This top serif font is great for adding a classic, timeless elegance to your work.
07. Mrs Eaves
You may recognise Mrs Eaves from its use in the WordPress logotype
While its unconventional name may raise a few eyebrows, Emigre's versatile serif, designed by Zuzana Licko in 1996, is a subtle modern interpretation of the work of legendary 18th century type pioneer John Baskerville, and named after Sarah Eaves, the housekeeper who would become his wife. You may recognise it from its use in the WordPress logotype.
08. Bembo
Bembo was reborn under the Monotype label in 1929
A 20th century revival of an old-style serif originally cut by Francesco Griffo in the late 15th century, Bembo was reborn under the Monotype label in 1929. Widely considered a great typeface for setting book copy, this top font is generally best used to express traditional, formal beauty, and is particularly notable for its stylish italic ampersand.
09. Modern No 20
Modern No 20 is perfect for adding class to your designs
Designed by Stephenson Blake, this modern serif is excellent typographical shorthand for quality and refinement. Designed by Edward Benguiat for Bitstream, it's perfect for adding class to titles the world over. There's no better testimonial than the fact that it's been employed for world-renowned design agency Pentagram's logotype.
10. Rooney
Rooney typeface has a friendly feel, without ever being too cheap and cheerful
One of a growing number of modern fonts earmarked as particularly effective for use on screen – particularly for apps and websites – Jan Fromm's Rooney typeface has a friendly feel, without ever being too cheap and cheerful. The subtle rounded serifs and terminals of this top font add personality and impact when used large, as well as having a softening effect when set in smaller sizes. It's available in six weights.
Next page: Sans serif fonts
11. Gotham
Gotham is a no-nonsense sans-serif
Tobias Frere-Jones' assertive, geometric sans-serif was inspired by New York's architectural signage of the mid-20th century. Initially commissioned by GQ magazine, Gotham has been used everywhere from Barack Obama's 2008 presidential campaign to the One World Trade Centre, and is available in four widths.
12. AG Book Rounded
This sans serif has a considerably soft, informal feel
Although based on the root typeface Akzidenz-Grotesk – the late 19th century precursor to Helvetica, and indeed all modern sans serif fonts – this rounded version from Berthold has a considerably softer, more informal feel, generous spacing and large x-height, all of which combine to make it well suited to easy reading in children's books and advertising.
13. Franklin Gothic
Franklin Gothic boasts a broad range of weights to suit print, web and other purposes
Originally designed in 1903, redrawn in 1980 and finally updated in 1991, Franklin Gothic (or Grotesque in the US) can boast a broad range of weights to suit print, web and other purposes. Although it fell out of favour for a brief period in the 1930s after the introduction of European faces such as Futura, Franklin soon regained and maintained its popularity in the US, and is today a shoo-in for our list of top fonts.
14. Wagner Grotesk
Wagner is particularly well-suited to screen use
Canada Type's original intention with this extensive redesign of Edel Gothic/ Grotesque was to update, enhance and adapt the early 20th century typeface for use on digital platforms. Accordingly, Wagner Grotesk is particularly well-suited to screen use, although its impact and legibility ensure it works hard on posters and in headlines, too.
15. Source Sans Pro
Adobe’s Source Sans Pro is one of the design community’s most popular free fonts
Released in 2012, Source Sans Pro was the first open source type family for Adobe, and has proved wildly popular. It was envisioned as a classic grotesque typeface with a simple, unassuming design. It was designed by Paul D. Hunt, who continues to work as a type designer at Adobe, and is available for free.
Next page: slab serif fonts
16. Kondolar
This top font works hard as a legible text face
Unexpected flourishes on certain characters give Cadson Demak's appealing slab serif font something of a dual personality. This top font works hard as a legible text face, but used large enough, the sweeping descenders on the 'K', 'Q' and 'R' provide just the level of detail it needs to feel special enough to carry a headline.
17. Black Slabbath
If you use Black Sabbath, use it big!
Besides Cumulus & Foam, this is Stefan Kjartansson's other major claim to fame – the headline-stealing, self-proclaimed "heaviest typeface in the world", with slivers of white space in between ultra-chunky geometric letterforms. Suffice to say, this one doesn't function at any size below monster – but then if you use it, you'll want it to roar.
18. Enclave
Enclave boasts thick, chunky slab serifs
Designed by Terminal Design's James Montalbano with the goal of being unique but still highly legible, Enclave boasts thick, chunky slab serifs that are nonetheless softened and subtly rounded to take some of the harsh edge off, and warmth, and stop it looking too much like a typewriter font. It's another top font that works equally well large or as a text face.
19. Sentinel
Sentinel was seen in President Obama's 2012 campaign messaging
Based on Clarendon – one of the first and arguably most defining examples of a slab serif typeface, released in 1845 – Hoefler & Frere-Jones' "slab serif that works" overcomes many of the shortcomings of a traditional slab font by integrating a broad range of weights, and carefully-designed italics, to ensure true versatility without compromising on style. This top font was seen in President Obama's 2012 campaign messaging.
20. Rockwell
Rockwell demonstrates what strong, thick, edgy serif fonts can do
One of the best-known examples of the slab serif genre, Rockwell demonstrates what strong, thick, edgy serifs, bold shapes and opposing curves can do to add clout and impact to a typeface. This top font is effective in capitals for a statement headline piece, but also features beautiful lower case forms for more versatile uses.
You might also like these articles:
-
Seb Lee-Delisle will kick off the 5th annual Generate London conference on 21 September. Expect super bright LEDs, electronics and lasers.
"Introduce myself?" Seb Lee-Delisle smiles, laughs and fidgets in his chair. "You know how difficult it is to write your own profile, right? Well, currently, I'm a full time artist, building digital installations... building cool stuff with computers. I do some presentations and consultation all about creative coding. I try to help people explore creative uses of computers."
With a palpable sense of relief, he leans back in his chair and exhales. "That never gets any easier," he finishes.
When it comes to computer-based creativity, it's hard to think of anybody whose veins course with more caffeinated bits and bytes than Seb Lee-Delisle's. He's the man behind PixelPyros, a digital firework show that's toured the world.
Interactive pyrotechnics
Whereas fireworks rely on gunpowder, lasers power PixelPyros. They daub sparkling arcs and eruptions of colour onto a sixty-foot screen. The show is also interactive. Viewers – or rather, participants – launch fireworks by moving their hands in front of orbs of projected light.
Arduino provided Lee-Delisle with the perfect gateway into learning about electronics and connecting devices
"I like challenging myself, " he explains, considering the motivation behind PixelPyros. "I like challenging myself and creating things. Sure, a big part of what fascinates me is solving problems. If I see a Rubik's Cube that's messed up, it does my head in. I have to solve it. Building stuff is just a good feeling."
Other projects include Lunar Trails and PixelPhones. The former is an art installation built around a Lunar Lander gaming cabinet from 1979. As you play, a robot plots your movements on a giant canvas. The results are delicate, whimsical and strangely evocative of Bubble Chamber tracks.
PixelPhones is an open source platform that turns viewers' smartphones into pixels in a piece of art. Imagine a bright constellation map of all the smartphones in a theatre and you're on the right track.
Seb Lee-Delisle will open the fifth annual Generate London conference in style – with lasers
So, when did computers first appear in his life? "Very early. My dad was a physics lecturer and he used to bring home computers for me to play with. I remember my brother and father had a really early computer called the Nascom. The memory was counted in bytes. Somehow they made a Space Invaders game for it. It was magic to me! I must have been nine or ten at the time."
"I remember first getting my hands on a computer when I was eleven. I learned BASIC on a little handheld computer. That seems futuristic, doesn't it? I think it was a Sharp. You could print stuff [to the screen] and make it beep. That was it," he laughs.
"The interesting thing is," he says, "I was always trying to make drawings, to make pictures, animations and games. Back then, of course, you had no choice but to learn programming. We didn't have Photoshop. My entire motivation for programming was to make pictures. And you know, today I just try to do the same stuff. I try to draw pictures with computers," he continues.
Computer music
Lee-Delisle also made music. "One of my friends ran an Amiga demo group Share and Enjoy. He chucked some of my music into a demo called Amazing Tunes II."
Despite his enthusiasm for computers, Lee-Delisle spent his 20s in a band. "That was my focus. It was possibly 1996. We wanted to make a big thing about being on the internet. So, I learned how to make websites for my band. We got a lot of coverage for being one of the first internet bands."
Sadly, the band didn't quite make it and its members needed to get jobs. Lee-Delisle took a job working for an e-learning firm. He says, "I was only freelance. I was doing lots of work in [Adobe] Director and then I learned Flash."
Flash games
Flash, it becomes apparent, was a real epiphany for Lee-Delisle. "I got really excited about Flash games. I really wanted to work for Kerb. They were a big Flash games house in Brighton. In the late '90s and early 2000s they were the bad boys of digital."
A plotter from the 80s that Lee- Delisle used to make small prints from the LunarTrails project
Lee-Delisle formed his own company and it went on to become the seed of Plug-in Media. "My first client was Kerb." Lee-Delisle explains. "I did maybe a couple of days a week for Kerb. I did some big projects. Something for Sony and a couple of games.
"One or two of my games won awards. One in particular [Stan James Free-Kick Challenge] had millions and millions of plays. It was hugely successful. And then I started to grow Plug-in a bit. I was doing some web design work too. It was only when I focused on games, things started working properly."
An artist called Dominic Minns joined Plug-in. He had contacts at the BBC so Plug-in started pitching for big projects. The BBC became a big client and Plug-in began specialising in making Flash games. "I guess this would have been around 2006," he recalls.
"And Plug-in just started growing and growing over the next few years until there were around 15 people there. We started doing some really big projects like [CBeebies] Big and Small."
For those who haven't frequented the children's BBC TV channels, Big and Small is a show about a friendly purple puppet and a bouncy orange one. For their efforts on the Big and Small Flash game, Plug-in won a BAFTA. Next came another BAFTA for work on the ZingZillas game, again for a BBC children's show.
Moving towards open source
As Plug-in flourished, Lee-Delisle began another dalliance. "I started speaking at conferences and contributing to open source. I was a member of the Papervision team, which was a 3D open source engine for Flash. I was starting to contribute to open source.
Despite the success of the firm he started, Lee-Delisle began to feel increasingly unfulfilled by it. "I began to realise that [Plugin] wasn't what I wanted to be doing. I was still doing the open source stuff and writing on my blog. I was sharing everything that I learned." As he recalls the memories, Lee-Delisle breaks into a full smile.
The look of joy recedes moments later. "I realised this was a bit of a conflict with the business. I think my partners got fed up when I was off in America all the time, running around doing conferences when they were doing all the work. I think it was a valuable thing to do but their point of view was..." He pauses, smiles and says: "different".
And so he parted ways with Plug-in. "I just decided to leave the company, which was really difficult. It's hard to get out of something you started, right? There's a lot of emotions flying around. It's like a divorce. But, it was the best thing to do."
Moving on to PixelPyros
Everybody loves lasers. This R&D unit is a 1W machine (that's 2,000 times more powerful than a common or garden laser pointer). PixelPyros performances used 11W lasers
Our discussion meanders its way back to PixelPyros and how it came into being. "It was a good few years ago. It was a side project. I'd seen Graffiti Research Labs had a project call Laser Tag. You could do graffiti tagging on a building with a laser... the tag would be projected on by a fairly low power projector [it's low power compared to the projectors we use but still four times brighter than most domestic projectors]. Maybe a 4,000-lumen projector.
"I got really excited. I'd never considered that you could project onto a building. I knocked up a demo in Flash. I projected it at a building and did webcam motion detection, all in Flash, and made some fireworks. It was a bit crap really, compared to the massive project it became."
Despite PixelPyros's modest beginning in 2007, Lee-Delisle found he couldn't shake off the idea. "Something about it really resonated with me. It captured my imagination."
Pyro problems
In 2012, Lee-Delisle set about building the project. "It was at the Brighton Digital festival. I started talking to people and got to know people who were good at getting Arts Council funding. Naively, I set upon this task to build this project. I applied for a grant and somehow got it and, honestly, everything went wrong!"
Throughout the four or five month production phase, the team had problems with finding venues, projection, getting insurance, health and safety, crowd control, evacuation plans, finding a production manager and hiring equipment.
But PixelPyros ran perfectly on the night. The show went on to tour the country, playing five dates at four venues and to tens of thousands of people.
Our chat moves on to open source, which is a topic close to Lee-Delisle's heart. "I wouldn't be able to do any of the work I do if it weren't for open source," he tells us. "LunarTrails makes massive use of Processing and Arduino. PixelPyros is built on open frameworks and uses lots of contributions from people in the community."
He rocks back in his chair and continues. "You know people say to me all the time: 'why don't you monetise your work? Why don't you set up a business that sells PixelPyros around the world?' But, by making it open source, it releases my sense of custodianship... of ownership."
Intellectual property
Clearly, Lee-Delisle isn't a complete refusenik when it comes to the idea of intellectual property and ownership. He leans forward purposefully in his chair and says: "Now, sure. If somebody took the code and made a show exactly the same as PixelPyros I'd be annoyed. People should be able to share and benefit from it."
"I've had a few famous international rock stars sniffing around [PixelPhones]. One said if we're going to pay you to do this, we want to own it. I said 'no'. That's not the point of it.
"I've put a lot of my own time into this. I don't want somebody to own it. I don't even want me to own it. Syncing up all the phones in a room isn't original but it's not been done in this way before because it's really hard!
"I don't want other people to go through what I went through to remake it. I'd rather they used my stuff and then maybe they'd get me in to be a consultant. To me, that's much better business rather than me putting a patent on it and suing anybody who links up phones. That's bullshit. That's not what I want to be doing with my life."
Lee-Delisle embraces a plethora of technologies to make and to power his projects. PixelPyros employed C++ and open frameworks. PixelPhones used JavaScript. He's also a proponent of Processing and Arduino
Is PixelPyros open source? "The source for PixelPyros is all there for you to see on my GitHub. I haven't actually attached a licence to it yet because I can't really figure out what licence to give it! You can certainly look at the source but, I'm still figuring out the best way to license it."
Finally, we touch on side projects. Lee-Delisle says: "Starting a project is easy. Finishing it is the hard bit. If you actually finish projects it sets you apart from almost everyone else. People are just very unprepared for the amount of work it takes to finish a project.
"That's why I always say, if you're doing a side project, make it buildable. Make it small. It's better to finish a small project than start a really big one."
So what's next for the man who makes digital fireworks? "I don't know whether I should talk about this," he says, rocking forward in his chair and beaming. "I want to make a simulation of being struck by lightning. Not killing anyone, but I could make a really cool lightning effect with a laser."
Photography: Rob Monk
This article originally appeared in net magazine issue 251 (March 2014).
As well as Seb Lee-Delisle's appearance, Generate London will feature 15 other great sessions spread over two days covering web animations, performance, UX strategy, teamwork, product design, accessibility, conversational and adaptive interfaces and much more. There's also a full day of workshops on 20 September, and if you buy a bundle, you'll save £95. Reserve your spot today!
-
You're reading 10+ Free Alternative Open Source CMS Tools to Explore, originally posted on Designmodo. If you've enjoyed this post, be sure to follow on Twitter, Facebook, Google+!

A content management system (CMS) is a monolithic software application or set of tools that are used to create and manage digital content. A CMS is used for web content management (WCM) or enterprise content management (ECM). It started in the 1990s when Perl or Cold Fusion were used to create dynamic pages for e-commerce […]
-
Much of the work of graphic designers today exists only in pixel form. But that doesn’t mean the appeal of print design has gone away; quite the reverse.
Precisely because of the digital takeover of our society, there’s a yearning for the physical and tactile, so it’s not surprising that designer business cards are more popular than ever.
Here are 10 of our favourite designs for your inspiration. But of course there are thousands more out there, so feel free to share your own favourites in the comments below.
01. Ryan Brinkerhoff
Ryan Brinkerhoff’s passion for typography shines out in this stunning business card
Trading under the name Bandito Design, Michigan-based Ryan Brinkerhoff has a passion for branding, illustration, and poster design and the goal of “finding smart solutions that make people smile”. His beautiful typography-based design was printed by Floridan letterpress specialists Mama’s Sauce.
02. Kelli Marie Daly
Freelancer Kelli Marie Daly’s poster-style card is effortlessly cool
Kelli Marie Daly is an art director and freelance graphic designer, currently based in Milwaukee. This vintage poster-style business card isn’t the most original concept, but it’s beautifully realised and conveys a real sense of her personality. You can see more of Daly’s personal branding here.
03. RAMA
These letterpress-savvy designers have taken full advantage of their printing prowess to create these cards
Rama is a group of graphic designers in Buenos Aires who founded their own letterpress and bookbinding studio. Inspired by vintage typographic posters, they designed and printed these business cards in their own workshop, using a white cardboard that they were going to throw out due to a texture problem. Instead, they used the problem to their advantage, to create the old and worn appearance they’d been seeking for the business cards. You can see the collection in more detail here.
04. Brigada Creativa
Designer quotes give this business card design a unique touch
Brigada Creativa is a small design and illustration studio based in Barcelona that offers “happy design, unique products and original gifts”. This clever business card shows the shop’s logo grasping a real pencil, and surrounded by inspirational quotes about graphic design.
05. Wendy Stephens
Wendy Stephens’ love for typography shines through in this design
Wendy Stephens is a freelance graphic designer and creative artist who works from her studio in Hertfordshire. Going by the name of Dark Iris Design, she has clients across the UK and worldwide. Her quirky blue-black business card highlights her love of typography, with the reverse side featuring a stylised ‘Quick brown fox…’ pangram and a brilliant ‘Very Brief Guide to Typefaces’.
06. Anthony Cole
This Swiss army knife-style card is a real one-off
“I wanted to create a business card that people would remember,” says Anthony Cole, a graphic designer based in Auckland, New Zealand. “I ended up with not so much a card, but more a business army knife.” Each ‘tool’ pulls out and showcases Cole’s different design skills and contact details, as you can see in more detail here.
07. Jose Antonio Contreras
A business card that will keep you amused for ages
Brooklyn-based designer Jose Antonio Contreras has given people a great reason to hang on to his business card. There’s a cool word search on one side, and the clues are his contact details on the other. It's a wonderfully imaginative idea, superbly executed.
Can you find all of Contreras' details?
08. Whiskey Design
Whiskey Design and Valhalla Studios have knocked it out of the park with these stunning cards
Whiskey Design is a small design studio based in Kansas City whose motto is ‘Raise a ruckus’. And these sumptuous, quadriplexed business cards have certainly raised a few eyebrows. Incorporating wood veneer, blind deboss and foil, they were printed by letterpress and silkscreen experts Valhalla Studios.
00. Chad Michael Smith
Is this the ultimate designer business card?
Chad Michael Smith is the owner and principal creative of Chad Michael Studio, a Dallas-based design studio specialising in unique package design, product development, and attractive branding. Engraved on cherry wood and painted painstakingly by hand, these gorgeous creations might be the ultimate in designer business cards.
“I wanted to make obvious my scrutiny for detail and give a small nod to what I love designing most, liquor and alcohol,” says Smith. “In the end, I wanted the business cards in particular to be something that you couldn't simply tuck away in a wallet and one you couldn't bring yourself to throw away.” He clearly succeeded, and you can see his design in more detail here.
-
Avanti Markets notified customers of a possible breach of personal and payment card data as well as biometric user information that likely occurred July 4.
-
You're reading Premium Web Tools & Services Recommended By Professionals, originally posted on Designmodo. If you've enjoyed this post, be sure to follow on Twitter, Facebook, Google+!

There is no secret that time is the most valuable resource that we have in this life. Most people say that there is nothing that we can do. It’s not true, every web designer, developer or the average guy using a web invoice or document signing platform knows that having the right web tool or […]
-
-
Whatever kind of design job you have, whether it be art director or 3D artist, the time comes when you ask yourself: "Why am I working for a boss when I could sell design work I've created directly to the public?" There are loads of ways to make money from your talents, and it's simpler than ever to sell design work online.
You no longer have to invest huge amounts of time and money in building your own online store: there are many existing ecommerce websites that will allow you to reach a wider market to sell your products.
So whether you're looking to publish a book, create your own T-shirts, or sell a series of art prints, the following sites offer a tried and tested way to make the most of your design work and start generating an income from it...
01. Creative Market
Popular site Creative Market is a brilliant place to sell your fonts, graphics, website themes, print templates and other designs online
A favourite among designers, Creative Market is a brilliant place to sell your designs online. Whatever it is you're creating – graphics, fonts, photos, even 3D assets – get it online at Creative Market and in front of its thousands of daily visitors. There's no exclusivity lock-in, you set your own prices and take home 70 per cent of each sale. Open a Creative Market shop here.
02. Design Cuts
Design Cuts was set up by designers, offering quality assets
Design Cuts is a community website offering high quality assets to designers at affordable and discounted prices. Patterns, brushes, backgrounds, fonts, graphics and other slick assets abound. "We're very exclusive and work with only the best designers in the world, curating the highest quality marketplace around," it told us. To be featured on the site, Design Cuts says to get in touch via its Contact page.
03. Art Web
Art Web offers options to sell paintings, illustrations, digital art, prints, designs and more
Art Web is an ecommerce site that specialises in selling art online to buyers around the world. A community of different artists and creatives use this online platform to network and share their work, as well as to make money from it. The service works on a no-commission basis, and there's a free plan that gives you an online gallery with up to 15 images. There's also a paid-for version that gives you more images and a professional-looking website. Sell your art with Art Web here.
04. Big Cartel
Create and customise your own store on Big Cartel's website
Launched in 2004, Big Cartel is one of the most popular platforms for any creative looking to sell design work online. Unlike a lot of websites, it allows you to build your store and customise it to give it a unique feel as well as it adapting to your existing website.
Giving you all the professional tools you need to conduct market research – such as a tracking and social networking – you're given total freedom and control over the ways in which you choose to sell and promote your work. The price plan ranges from free to $29.99 a month depending on the support and facilities you wish to use, as well as the number of products you are offering. Sign up for a Big Cartel store here.
05. This is a Limited Edition
This is a Limited Edition
This is a Limited Edition, formerly Click for Art, specialises in art prints, canvas prints and limited edition products from cushions to mugs and laptop cases. It features work from over 50 artists and design studios from Europe, the US, Asia and Brazil. If you're a talented artist, this could be a great avenue to sell your designs to a commercial audience. Fill out its Artist Application to be considered.
06. Threadless
Open an artist shop for free at Threadless
Open to the community of artists and designers globally, Threadless gives you the opportunity to submit your designs to a public vote. If you get enough votes from the community you'll get the chance to make money through the site's online production and promotion of your products. It's definitely a site to look into if you have designs hidden away, if you want exposure and great networking. Look into selling with Threadless here.
07. Society 6
Society 6 takes care of the manufacturing and logistics for you
Society 6 is another online platform for creatives to sell design work, focusing on "affordable art prints, iPhone cases and T-shirts". It's free to set up, and the products are produced made, shipped, and managed for you – leaving you with only the designing to do. With the site only taking a small percentage of what you sell back, this is a great place for designers and creatives looking to get their work featured onto a vast range of products. Find out how to sell on Society 6 here.
08. Etsy
Etsy has the feel of a giant online craft fayre
Launched in 2005, Etsy is a global ecommerce website that caters for the needs of creatives looking to sell design work, focusing on handmade goods, vintage items and art and craft supplies. Essentially it's an online version of a massive craft fayre. It could also be characterised as a folksy version of eBay. The site charges 20 cents per item listed, while for every item sold Etsy collects an additional 3.5 per cent commission. Open an Etsy shop here.
09. Zazzle
Sell your designs on hundreds of products with Zazzle
Zazzle is an online marketplace that lets you sell your designs on hundreds of products. It's free and easy to create an online store on Zazzle, and its powerful tools make it possible to sell your art on T-shirts, stamps, posters, mugs, business cards, skateboards, calendars, tote bags, hats, and more. Sell your designs with Zazzle here.
10. Redbubble
You can set up your own profit margin rate on Redbubble
On Redbubble you can set your own profit margin for all product types – avoiding any dodgy percentage cuts. It also has an array of artist groups that host challenges to inspire your creativity. It's free to join, with the site sending you your earnings every month. Find out more about selling on Redbubble here.
11. INPRNT
There's a three-part process to setting up your artworks on INPRNT
INPRNT is a moderated gallery with a three part submission process. First, sign up for an INPRNT account and submit three of your best pieces for review. That submission is then voted on by artists already on the site. Once the submission is approved, the new member's account is automatically upgraded to an artist account and you can upload work to your gallery for sale straight through the site. Apply for an INPRNT site here.
12. Not on the High Street
This online store gets over 2 million unique users per month
Not on the High Street gets over two million unique visitors per month, which then doubles at Christmas. Its TV and outdoor ad campaigns are also seen by millions, so this is a site for getting some great exposure. It's constantly looking for small businesses that are looking to grow. So if that's you, head here to find out more about selling on Not on the High Street!
13. Design By Humans
Illustrators rejoice! There's a huge marketplace of illustrated wares here
Design By Humans is an online store offering T-shirts, phone cases, prints, mugs and more with designs from over 15,000 global designers. Describing itself as a "community" of passionate artists and customers, you upload your designs and the site handles the logistics of payments, printing items, shipping orders and so on. You can even opt for a custom storefront. Sign up for a Design By Humans store here.
14. MyFonts

MyFonts is one of our go-to sources of new and exciting fonts here at CreativeBloq, and you can be featured on it! Your type designs could reach a broader (paying) audience by being featured in one of the site's bundles, as well as its collections filtered by descriptive keywords. Find out how to sell your typefaces through MyFonts here.
Related articles:
-
Think you know your music? Test your knowledge with the new alphabet prints from UK-based studio Dorothy. Consisting entirely of letters taken from classic band logos, there are two different versions of the two-colour screenprints: the Alphabet of Rock and Alphabet of Alternative Music.
Not sure which band’s logo is J? There’s a handy A-Z key on the prints revealing the full list of featured bands.
How many band logos do you recognise?
“We fell in love with classic band logos when we were in school, doodling them onto the front of any exercise book that wasn’t covered in our mum’s wallpaper,” says Dorothy founder Ali Johnson.
“For us these alphabets bring back some brilliant memories and celebrate that perfect moment when design meets music.”
The alphabet prints measure 80 x 60cm and cost £30 each (around $38.50).
Related articles:
- 20 great hard rock logos
- The Beatles’ cover artist on why hand-drawn is best
- The 25 greatest animated music videos
-
Pen and ink gives Canada-based artist Socar the ability to create wonderfully expressive images like this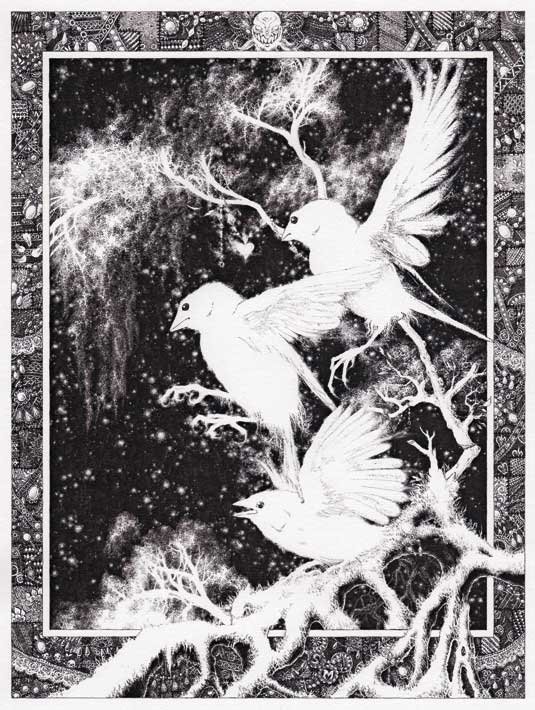
Learning how to draw with ink is a big step up from pencil drawing. The most obvious difference is that there's no more relying on the eraser, but it can be a wonderfully creative medium – just look at these stunning examples of ink drawings.
Traditional pen and ink consists of black ink and white paper, creating space through thick or thin lines and repeating marks for texture. Ink drawing techniques can be as delicate or bold as your temperament dictates: it's all about trying things out.
Getting started with ink drawing
First of all, pour your ink into an inkwell high enough so that when the nib touches the bottom, it covers three-quarters of the nib. Start with the focal point, working your way back and out to the less important elements.
Grip the pen close to the tip and keep the angle of the pen at about 45 degrees. Your main subject should feature bold, heavy lines and should have the greatest detail and contrast. Strokes generally start close to your body and move outward. Use your arm and shoulder, not just your wrist.
Now that you're comfortable, illustrator Terese Nielsen explains how to choose the right equipment and materials.
01. Try out ink drawing tools
Develop your strokes with ink drawing tools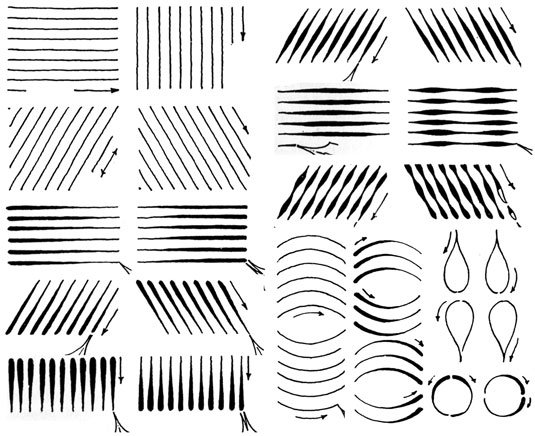
There are many options for drawing in pen/ink, so find which best suits your temperament by experimenting with different tools. Take time to develop your dexterity in pen handling by doing exercises. Learn sweeping strokes, bold lines, crisp dashes, delicate dots, curves and straight lines. Be able to do this vertically, horizontally and slantwise.
02. Lay down preliminary sketches
Starting with pencil is a tried-and-tested ink drawing technique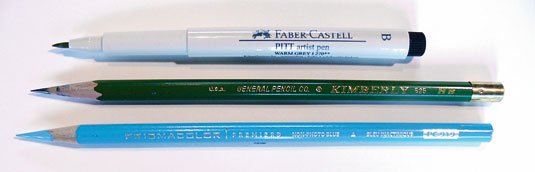
There are several approaches for laying out a sketch before using pen. Sketch with an HB pencil and erase only after the pen work is dry. Comic book and manga artists often use non-photo blue pencils. Alternatively, lightly sketch with a light-warm, grey PITT pen, or sketch with light washes of ink thinned with water.
03. Vary tone and texture
Stroke can dictate the tone and texture of your ink drawing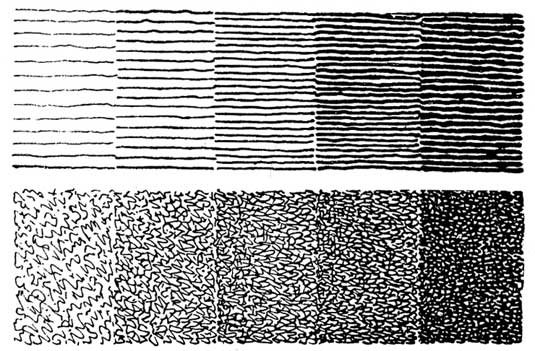
Conveying tone and the idea of texture is done with the type of stroke, or the spacing of strokes, whether wider apart or broken up. Each will have its own peculiar feel. With practice, you learn to use tonal line directions and textures to add points of interest, such as a rhythmic sweep or by applying tiny differences in the direction and line weight.
04. Choose your ink, pen and nib
Choose pens, nibs and ink to suit your ink drawing style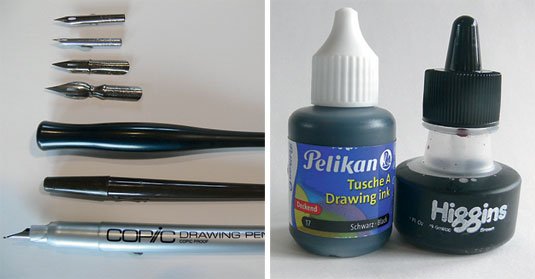
Unless you plan to create subtle washes with a brush, we'd recommend you use waterproof drawing ink. When it comes to pen and nib, crow quills offer great nuances in lines, from extremely fine to quite wide marks. They require dipping into ink, though, and can be messy. Wipe the nibs off every 10 minutes to keep a clean ink flow.
05. Consider other ink drawing tools
A brush pen may be a better alternative to quill pens for you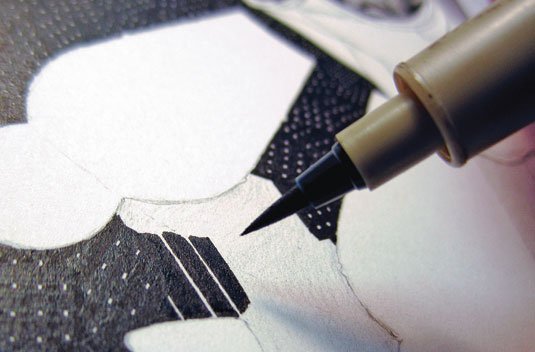
Brushes
Brushes are preferred by many ink artists because of the line control that can be achieved. Press down to create thick fat lines or lift almost off the page to create tiny, thin lines. Sizes 1-3 provide great variety.
Brush pens
Brush pens are a convenient alternative option as they require no dipping or wiping of the nib.
Fine point pens
Some artists prefer fine-point pens to brushes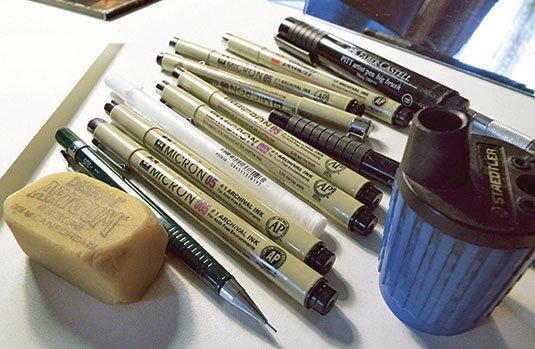
Fine point pens produce hard, solid lines. Some artists prefer them to the soft, curved strokes of a brush, but they lack the line variation that crow quills and brushes/brush pens offer, often creating a more mechanical, less expressive drawing.
There's no 'right answer' to what to use, of course: it's all about what kind of ink drawing you want to create. But hopefully these introductory tips have helped you to get started. Good luck!
Other great drawing tutorials:
-
Offline mobile experiences can be frustrating for users. You're on the train attempting to open an article you were reading earlier that morning but didn't get the chance to finish. You've loaded it once before, and you even have two bars of service. However, it just won't open. Your phone thinks it is online, but really it is not. You are offline.
What you're experiencing, day in and day out in a variety of ways, is a problem that we have all accepted as the standard yet haven't seen for what it truly is: a fundamentally flawed experience.
Regardless of whether you're a maker or a consumer of tech, we don't expect things to work offline, and decades of requiring constant internet connection has set us up to be blind to this issue.
As such, supporting offline experiences requires attention to be paid to the negative space, which is somewhere we didn't really know to look until Alex Feyerke introduced us to the concept of offline first.
Offline first
With non-digital objects it's easy to differentiate between various on and off buttons
Offline is any scenario in which a user seeks information or functionality while being unable to access a supportive outside network. This may be experienced due to low bandwidth, a lack of internet connection, server outages, or countless other reasons.
At first glance it may seem like designing for offline is as simple as communicating to users that they cannot access the app or that any new data they enter will be lost, but this approach falls far short of what is possible with today's technology.
Instead, we should look at this as an opportunity to create a 'deployed' application that is as close to fully functional offline as it is online; blending the experiential line between native and web apps.
The offline first methodology aims to be deliberate about these experiences by treating them as more than a patch. It views offline state as an issue of accessibility, and accessibility as the centre of the product.
It combines what we've learned from the mobile first and responsive design movements, with heavy emphasis placed on designing for the most constrained environments (offline) first and treating connectivity as a progressive enhancement.
With Pokedex you can use advanced search, explore by type, weakness and ability, all offline
We now have an offline-enabled Pokedex, an open source tool for hospitals of the developing world with HospitalRun, Offline Gmail, and even browser games such as 2048 that can function entirely without connectivity.
Developers have proven the concept of offline design and are now managing to deliver real-life value with it.
The catch
This is awesome, but unfortunately with these types of things there is always a catch. Offline UX patterns maintain ambiguity and often open up more existential questions than we started off with. The question of what we are able to (and should) do with regard to offline state never seems to enjoy a succinct answer, and the huge diversity of internet-based software we're tasked to design certainly doesn't make the work any easier.
That's not to say that there haven't been some interesting developments in the field, though, and there's a foundation taking form for what offline first apps can be.
With most non-digital products that aim to improve our quality of life, we have an unspoken and true-to-form understanding of the full system state. We can visibly see that the desk lamp is on, or that a desk drawer is open. We can smell the cookies that are being baked or feel the warmth of the oven as it operates. If we didn't sense state with some of these objects, there could be real-world consequences.
With software, such indicators of state that naturally register with our senses don't come with the territory. State is manual and challenging to articulate, and to express it well we must pay proper attention to the environment the product is used in (or the unpredictability therein), and work with design patterns our users comfortably understand (or can easily come to rely on).
Good design is just as much about context and reliability as it is about the ease and pleasure of its use. Achieving the proper design begins with an understanding of the context and motivations of our users.
Luckily, when thinking about offline experiences, we're already in the right frame of mind. We've started with a complete lack of connectivity as our context and will attempt to provide value under these conditions. To do so, we'll need to see more of the picture, however. Our users could be offline and:
- Recording patient medical data when out in the field
- Reading while riding the train to work
- Trying to upload a photo to social media while on vacation in the desert (and fighting off a hyena)
The next – and often more challenging – steps are to gain an understanding of what the motivations for each use are, then to couple those motivations with the contexts we've outlined. From there we can choose from those couplings the ones that will most benefit from our attention in design.
Having a grasp on the crossover between motivation and context allows us to understand and serve our customers better, but can also provide answers to broader product questions.
Job stories help us to discover good design, which is essential when it comes to offline use
We can then record the context and motivations in the form of a job story, a form of user story that centres around context and motivation. For a pharmacist whose prescription fulfilment system depends on the internet, we could write either of the following job stories:
- When a customer wants to buy something and I'm offline, I want to be able to collect payment anyway, so that we may be able to continue to serve customers the medicines they need.
- When I'm offline and I've marked a customer's prescription as having been fulfilled, I want to know that the system will perform this function when it has reconnected, so that I don't have to repeat my actions and record fulfilment elsewhere.
These stories are each meant to be a brief detailed objective that frames exploration of design and product teams. They guide our discovery of a proper design, and serve well when designing for offline experiences.
With an appropriate sense of context and motivation, it should become easier to judge what interactions and UI will be effective for our users.
Next page: Interaction models and offline UX design examples
Use this handy interaction model to help when designing offline experiences
When we're ready to work on our offline UI, whether starting from scratch or improving upon an existing product, it is wise to be mindful of our product's core interaction(s). This interaction (or group of interactions) is what our users do to repeatedly get value out of our software.
Where possible, we should use this interaction model to help communicate offline state.
For example, Instagram's core interactions might be scrolling through lists of content as well as creating and manipulating it. When we are offline, we're able to interact as we do online, allowing us to go as far as we can without running into roadblocks of functionality.
When attempting to save, the app places the content in an unobtrusive "waiting" state that is using an existing feedback mechanism to communicate to users that it hasn't yet been uploaded.
Instagram is a great example of an app that clearly communicates its offline state
While it may seem obvious at times, noting our core interactions is a useful practice in helping us maintain continuity in how customers expect to interact with our app. The additional benefit is that we can reuse UI where they're already looking for clues of cause and effect.
While not all breeds of software products can deliver their entire functionality when they're offline, they can provide partial value or clues that it existed to begin with. The bottom line is that they must clearly communicate state.
Instagram and Slack are great examples of apps delivering as much value as they can up to their reasonable limits while also unobtrusively communicating state.
The need for assurance
Designing for offline requires a new way of thinking
Not all applications are the same, of course, so design patterns for these situations will largely depend on who you're trying to serve, where they are and what they need to do. There are some common clues related to offline experiences, however. They are reach, freshness and reliability (Jesse Beach refers to this as assurance).
Reach is about communicating how far users may explore in our application while offline. To use a videogame analogy, if our users are bound to a single linear path, we don't necessarily want it to appear as though they're operating in an open world. The result of doing so could mean a lot of wasted time on dead-end paths on a quest to unreachable or non-existent areas.
If state isn't well communicated here, it can become difficult to know if that area is purposefully inaccessible or if there is a bug in the system.
So, we can improve our user experience by establishing clear boundaries when they are in an offline state. Those boundaries should be composed of reachable and unreachable content or actions.
The visual indication of something that is reachable or unreachable will vary by product. For instance, an eCommerce site may fade out products that are not reachable when offline, but in applications comprised of content feeds – such as Twitter – the interaction to load more content has no static visual affordance, so there is a need to find a different solution for communicating reach in this circumstance.
Instagram alerts users to a lack of connectivity so that you're always aware of what's going on
Instagram's approach to this is to use its intercom UI pattern to alert users to their lack of connectivity. The application provides users with a means to attempt to load more content, but is consistent with its feedback for why it was unable to perform the request.
While reach helps users understand what can be done, freshness lets them assess whether or not an action is worth their time. It might be represented as a date on a news article, a timestamp for the last time a currency converter rate was updated, a last-edited date for a collaborative document, or perhaps when a photo was last viewed.
For example, if the weather forecast was last downloaded just three minutes ago, users may as well spend the next two minutes putting on their rain coats, rather than waiting for a new forecast to download.
Comfortably offline
LinkedIn is another example of an app that provides good context awareness
The combination of these clues helps our users breeze through our application with greater contextual awareness and agility. In the cases where offline state forms an impenetrable barrier for an action (such as saving edits to a collaborative document), the combination of clues of reach and freshness deliver a sense of reliability.
When one attempts to upload a photo to Instagram without connectivity, the photo and work they've done to it isn't destroyed due to an inability to send it to the server. Instead, Instagram saves the photo to their device and retries that upload until the user decides they don't want to anymore. This is an example that treats offline clues of reliability very well.
No data is lost when Instagram loses connection, and the app will keep trying to post until you tell it not to
What we want to achieve in communicating reliability is simple: make it clear whether or not the data that users are concerned with is their responsibility or the app's when they're offline.
We need to immediately answer their questions of whether or not data syncs automatically when they reconnect, whether further action to sync is required, or whether any progress will be destroyed. A good rule of thumb is to allow users to go as far as possible while reliably preserving data locally until connectivity is restored.
With a process focused on context, motivations and accessibility combined with an awareness of reach, freshness and reliability clues, the designer improves much more than simply the offline experience. It won't be simple, but in the process they'll have created an accessible, fast and easy-to-use product from the start. This is the promise of designing offline first.
This article originally appeared in net magazine issue 293 – buy it here!
Further reading:
You might like Jesse Beach's takeaway from the second Offline Camp in Santa Margarita
Related articles:
-
Photography is one of those skills that is easy to learn but difficult to master. Whether you want to turn your passion into a profession or just make your social media feed catch the eyes of all your friends, the Learn to Become A Master Photographer 2017 Bundle can help. Get it on sale now for 96% off the retail price.
It doesn’t matter if you've just picked up a camera for the first time or if you're a pro looking to add new skills, you’ll find plenty of useful information within this huge collection of courses. The Learn to Become A Master Photographer 2017 Bundle can teach you foundational information and advanced skills, from snapping pictures in unique settings to touching up photos with software after the fact. There’s over 26.5 hours of content for you to put to use.
You can get the Learn to Become A Master Photographer 2017 Bundle on sale now for 96% off the retail price. That's a huge saving for a bundle that will help you snap amazing photos, so grab this deal today!
-
Ageing a photograph in Photoshop is a classic technique that can turn even a ho-hum, full colour image into something striking. If your design work requires a vintage look, replicating the look of a distressed old photo digitally can work wonders.
However, it’s more than merely converting a photograph to sepia tones and calling it a day. In this article, we’ll explore how to age a photograph using the duotone technique in Photoshop CC. Simply follow these nine steps.
01. Choose a start photo
Photo by Rowan Chestnut. Click to download for free from Unsplash
I’m going to start with this beautiful photograph from photographer Rowan Chestnut, available for free on Unsplash. Alternatively, you can of course work with your own photograph.
02. Convert to greyscale
Add a Black & White adjustment layer to turn the full-colour image greyscale [click the icon to enlarge the image]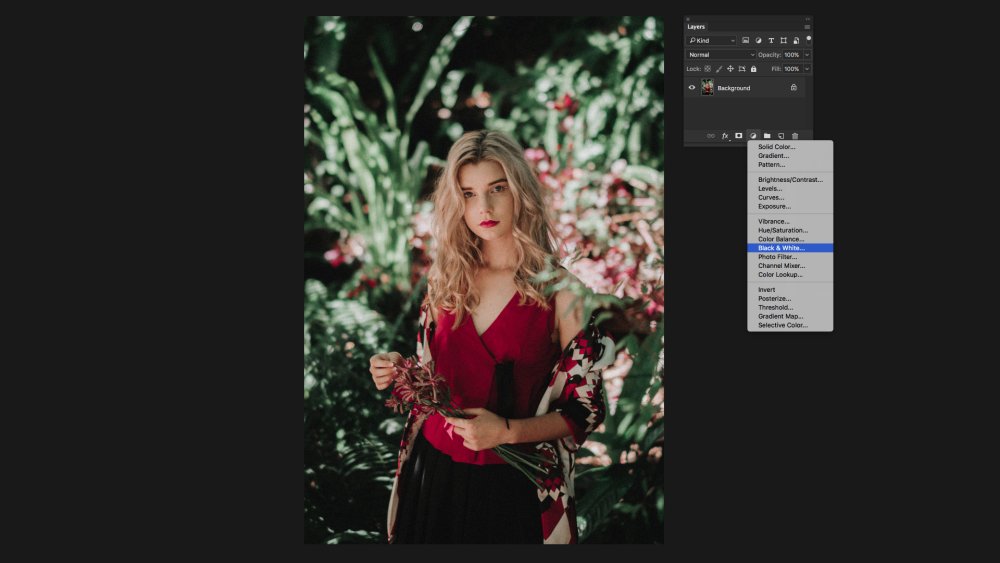
In order to convert a photo to sepia, it must first be made greyscale. Photoshop offers a number of ways to convert an image to greyscale, but let’s go with the least destructive choice and use an adjustment layer.
At the bottom of the Layers panel you’ll find a Create New Fill or Adjustment Layer button, along with a black-and-white icon. Click that icon and choose Black & White to add a black and white adjustment layer. The colour image will instantly turn greyscale, but without altering the original image, which can be found on the Background layer.
03. Apply a gradient map
A Gradient map adjustment layer converts the tones of the greyscale image to something else [click the icon to enlarge the image]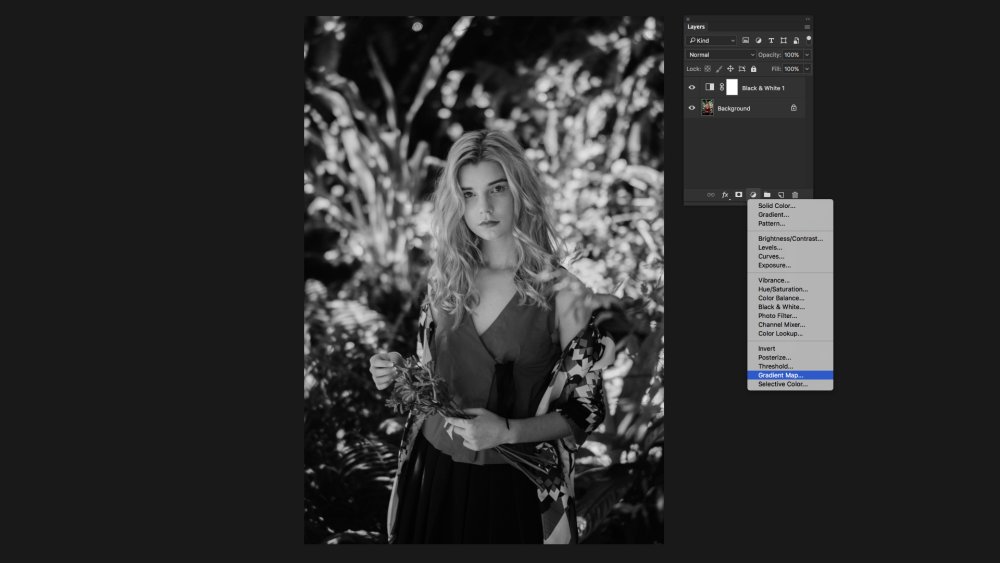
Sepia tones occur when a greyscale photo has faded – the black ink shifts towards brown, while the paper, which is reflected in the whites and light shades, turns yellow. Therefore, to artificially age our photograph we want to replace the black and dark grey tones with a brown hue and substitute the lighter tones with a pale yellow or cream. We can easily do this using another adjustment layer.
Click again on the Create New Fill or Adjustment Layer button at the bottom of the Layers panel, but this time choose Gradient Map. As you can see in the image below, red replaced the black in this image, but your results may be different. We’ll fix the colours next.
04. Convert to sepia
The Gradient Editor lets you modify the colours in the Gradient Map adjustment layer [click the icon to enlarge the image]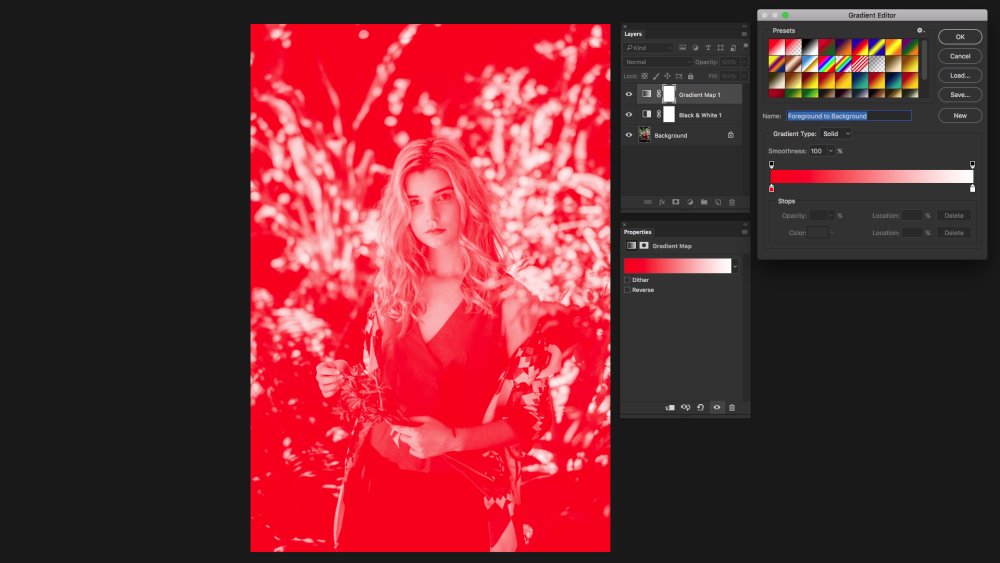
Open the Properties panel from ‘Window > Properties’. With the Gradient Map 1 layer selected in the Layers panel, the Properties panel will display the gradient map.
In the Properties panel, click on the gradient itself to open Photoshop’s Gradient Editor. At the top are presets – defaults and ones you create – and dominating the dialog is the gradient ramp itself. We’ll use this to turn our image into sepia tones.
05. Replace dark tones with brown
Pick a muted brown shade to represent faded blacks [click the icon to enlarge the image]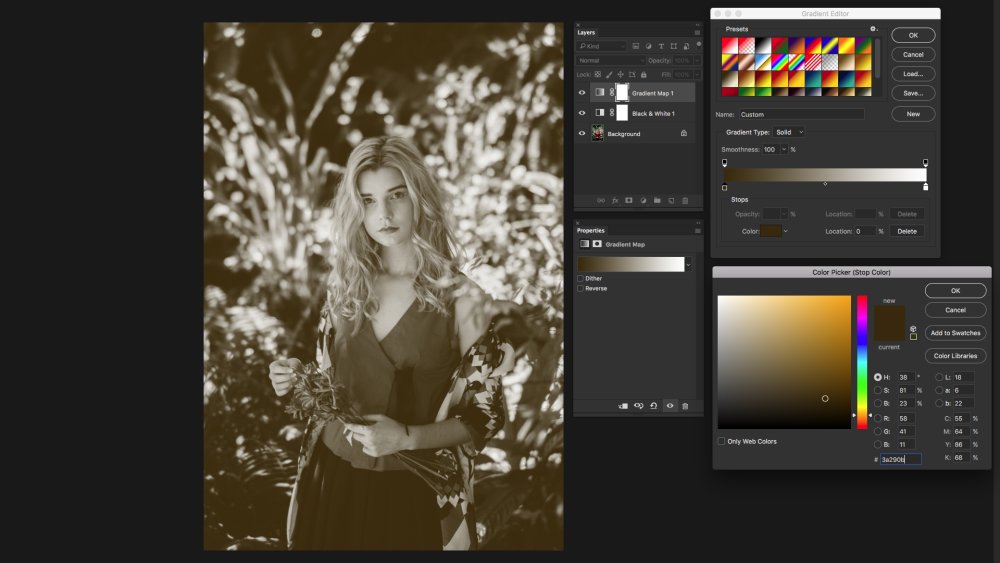
Double-click on the left colour stop beneath the gradient colour ramp (the red one in the image above) and a colour picker will appear. Here we need to choose a colour to replace the black and dark tones. You want to mix a muted brown – we’ve chosen RGB 58, 41, 11.
Click OK to return to the Gradient Editor.
06. Replace light tones with yellow
Replace light tones with a pale yellow [click the icon to enlarge the image]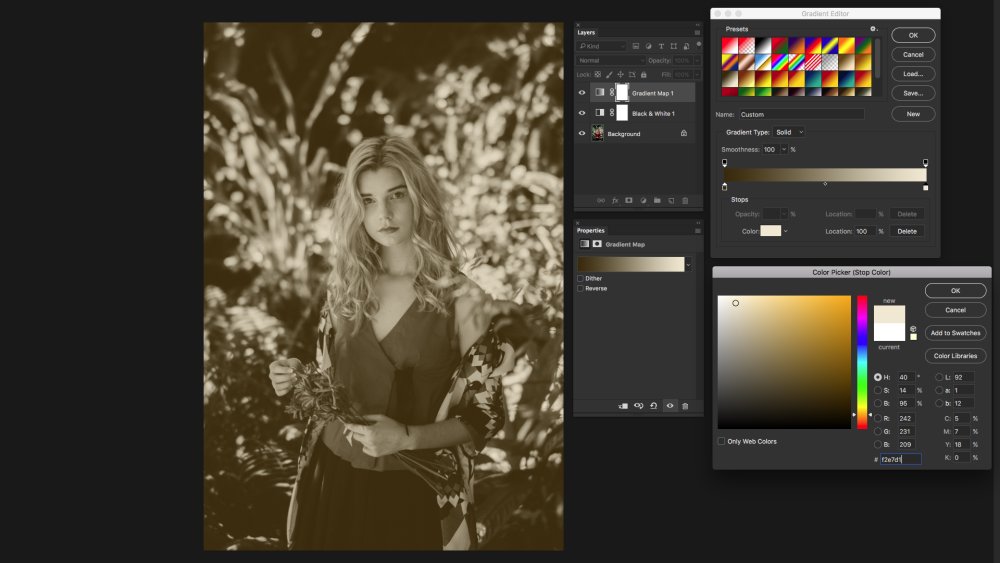
We need to change the colour stop on the other end of the gradient, too. Double-click it, and in the colour Picker dialog, select a shade to replace the whites of the image and tint all the lighter tones in the photograph. We used RGB 242 ,431, 209, but feel free to use a different colour.
With that done, you should see something similar to the image above.
07. Make it grainy
The Add Noise filter can simulate film grain [click the icon to enlarge the image]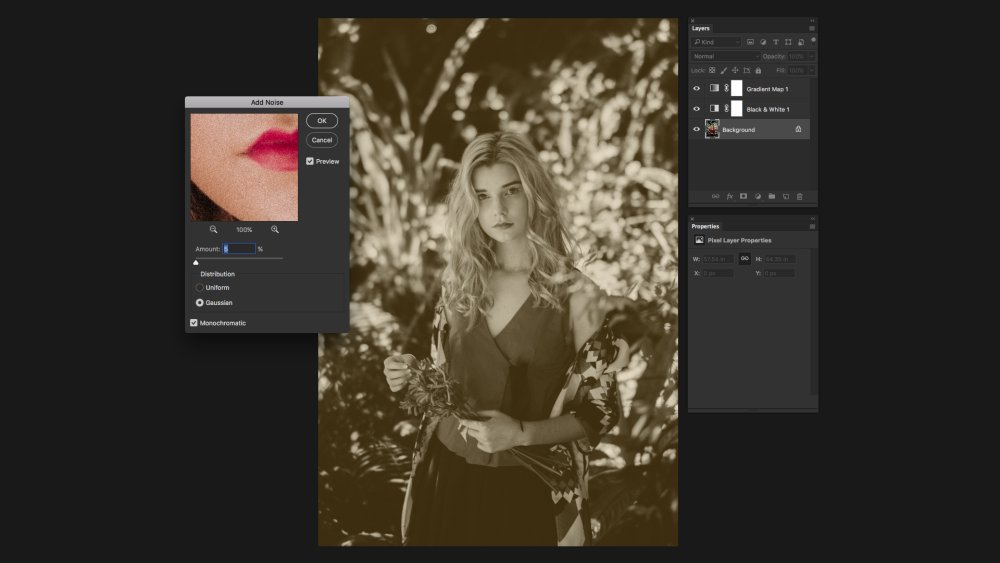
One of the most important – and beloved – aspects of shooting black and white film photography is the film grain visible in the photographs. So if you want a realistically aged-looking photo, you’ll need to add film grain.
In the Layers panel, click on the Background layer to select it. This step will permanently alter the original photograph, so you may want to create a copy of the Background layer first. From the Filter menu choose ‘Noise > Add Noise’ and the Add Noise dialog will appear.
Note that with the full-colour Background layer (or a copy of it) selected, the preview window in the Add Noise dialog box will show in full-colour, excluding the two adjustment layers – don’t worry about this.
08. Add Gaussian blur
Adjust the noise levels until they look right for your photo [click the icon to enlarge the image]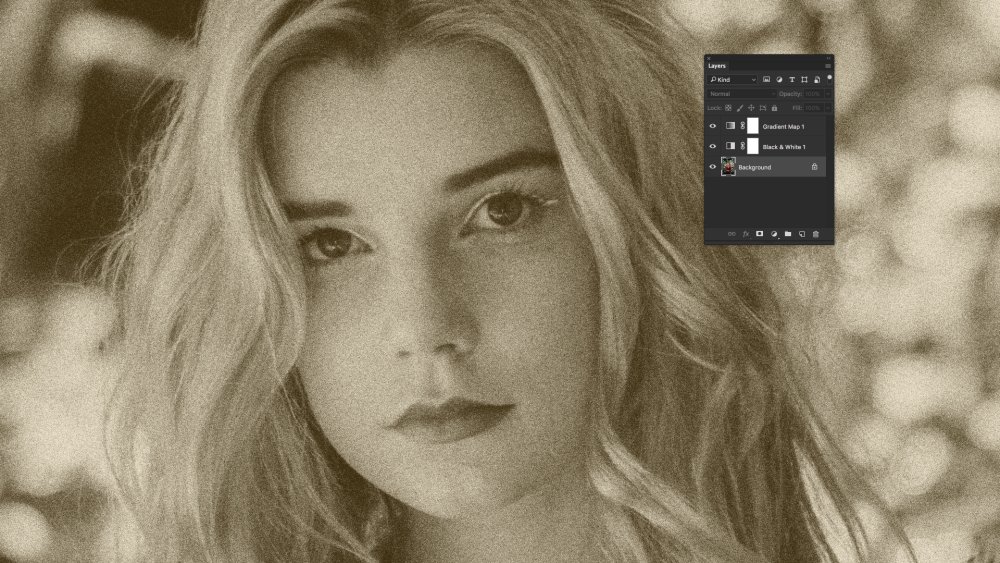
Still in the Add Noise dialog, make sure Gaussian is selected under Distribution and that the box beside Monochromatic is checked. Now adjust the Amount field or the slider beneath it to set the right amount of noise. We went with 10 per cent for this photograph.
When you’re satisfied, click OK to apply the film grain noise to the photograph. If your results aren’t ideal, you can always undo the application of Noise and then use the Add Noise filter again.
09. Push things further
Try adding a frame or distressing your photo further with a Photoshop brush
You now have a sepia-toned image that looks like it really is old. From here, you can use the image as is, or work with it a little further. You might want to consider adding some scratches, nicks, and dust to further age the photograph.
You can do that yourself with a simple round paintbrush, or using one of the numerous sets of special Photoshop brushes – for inspiration, take a look at the ‘grunge’ section of our round-up of free Photoshop brushes.
You might even want to add a frame and background to the image, which we’ve done in the final image above using a different set of free brushes by MiloArtDesign (download them here) and another stock photo.
If you’d like to learn more techniques and tricks for working with gradient maps in Photoshop or with monotone, duotone, and tritone in Photoshop or InDesign, take a look at the two-in-one Pluralsight video course, Designing in Duotone in Photoshop and InDesign.
Before and after compared [click the icon to enlarge the image]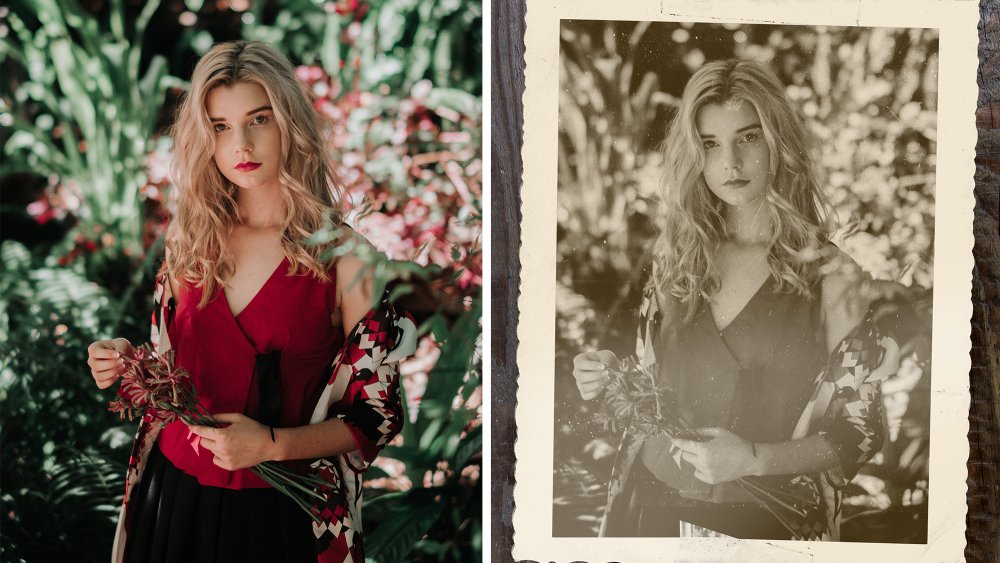
About Pluralsight
Pluralsight is an enterprise technology learning platform that delivers a unified, end to end learning experience for businesses across the globe. Through a subscription service, companies are empowered to move at the speed of technology, increasing proficiency, innovation, and efficiency. For a free trial and more information, visit www.pluralsight.com.
Related articles:

6 best digital art tools of 2017 so far
in Ειδήσεις από τον χώρο του Design και Hosting
Posted · Report reply
It’s always exciting to see new digital art tools hit the market. But in 2017, it feels like there’s something extra-special in the air.
Right now, merging technologies are ramping up digital art software like never before. We’re seeing better representation of traditional art techniques, better interpretation of digital artists’ strokes, and new virtual environments for art creation.
In this post, we round up six of the best recent releases taking advantage of these trends. But things move fast, so keep checking Creative Bloq to make sure you don’t miss the next wave of tools to hit the market.
01. Corel Painter 2018

Corel Painter’s Thick Paint feature lets you apply digital paint in layersCorel Painter is an established name in digital art software, with its makers keen to funnel user feedback into each new iteration. And the 2018 version, released last month, fits right into that mould. Its most talked-about new feature is Thick Paint, aimed squarely at artists from a traditional painting background.
When used in combination with a new selection of brushes and palette knives, Thick Paint enables you to apply digital paint in layers, which means you can pull, push, scrape and build it up with your stylus in a way that’s significantly closer to the physical experience of slapping actual paint on a canvas.
Other additions to the 2018 version include a new range of 2.5D Thick Texture brushes and a new Natural-Media brush library. Plus there’s the Texture Synthesis tool, which lets you select a particular area of an painting and tell Painter to automatically generate a larger image based on its texture.
You can learn more about the new features in Corel Painter 2018 here.
02. Rebelle 2

Budget tool Rebelle has improved the realism of its brushes with its latest releaseWe’ve long been fans of Rebelle, a popular budget painting tool from Escape Motion. It’s essentially a decent, cut-price version of Corel Painter with some cool little features all of its own, such as the Blow tool, which simulates your breath on the digital canvas in a similar way to how it would affect wet paint. Released in April, the latest version of Rebelle follows its pricier rival in bringing traditional and digital painting practices ever closer together.
In particular, Rebelle has made big strides in improving the realism of its watercolour brushes, which can now more accurately mimic the colour mixing, blending, wet-diffusion and drying that take place in physical painting. For example, you can now smear your watercolour paint, blow wet washes across your canvas, and even tilt it to create drops and runs.
Learn more about the new features in Rebelle 2 here.
03. CorelDRAW’s LiveSketch tool

LiveSketch interprets what you’re trying to achieve with your strokes to create smoother lines and curvesCorel doesn’t just have one digital art tool up its sleeve. To complement its raster-based Painter, it also produces a vector drawing program, CorelDRAW. And this year’s iteration comes with a very useful tool for digital artists: Corel LiveSketch.
LiveSketch uses sophisticated artificial intelligence (AI) technology to interpret what you’re trying to achieve with your strokes and reproduce it on screen. In other words, if you’re unable to draw a long, smooth, continuous line with your stylus naturally, you can tell the program to create one based on a series of short strokes. It sounds like dark magic, but our reviewer found it worked a treat.
Learn more about CorelDRAW here.
04. Google Autodraw

Google Autodraw is a digital art tool, though it’s not exactly aimed at digital artistsCorel isn’t the only big player experimenting with AI drawing technology right now. In April, Google brought out its own intuitive art tool in the form of Autodraw. Autodraw specialises in taking amateur doodles, matches them with images in its database, and then transforming them into something slicker.
While it is a digital art tool, it’s not one aimed at digital artists. In fact, it’s primarily for people who are no good at drawing at all. Still it’s free to download to your phone or desktop, and a lot of fun to play around with.
05. Google Blocks

Google Blocks lets you create low-poly art within a VR environmentIf Autodraw is aimed at amateurs, Google Blocks, released this month, is a lot more interesting for pro artists. Available for free on the Oculus Rift and HTC Vive, Google Blocks aims to help you make colourful, low-poly, 3D art in virtual reality.
Blocks is as intuitive in use as Google’s other popular VR drawing program, Tilt Brush, which it complements rather than replaces. And it can be used to make some pretty impressive artwork, as its website’s gallery demonstrates.
Once you’ve completed your artwork, you can export it to VR and AR software as an .obj file, or show it to everybody on the web in the form of an animated GIF.
06. Edvard Munch brushes

These Photoshop brushes simulate those used by expressionist painter Edvard MunchPhotoshop is still a favourite tool of many a digital artist. But while 2017 hasn’t yet seen a new version of Adobe’s warhorse, digital artists have had one treat in the form of some cool new Photoshop brushes.
You may or may not know the name of Norwegian expressionist painter Edvard Munch (1863-1944), but you’ll certainly recognise his most famous painting, The Scream. And last month, as part of a painting contest, Adobe released a free set of Photoshop brushes that replicate the ones used by the man himself.
These were created in collaboration with Oslo’s Munch Museum and Photoshop brush maker Kyle T Webster, based on scans of the original brushes in 3D. Learn more about the new Photoshop brushes here.
View the full article